Tag Archives: Amazon S3

Enhance container software supply chain visibility through SBOM export with Amazon Inspector and QuickSight

Post Syndicated from Jason Ng original https://aws.amazon.com/blogs/security/enhance-container-software-supply-chain-visibility-through-sbom-export-with-amazon-inspector-and-quicksight/

In this post, I’ll show how you can export software bills of materials (SBOMs) for your containers by using an AWS native service, Amazon Inspector, and visualize the SBOMs through Amazon QuickSight, providing a single-pane-of-glass view of your organization’s software supply chain.

The concept of a bill of materials (BOM) originated in the manufacturing industry in the early 1960s. It was used to keep track of the quantities of each material used to manufacture a completed product. If parts were found to be defective, engineers could then use the BOM to identify products that contained those parts. An SBOM extends this concept to software development, allowing engineers to keep track of vulnerable software packages and quickly remediate the vulnerabilities.

Today, most software includes open source components. A Synopsys study, Walking the Line: GitOps and Shift Left Security, shows that 8 in 10 organizations reported using open source software in their applications. Consider a scenario in which you specify an open source base image in your Dockerfile but don’t know what packages it contains. Although this practice can significantly improve developer productivity and efficiency, the decreased visibility makes it more difficult for your organization to manage risk effectively.

It’s important to track the software components and their versions that you use in your applications, because a single affected component used across multiple organizations could result in a major security impact. According to a Gartner report titled Gartner Report for SBOMs: Key Takeaways You Should know, by 2025, 60 percent of organizations building or procuring critical infrastructure software will mandate and standardize SBOMs in their software engineering practice, up from less than 20 percent in 2022. This will help provide much-needed visibility into software supply chain security.

Integrating SBOM workflows into the software development life cycle is just the first step—visualizing SBOMs and being able to search through them quickly is the next step. This post describes how to process the generated SBOMs and visualize them with Amazon QuickSight. AWS also recently added SBOM export capability in Amazon Inspector, which offers the ability to export SBOMs for Amazon Inspector monitored resources, including container images.

Why is vulnerability scanning not enough?

Scanning and monitoring vulnerable components that pose cybersecurity risks is known as vulnerability scanning, and is fundamental to organizations for ensuring a strong and solid security posture. Scanners usually rely on a database of known vulnerabilities, the most common being the Common Vulnerabilities and Exposures (CVE) database.

Identifying vulnerable components with a scanner can prevent an engineer from deploying affected applications into production. You can embed scanning into your continuous integration and continuous delivery (CI/CD) pipelines so that images with known vulnerabilities don’t get pushed into your image repository. However, what if a new vulnerability is discovered but has not been added to the CVE records yet? A good example of this is the Apache Log4j vulnerability, which was first disclosed on Nov 24, 2021 and only added as a CVE on Dec 1, 2021. This means that for 7 days, scanners that relied on the CVE system weren’t able to identify affected components within their organizations. This issue is known as a zero-day vulnerability. Being able to quickly identify vulnerable software components in your applications in such situations would allow you to assess the risk and come up with a mitigation plan without waiting for a vendor or supplier to provide a patch.

In addition, it’s also good hygiene for your organization to track usage of software packages, which provides visibility into your software supply chain. This can improve collaboration between developers, operations, and security teams, because they’ll have a common view of every software component and can collaborate effectively to address security threats.

In this post, I present a solution that uses the new Amazon Inspector feature to export SBOMs from container images, process them, and visualize the data in QuickSight. This gives you the ability to search through your software inventory on a dashboard and to use natural language queries through QuickSight Q, in order to look for vulnerabilities.

Solution overview

Figure 1 shows the architecture of the solution. It is fully serverless, meaning there is no underlying infrastructure you need to manage. This post uses a newly released feature within Amazon Inspector that provides the ability to export a consolidated SBOM for Amazon Inspector monitored resources across your organization in commonly used formats, including CycloneDx and SPDX.
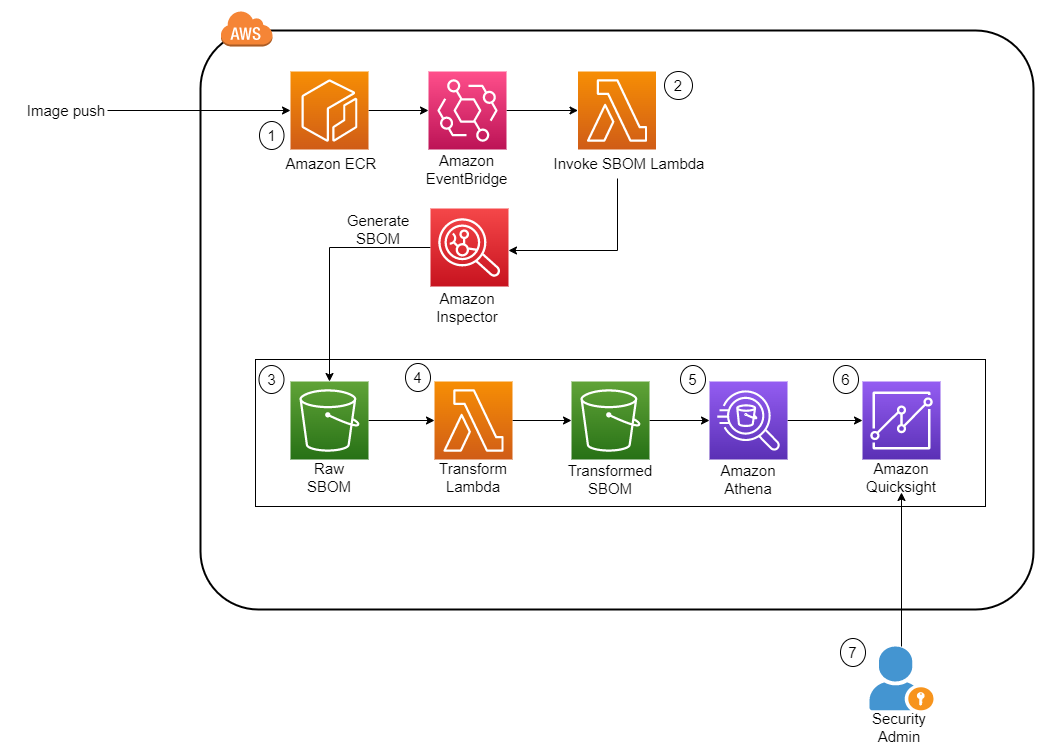
Figure 1: Solution architecture diagram

Figure 1: Solution architecture diagram

The workflow in Figure 1 is as follows:

  1. The image is pushed into Amazon Elastic Container Registry (Amazon ECR), which sends an Amazon EventBridge event.
  2. This invokes an AWS Lambda function, which starts the SBOM generation job for the specific image.
  3. When the job completes, Amazon Inspector deposits the SBOM file in an Amazon Simple Storage Service (Amazon S3) bucket.
  4. Another Lambda function is invoked whenever a new JSON file is deposited. The function performs the data transformation steps and uploads the new file into a new S3 bucket.
  5. Amazon Athena is then used to perform preliminary data exploration.
  6. A dashboard on Amazon QuickSight displays SBOM data.

Implement the solution

This section describes how to deploy the solution architecture.

In this post, you’ll perform the following tasks:

  • Create S3 buckets and AWS KMS keys to store the SBOMs
  • Create an Amazon Elastic Container Registry (Amazon ECR) repository
  • Deploy two AWS Lambda functions to initiate the SBOM generation and transformation
  • Set up Amazon EventBridge rules to invoke Lambda functions upon image push into Amazon ECR
  • Run AWS Glue crawlers to crawl the transformed SBOM S3 bucket
  • Run Amazon Athena queries to review SBOM data
  • Create QuickSight dashboards to identify libraries and packages
  • Use QuickSight Q to identify libraries and packages by using natural language queries

Deploy the CloudFormation stack

The AWS CloudFormation template we’ve provided provisions the S3 buckets that are required for the storage of raw SBOMs and transformed SBOMs, the Lambda functions necessary to initiate and process the SBOMs, and EventBridge rules to run the Lambda functions based on certain events. An empty repository is provisioned as part of the stack, but you can also use your own repository.

To deploy the CloudFormation stack

  1. Download the CloudFormation template.
  2. Browse to the CloudFormation service in your AWS account and choose Create Stack.
  3. Upload the CloudFormation template you downloaded earlier.
  4. For the next step, Specify stack details, enter a stack name.
  5. You can keep the default value of sbom-inspector for EnvironmentName.
  6. Specify the Amazon Resource Name (ARN) of the user or role to be the admin for the KMS key.
  7. Deploy the stack.

Set up Amazon Inspector

If this is the first time you’re using Amazon Inspector, you need to activate the service. In the Getting started with Amazon Inspector topic in the Amazon Inspector User Guide, follow Step 1 to activate the service. This will take some time to complete.

Figure 2: Activate Amazon Inspector

Figure 2: Activate Amazon Inspector

SBOM invocation and processing Lambda functions

This solution uses two Lambda functions written in Python to perform the invocation task and the transformation task.

  • Invocation task — This function is run whenever a new image is pushed into Amazon ECR. It takes in the repository name and image tag variables and passes those into the create_sbom_export function in the SPDX format. This prevents duplicated SBOMs, which helps to keep the S3 data size small.
  • Transformation task — This function is run whenever a new file with the suffix .json is added to the raw S3 bucket. It creates two files, as follows:
    1. It extracts information such as image ARN, account number, package, package version, operating system, and SHA from the SBOM and exports this data to the transformed S3 bucket under a folder named sbom/.
    2. Because each package can have more than one CVE, this function also extracts the CVE from each package and stores it in the same bucket in a directory named cve/. Both files are exported in Apache Parquet so that the file is in a format that is optimized for queries by Amazon Athena.

Populate the AWS Glue Data Catalog

To populate the AWS Glue Data Catalog, you need to generate the SBOM files by using the Lambda functions that were created earlier.

To populate the AWS Glue Data Catalog

  1. You can use an existing image, or you can continue on to create a sample image.
  2. Open an AWS Cloudshell terminal.
  3. Run the follow commands
    # Pull the nginx image from a public repo
    docker pull public.ecr.aws/nginx/nginx:1.19.10-alpine-perl
    
    docker tag public.ecr.aws/nginx/nginx:1.19.10-alpine-perl <ACCOUNT-ID>.dkr.ecr.us-east-1.amazonaws.com/sbom-inspector:nginxperl
    
    # Authenticate to ECR, fill in your account id
    aws ecr get-login-password --region us-east-1 | docker login --username AWS --password-stdin <ACCOUNT-ID>.dkr.ecr.us-east-1.amazonaws.com
    
    # Push the image into ECR
    docker push <ACCOUNT-ID>.dkr.ecr.us-east-1.amazonaws.com/sbom-inspector:nginxperl

  4. An image is pushed into the Amazon ECR repository in your account. This invokes the Lambda functions that perform the SBOM export by using Amazon Inspector and converts the SBOM file to Parquet.
  5. Verify that the Parquet files are in the transformed S3 bucket:
    1. Browse to the S3 console and choose the bucket named sbom-inspector-<ACCOUNT-ID>-transformed. You can also track the invocation of each Lambda function in the Amazon CloudWatch log console.
    2. After the transformation step is complete, you will see two folders (cve/ and sbom/)in the transformed S3 bucket. Choose the sbom folder. You will see the transformed Parquet file in it. If there are CVEs present, a similar file will appear in the cve folder.

    The next step is to run an AWS Glue crawler to determine the format, schema, and associated properties of the raw data. You will need to crawl both folders in the transformed S3 bucket and store the schema in separate tables in the AWS Glue Data Catalog.

  6. On the AWS Glue Service console, on the left navigation menu, choose Crawlers.
  7. On the Crawlers page, choose Create crawler. This starts a series of pages that prompt you for the crawler details.
  8. In the Crawler name field, enter sbom-crawler, and then choose Next.
  9. Under Data sources, select Add a data source.
  10. Now you need to point the crawler to your data. On the Add data source page, choose the Amazon S3 data store. This solution in this post doesn’t use a connection, so leave the Connection field blank if it’s visible.
  11. For the option Location of S3 data, choose In this account. Then, for S3 path, enter the path where the crawler can find the sbom and cve data, which is s3://sbom-inspector-<ACCOUNT-ID>-transformed/sbom/ and s3://sbom-inspector-<ACCOUNT-ID>-transformed/cve/. Leave the rest as default and select Add an S3 data source.
     
    Figure 3: Data source for AWS Glue crawler

    Figure 3: Data source for AWS Glue crawler

  12. The crawler needs permissions to access the data store and create objects in the Data Catalog. To configure these permissions, choose Create an IAM role. The AWS Identity and Access Management (IAM) role name starts with AWSGlueServiceRole-, and in the field, you enter the last part of the role name. Enter sbomcrawler, and then choose Next.
  13. Crawlers create tables in your Data Catalog. Tables are contained in a database in the Data Catalog. To create a database, choose Add database. In the pop-up window, enter sbom-db for the database name, and then choose Create.
  14. Verify the choices you made in the Add crawler wizard. If you see any mistakes, you can choose Back to return to previous pages and make changes. After you’ve reviewed the information, choose Finish to create the crawler.
    Figure 4: Creation of the AWS Glue crawler

    Figure 4: Creation of the AWS Glue crawler

  15. Select the newly created crawler and choose Run.
  16. After the crawler runs successfully, verify that the table is created and the data schema is populated.
     
    Figure 5: Table populated from the AWS Glue crawler

    Figure 5: Table populated from the AWS Glue crawler

Set up Amazon Athena

Amazon Athena performs the initial data exploration and validation. Athena is a serverless interactive analytics service built on open source frameworks that supports open-table and file formats. Athena provides a simplified, flexible way to analyze data in sources like Amazon S3 by using standard SQL queries. If you are SQL proficient, you can query the data source directly; however, not everyone is familiar with SQL. In this section, you run a sample query and initialize the service so that it can used in QuickSight later on.

To start using Amazon Athena

  1. In the AWS Management Console, navigate to the Athena console.
  2. For Database, select sbom-db (or select the database you created earlier in the crawler).
  3. Navigate to the Settings tab located at the top right corner of the console. For Query result location, select the Athena S3 bucket created from the CloudFormation template, sbom-inspector-<ACCOUNT-ID>-athena.
  4. Keep the defaults for the rest of the settings. You can now return to the Query Editor and start writing and running your queries on the sbom-db database.

You can use the following sample query.

select package, packageversion, cve, sha, imagearn from sbom
left join cve
using (sha, package, packageversion)
where cve is not null;

Your Athena console should look similar to the screenshot in Figure 6.
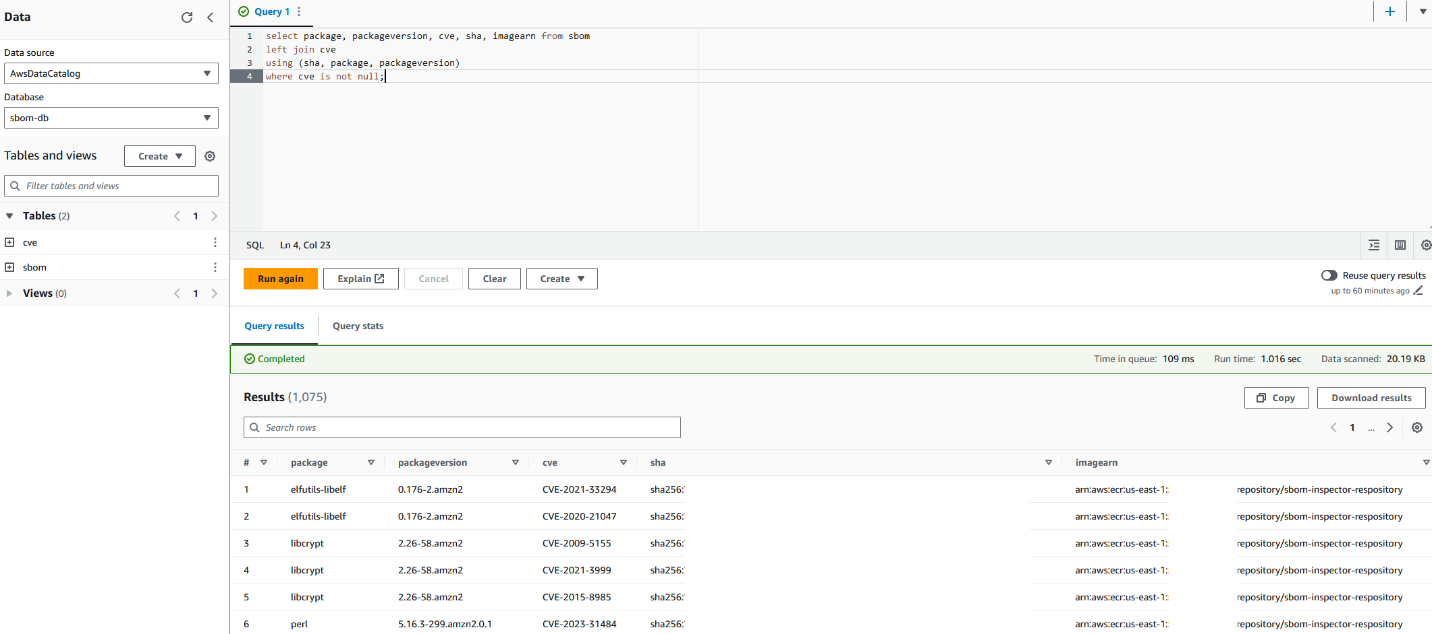
Figure 6: Sample query with Amazon Athena

Figure 6: Sample query with Amazon Athena

This query joins the two tables and selects only the packages with CVEs identified. Alternatively, you can choose to query for specific packages or identify the most common package used in your organization.

Sample output:

# package packageversion cve sha imagearn
<PACKAGE_NAME> <PACKAGE_VERSION> <CVE> <IMAGE_SHA> <ECR_IMAGE_ARN>

Visualize data with Amazon QuickSight

Amazon QuickSight is a serverless business intelligence service that is designed for the cloud. In this post, it serves as a dashboard that allows business users who are unfamiliar with SQL to identify zero-day vulnerabilities. This can also reduce the operational effort and time of having to look through several JSON documents to identify a single package across your image repositories. You can then share the dashboard across teams without having to share the underlying data.

QuickSight SPICE (Super-fast, Parallel, In-memory Calculation Engine) is an in-memory engine that QuickSight uses to perform advanced calculations. In a large organization where you could have millions of SBOM records stored in S3, importing your data into SPICE helps to reduce the time to process and serve the data. You can also use the feature to perform a scheduled refresh to obtain the latest data from S3.

QuickSight also has a feature called QuickSight Q. With QuickSightQ, you can use natural language to interact with your data. If this is the first time you are initializing QuickSight, subscribe to QuickSight and select Enterprise + Q. It will take roughly 20–30 minutes to initialize for the first time. Otherwise, if you are already using QuickSight, you will need to enable QuickSight Q by subscribing to it in the QuickSight console.

Finally, in QuickSight you can select different data sources, such as Amazon S3 and Athena, to create custom visualizations. In this post, we will use the two Athena tables as the data source to create a dashboard to keep track of the packages used in your organization and the resulting CVEs that come with them.

Prerequisites for setting up the QuickSight dashboard

This process will be used to create the QuickSight dashboard from a template already pre-provisioned through the command line interface (CLI). It also grants the necessary permissions for QuickSight to access the data source. You will need the following:

  • AWS Command Line Interface (AWS CLI) programmatic access with read and write permissions to QuickSight.
  • A QuickSight + Q subscription (only if you want to use the Q feature).
  • QuickSight permissions to Amazon S3 and Athena (enable these through the QuickSight security and permissions interface).
  • Set the default AWS Region where you want to deploy the QuickSight dashboard. This post assumes that you’re using the us-east-1 Region.

Create datasets

In QuickSight, create two datasets, one for the sbom table and another for the cve table.

  1. In the QuickSight console, select the Dataset tab.
  2. Choose Create dataset, and then select the Athena data source.
  3. Name the data source sbom and choose Create data source.
  4. Select the sbom table.
  5. Choose Visualize to complete the dataset creation. (Delete the analyses automatically created for you because you will create your own analyses afterwards.)
  6. Navigate back to the main QuickSight page and repeat steps 1–4 for the cve dataset.

Merge datasets

Next, merge the two datasets to create the combined dataset that you will use for the dashboard.

  1. On the Datasets tab, edit the sbom dataset and add the cve dataset.
  2. Set three join clauses, as follows:
    1. Sha : Sha
    2. Package : Package
    3. Packageversion : Packageversion
  3. Perform a left merge, which will append the cve ID to the package and package version in the sbom dataset.
     
    Figure 7: Combining the sbom and cve datasets

    Figure 7: Combining the sbom and cve datasets

Next, you will create a dashboard based on the combined sbom dataset.

Prepare configuration files

In your terminal, export the following variables. Substitute <QuickSight username> in the QS_USER_ARN variable with your own username, which can be found in the Amazon QuickSight console.

export ACCOUNT_ID=$(aws sts get-caller-identity --output text --query Account)
export TEMPLATE_ID=”sbom_dashboard”
export QS_USER_ARN=$(aws quicksight describe-user --aws-account-id $ACCOUNT_ID --namespace default --user-name <QuickSight username> | jq .User.Arn)
export QS_DATA_ARN=$(aws quicksight search-data-sets --aws-account-id $ACCOUNT_ID --filters Name="DATASET_NAME",Operator="StringLike",Value="sbom" | jq .DataSetSummaries[0].Arn)

Validate that the variables are set properly. This is required for you to move on to the next step; otherwise you will run into errors.

echo ACCOUNT_ID is $ACCOUNT_ID || echo ACCOUNT_ID is not set
echo TEMPLATE_ID is $TEMPLATE_ID || echo TEMPLATE_ID is not set
echo QUICKSIGHT USER ARN is $QS_USER_ARN || echo QUICKSIGHT USER ARN is not set
echo QUICKSIGHT DATA ARN is $QS_DATA_ARN || echo QUICKSIGHT DATA ARN is not set

Next, use the following commands to create the dashboard from a predefined template and create the IAM permissions needed for the user to view the QuickSight dashboard.

cat < ./dashboard.json
{
    "SourceTemplate": {
      "DataSetReferences": [
        {
          "DataSetPlaceholder": "sbom",
          "DataSetArn": $QS_DATA_ARN
        }
      ],
      "Arn": "arn:aws:quicksight:us-east-1:293424211206:template/sbom_qs_template"
    }
}
EOF

cat < ./dashboardpermissions.json
[
    {
      "Principal": $QS_USER_ARN,
      "Actions": [
        "quicksight:DescribeDashboard",
        "quicksight:ListDashboardVersions",
        "quicksight:UpdateDashboardPermissions",
        "quicksight:QueryDashboard",
        "quicksight:UpdateDashboard",
        "quicksight:DeleteDashboard",
        "quicksight:DescribeDashboardPermissions",
        "quicksight:UpdateDashboardPublishedVersion"
      ]
    }
]
EOF

Run the following commands to create the dashboard in your QuickSight console.

aws quicksight create-dashboard --aws-account-id $ACCOUNT_ID --dashboard-id $ACCOUNT_ID --name sbom-dashboard --source-entity file://dashboard.json

Note: Run the following describe-dashboard command, and confirm that the response contains a status code of 200. The 200-status code means that the dashboard exists.

aws quicksight describe-dashboard --aws-account-id $ACCOUNT_ID --dashboard-id $ACCOUNT_ID

Use the following update-dashboard-permissions AWS CLI command to grant the appropriate permissions to QuickSight users.

aws quicksight update-dashboard-permissions --aws-account-id $ACCOUNT_ID --dashboard-id $ACCOUNT_ID --grant-permissions file://dashboardpermissions.json

You should now be able to see the dashboard in your QuickSight console, similar to the one in Figure 8. It’s an interactive dashboard that shows you the number of vulnerable packages you have in your repositories and the specific CVEs that come with them. You can navigate to the specific image by selecting the CVE (middle right bar chart) or list images with a specific vulnerable package (bottom right bar chart).

Note: You won’t see the exact same graph as in Figure 8. It will change according to the image you pushed in.
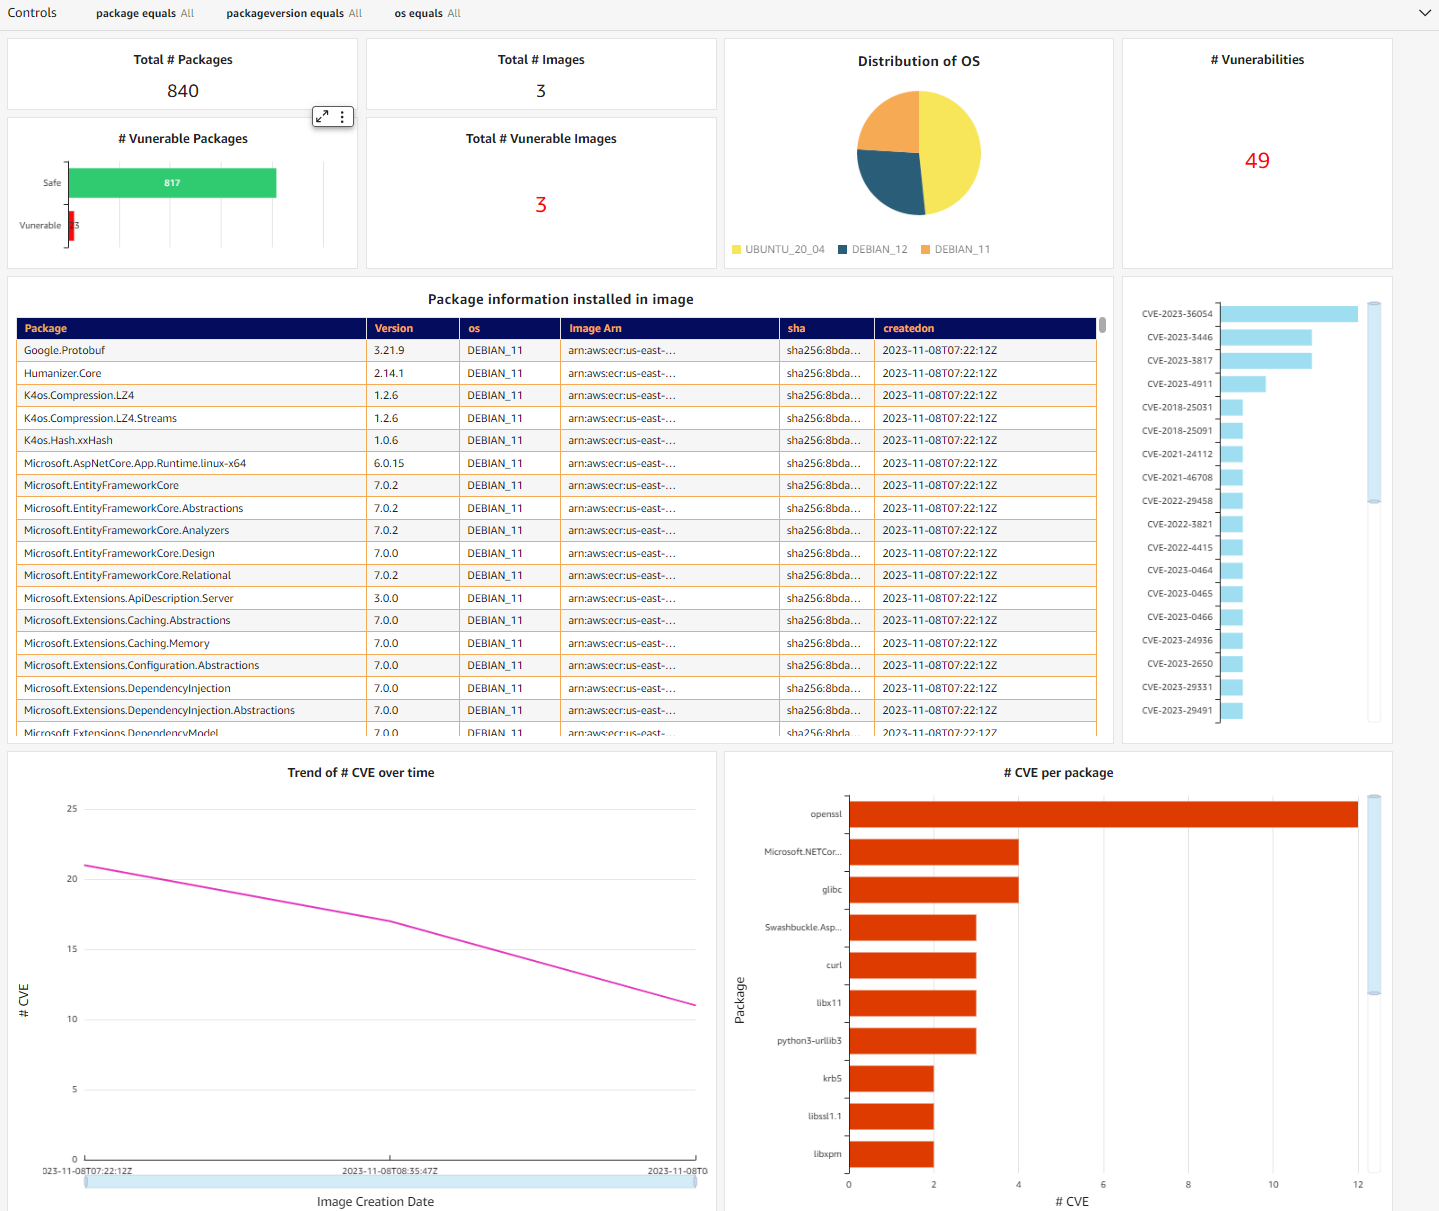
Figure 8: QuickSight dashboard containing SBOM information

Figure 8: QuickSight dashboard containing SBOM information

Alternatively, you can use QuickSight Q to extract the same information from your dataset through natural language. You will need to create a topic and add the dataset you added earlier. For detailed information on how to create a topic, see the Amazon QuickSight User Guide. After QuickSight Q has completed indexing the dataset, you can start to ask questions about your data.

Figure 9: Natural language query with QuickSight Q

Figure 9: Natural language query with QuickSight Q

Conclusion

This post discussed how you can use Amazon Inspector to export SBOMs to improve software supply chain transparency. Container SBOM export should be part of your supply chain mitigation strategy and monitored in an automated manner at scale.

Although it is a good practice to generate SBOMs, it would provide little value if there was no further analysis being done on them. This solution enables you to visualize your SBOM data through a dashboard and natural language, providing better visibility into your security posture. Additionally, this solution is also entirely serverless, meaning there are no agents or sidecars to set up.

To learn more about exporting SBOMs with Amazon Inspector, see the Amazon Inspector User Guide.

 
If you have feedback about this post, submit comments in the Comments section below. If you have questions about this post, contact AWS Support.

Jason Ng

Jason Ng

Jason is a Cloud Sales Center Solutions Architect at AWS. He works with enterprise and independent software vendor (ISV) greenfield customers in ASEAN countries and is part of the Containers Technical Field Community (TFC). He enjoys helping customers modernize their applications, drive growth, and reduce total cost of ownership.

Best practices for managing Terraform State files in AWS CI/CD Pipeline

Post Syndicated from Arun Kumar Selvaraj original https://aws.amazon.com/blogs/devops/best-practices-for-managing-terraform-state-files-in-aws-ci-cd-pipeline/

Introduction

Today customers want to reduce manual operations for deploying and maintaining their infrastructure. The recommended method to deploy and manage infrastructure on AWS is to follow Infrastructure-As-Code (IaC) model using tools like AWS CloudFormation, AWS Cloud Development Kit (AWS CDK) or Terraform.

One of the critical components in terraform is managing the state file which keeps track of your configuration and resources. When you run terraform in an AWS CI/CD pipeline the state file has to be stored in a secured, common path to which the pipeline has access to. You need a mechanism to lock it when multiple developers in the team want to access it at the same time.

In this blog post, we will explain how to manage terraform state files in AWS, best practices on configuring them in AWS and an example of how you can manage it efficiently in your Continuous Integration pipeline in AWS when used with AWS Developer Tools such as AWS CodeCommit and AWS CodeBuild. This blog post assumes you have a basic knowledge of terraform, AWS Developer Tools and AWS CI/CD pipeline. Let’s dive in!

Challenges with handling state files

By default, the state file is stored locally where terraform runs, which is not a problem if you are a single developer working on the deployment. However if not, it is not ideal to store state files locally as you may run into following problems:

  • When working in teams or collaborative environments, multiple people need access to the state file
  • Data in the state file is stored in plain text which may contain secrets or sensitive information
  • Local files can get lost, corrupted, or deleted

Best practices for handling state files

The recommended practice for managing state files is to use terraform’s built-in support for remote backends. These are:

Remote backend on Amazon Simple Storage Service (Amazon S3): You can configure terraform to store state files in an Amazon S3 bucket which provides a durable and scalable storage solution. Storing on Amazon S3 also enables collaboration that allows you to share state file with others.

Remote backend on Amazon S3 with Amazon DynamoDB: In addition to using an Amazon S3 bucket for managing the files, you can use an Amazon DynamoDB table to lock the state file. This will allow only one person to modify a particular state file at any given time. It will help to avoid conflicts and enable safe concurrent access to the state file.

There are other options available as well such as remote backend on terraform cloud and third party backends. Ultimately, the best method for managing terraform state files on AWS will depend on your specific requirements.

When deploying terraform on AWS, the preferred choice of managing state is using Amazon S3 with Amazon DynamoDB.

AWS configurations for managing state files

  1. Create an Amazon S3 bucket using terraform. Implement security measures for Amazon S3 bucket by creating an AWS Identity and Access Management (AWS IAM) policy or Amazon S3 Bucket Policy. Thus you can restrict access, configure object versioning for data protection and recovery, and enable AES256 encryption with SSE-KMS for encryption control.
  1. Next create an Amazon DynamoDB table using terraform with Primary key set to LockID. You can also set any additional configuration options such as read/write capacity units. Once the table is created, you will configure the terraform backend to use it for state locking by specifying the table name in the terraform block of your configuration.
  1. For a single AWS account with multiple environments and projects, you can use a single Amazon S3 bucket. If you have multiple applications in multiple environments across multiple AWS accounts, you can create one Amazon S3 bucket for each account. In that Amazon S3 bucket, you can create appropriate folders for each environment, storing project state files with specific prefixes.

Now that you know how to handle terraform state files on AWS, let’s look at an example of how you can configure them in a Continuous Integration pipeline in AWS.

Architecture

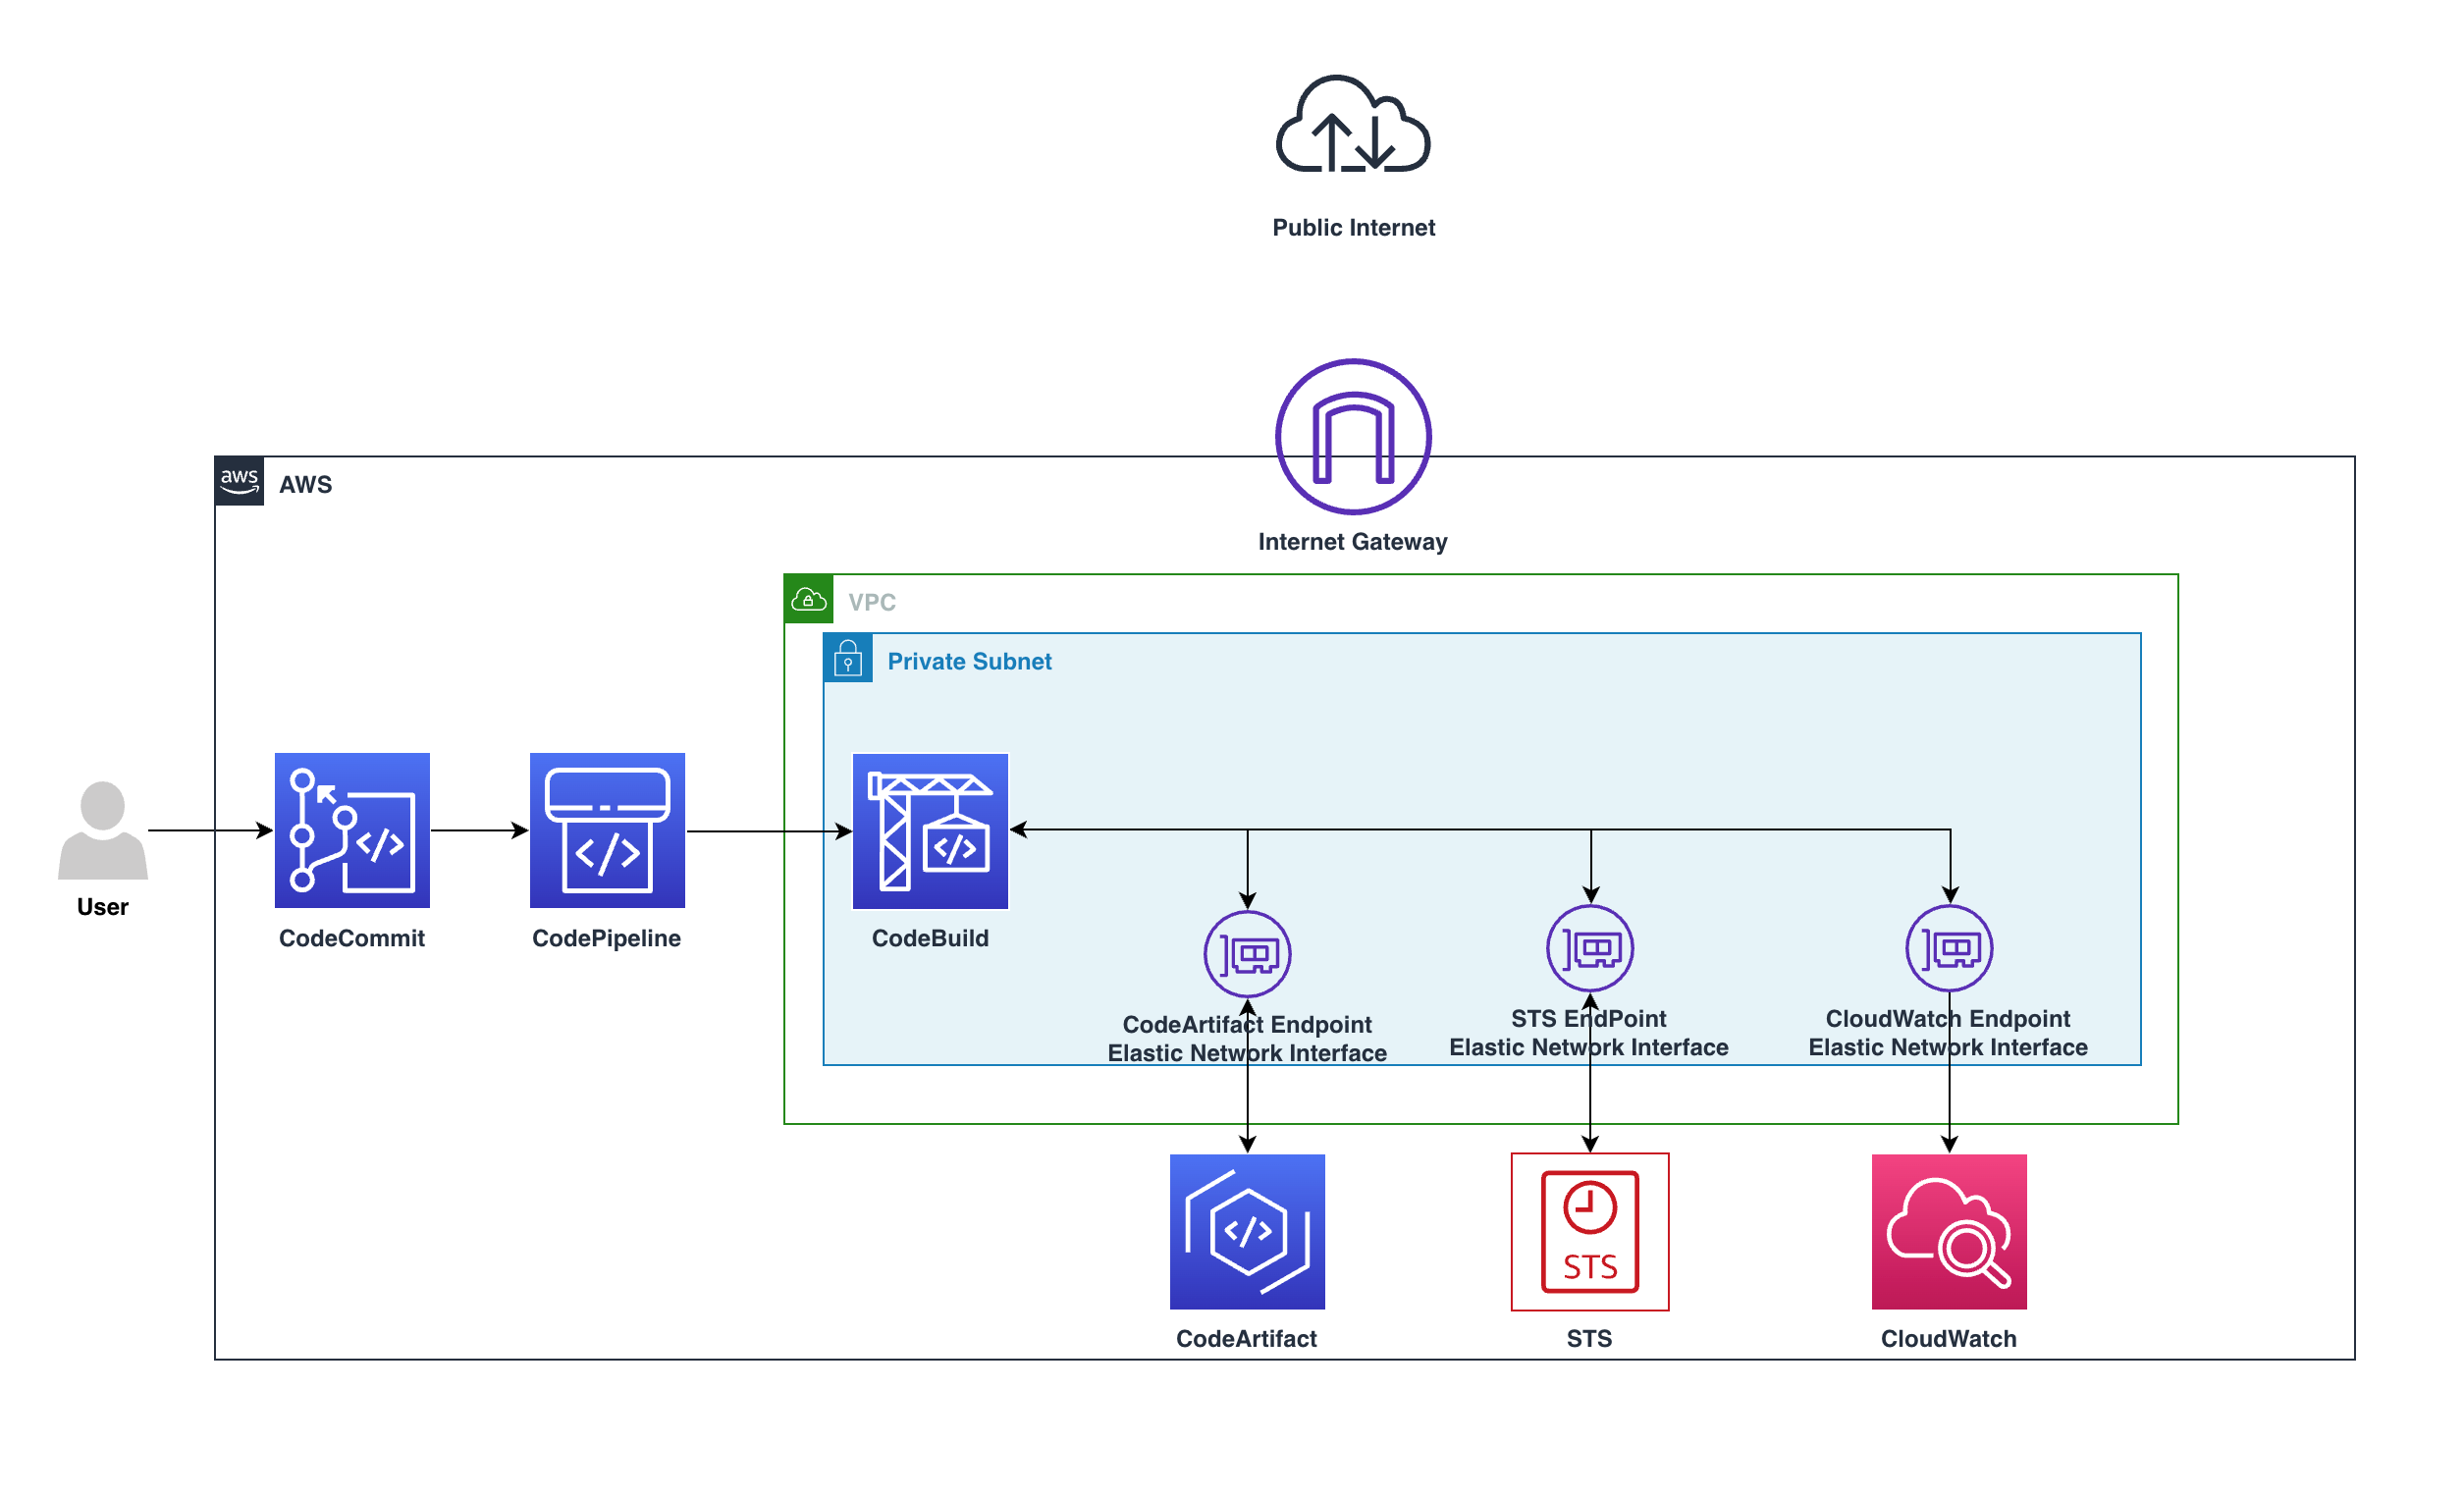
Architecture on how to use terraform in an AWS CI pipeline

Figure 1: Example architecture on how to use terraform in an AWS CI pipeline

This diagram outlines the workflow implemented in this blog:

  1. The AWS CodeCommit repository contains the application code
  2. The AWS CodeBuild job contains the buildspec files and references the source code in AWS CodeCommit
  3. The AWS Lambda function contains the application code created after running terraform apply
  4. Amazon S3 contains the state file created after running terraform apply. Amazon DynamoDB locks the state file present in Amazon S3

Implementation

Pre-requisites

Before you begin, you must complete the following prerequisites:

Setting up the environment

  1. You need an AWS access key ID and secret access key to configure AWS CLI. To learn more about configuring the AWS CLI, follow these instructions.
  2. Clone the repo for complete example: git clone https://github.com/aws-samples/manage-terraform-statefiles-in-aws-pipeline
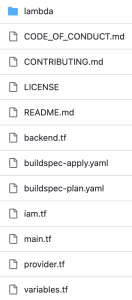
  3. After cloning, you could see the following folder structure:
AWS CodeCommit repository structure

Figure 2: AWS CodeCommit repository structure

Let’s break down the terraform code into 2 parts – one for preparing the infrastructure and another for preparing the application.

Preparing the Infrastructure

  1. The main.tf file is the core component that does below:
      • It creates an Amazon S3 bucket to store the state file. We configure bucket ACL, bucket versioning and encryption so that the state file is secure.
      • It creates an Amazon DynamoDB table which will be used to lock the state file.
      • It creates two AWS CodeBuild projects, one for ‘terraform plan’ and another for ‘terraform apply’.

    Note – It also has the code block (commented out by default) to create AWS Lambda which you will use at a later stage.

  1. AWS CodeBuild projects should be able to access Amazon S3, Amazon DynamoDB, AWS CodeCommit and AWS Lambda. So, the AWS IAM role with appropriate permissions required to access these resources are created via iam.tf file.
  1. Next you will find two buildspec files named buildspec-plan.yaml and buildspec-apply.yaml that will execute terraform commands – terraform plan and terraform apply respectively.
  1. Modify AWS region in the provider.tf file.
  1. Update Amazon S3 bucket name, Amazon DynamoDB table name, AWS CodeBuild compute types, AWS Lambda role and policy names to required values using variable.tf file. You can also use this file to easily customize parameters for different environments.

With this, the infrastructure setup is complete.

You can use your local terminal and execute below commands in the same order to deploy the above-mentioned resources in your AWS account.

terraform init
terraform validate
terraform plan
terraform apply

Once the apply is successful and all the above resources have been successfully deployed in your AWS account, proceed with deploying your application. 

Preparing the Application

  1. In the cloned repository, use the backend.tf file to create your own Amazon S3 backend to store the state file. By default, it will have below values. You can override them with your required values.
bucket = "tfbackend-bucket" 
key    = "terraform.tfstate" 
region = "eu-central-1"
  1. The repository has sample python code stored in main.py that returns a simple message when invoked.
  1. In the main.tf file, you can find the below block of code to create and deploy the Lambda function that uses the main.py code (uncomment these code blocks).
data "archive_file" "lambda_archive_file" {
    ……
}

resource "aws_lambda_function" "lambda" {
    ……
}
  1. Now you can deploy the application using AWS CodeBuild instead of running terraform commands locally which is the whole point and advantage of using AWS CodeBuild.
  1. Run the two AWS CodeBuild projects to execute terraform plan and terraform apply again.
  1. Once successful, you can verify your deployment by testing the code in AWS Lambda. To test a lambda function (console):
    • Open AWS Lambda console and select your function “tf-codebuild”
    • In the navigation pane, in Code section, click Test to create a test event
    • Provide your required name, for example “test-lambda”
    • Accept default values and click Save
    • Click Test again to trigger your test event “test-lambda”

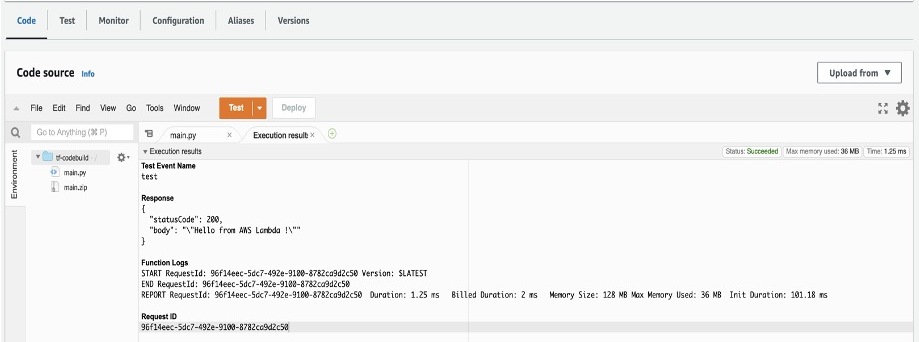
It should return the sample message you provided in your main.py file. In the default case, it will display “Hello from AWS Lambda !” message as shown below.

Sample Amazon Lambda function response

Figure 3: Sample Amazon Lambda function response

  1. To verify your state file, go to Amazon S3 console and select the backend bucket created (tfbackend-bucket). It will contain your state file.
Amazon S3 bucket with terraform state file

Figure 4: Amazon S3 bucket with terraform state file

  1. Open Amazon DynamoDB console and check your table tfstate-lock and it will have an entry with LockID.
Amazon DynamoDB table with LockID

Figure 5: Amazon DynamoDB table with LockID

Thus, you have securely stored and locked your terraform state file using terraform backend in a Continuous Integration pipeline.

Cleanup

To delete all the resources created as part of the repository, run the below command from your terminal.

terraform destroy

Conclusion

In this blog post, we explored the fundamentals of terraform state files, discussed best practices for their secure storage within AWS environments and also mechanisms for locking these files to prevent unauthorized team access. And finally, we showed you an example of how efficiently you can manage them in a Continuous Integration pipeline in AWS.

You can apply the same methodology to manage state files in a Continuous Delivery pipeline in AWS. For more information, see CI/CD pipeline on AWS, Terraform backends types, Purpose of terraform state.

Arun Kumar Selvaraj

Arun Kumar Selvaraj is a Cloud Infrastructure Architect with AWS Professional Services. He loves building world class capability that provides thought leadership, operating standards and platform to deliver accelerated migration and development paths for his customers. His interests include Migration, CCoE, IaC, Python, DevOps, Containers and Networking.

Manasi Bhutada

Manasi Bhutada is an ISV Solutions Architect based in the Netherlands. She helps customers design and implement well architected solutions in AWS that address their business problems. She is passionate about data analytics and networking. Beyond work she enjoys experimenting with food, playing pickleball, and diving into fun board games.

Detect Stripe keys in S3 buckets with Amazon Macie

Post Syndicated from Koulick Ghosh original https://aws.amazon.com/blogs/security/detect-stripe-keys-in-s3-buckets-with-amazon-macie/

Many customers building applications on Amazon Web Services (AWS) use Stripe global payment services to help get their product out faster and grow revenue, especially in the internet economy. It’s critical for customers to securely and properly handle the credentials used to authenticate with Stripe services. Much like your AWS API keys, which enable access to your AWS resources, Stripe API keys grant access to the Stripe account, which allows for the movement of real money. Therefore, you must keep Stripe’s API keys secret and well-controlled. And, much like AWS keys, it’s important to invalidate and re-issue Stripe API keys that have been inadvertently committed to GitHub, emitted in logs, or uploaded to Amazon Simple Storage Service (Amazon S3).

Customers have asked us for ways to reduce the risk of unintentionally exposing Stripe API keys, especially when code files and repositories are stored in Amazon S3. To help meet this need, we collaborated with Stripe to develop a new managed data identifier that you can use to help discover and protect Stripe API keys.

“I’m really glad we could collaborate with AWS to introduce a new managed data identifier in Amazon Macie. Mutual customers of AWS and Stripe can now scan S3 buckets to detect exposed Stripe API keys.”
Martin Pool, Staff Engineer in Cloud Security at Stripe

In this post, we will show you how to use the new managed data identifier in Amazon Macie to discover and protect copies of your Stripe API keys.

About Stripe API keys

Stripe provides payment processing software and services for businesses. Using Stripe’s technology, businesses can accept online payments from customers around the globe.

Stripe authenticates API requests by using API keys, which are included in the request. Stripe takes various measures to help customers keep their secret keys safe and secure. Stripe users can generate test-mode keys, which can only access simulated test data, and which doesn’t move real money. Stripe encourages its customers to use only test API keys for testing and development purposes to reduce the risk of inadvertent disclosure of live keys or of accidentally generating real charges.

Stripe also supports publishable keys, which you can make publicly accessible in your web or mobile app’s client-side code to collect payment information.

In this blog post, we focus on live-mode keys, which are the primary security concern because they can access your real data and cause money movement. These keys should be closely held within the production services that need to use them. Stripe allows keys to be restricted to read or write specific API resources, or used only from certain IP ranges, but even with these restrictions, you should still handle live mode keys with caution.

Stripe keys have distinctive prefixes to help you detect them such as sk_live_ for secret keys, and rk_live_ for restricted keys (which are also secret).

Amazon Macie

Amazon Macie is a fully managed service that uses machine learning (ML) and pattern matching to discover and help protect your sensitive data, such as personally identifiable information. Macie can also provide detailed visibility into your data and help you align with compliance requirements by identifying data that needs to be protected under various regulations, such as the General Data Protection Regulation (GDPR) and the Health Insurance Portability and Accountability Act (HIPAA).

Macie supports a suite of managed data identifiers to make it simpler for you to configure and adopt. Managed data identifiers are prebuilt, customizable patterns that help automatically identify sensitive data, such as credit card numbers, social security numbers, and email addresses.

Now, Macie has a new managed data identifier STRIPE_CREDENTIALS that you can use to identify Stripe API secret keys.

Configure Amazon Macie to detect Stripe credentials

In this section, we show you how to use the managed data identifier STRIPE_CREDENTIALS to detect Stripe API secret keys. We recommend that you carry out these tutorial steps in an AWS account dedicated to experimentation and exploration before you move forward with detection in a production environment.

Prerequisites

To follow along with this walkthrough, complete the following prerequisites.

Create example data

The first step is to create some example objects in an S3 bucket in the AWS account. The objects contain strings that resemble Stripe secret keys. You will use the example data later to demonstrate how Macie can detect Stripe secret keys.

To create the example data

  1. Open the S3 console and create an S3 bucket.
  2. Create four files locally, paste the following mock sensitive data into those files, and upload them to the bucket.
    file1
     stripe publishable key sk_live_cpegcLxKILlrXYNIuqYhGXoy
    
    file2
     sk_live_cpegcLxKILlrXYNIuqYhGXoy
     sk_live_abcdcLxKILlrXYNIuqYhGXoy
     sk_live_efghcLxKILlrXYNIuqYhGXoy
     stripe payment sk_live_ijklcLxKILlrXYNIuqYhGXoy
    
     file3
     sk_live_cpegcLxKILlrXYNIuqYhGXoy
     stripe api key sk_live_abcdcLxKILlrXYNIuqYhGXoy
    
     file4
     stripe secret key sk_live_cpegcLxKILlrXYNIuqYhGXoy

Note: The keys mentioned in the preceding files are mock data and aren’t related to actual live Stripe keys.

Create a Macie job with the STRIPE_CREDENTIALS managed data identifier

Using Macie, you can scan your S3 buckets for sensitive data and security risks. In this step, you run a one-time Macie job to scan an S3 bucket and review the findings.

To create a Macie job with STRIPE_CREDENTIALS

  1. Open the Amazon Macie console, and in the left navigation pane, choose Jobs. On the top right, choose Create job.
    Figure 1: Create Macie Job

    Figure 1: Create Macie Job

  2. Select the bucket that you want Macie to scan or specify bucket criteria, and then choose Next.
    Figure 2: Select S3 bucket

    Figure 2: Select S3 bucket

  3. Review the details of the S3 bucket, such as estimated cost, and then choose Next.
    Figure 3: Review S3 bucket

    Figure 3: Review S3 bucket

  4. On the Refine the scope page, choose One-time job, and then choose Next.

    Note: After you successfully test, you can schedule the job to scan S3 buckets at the frequency that you choose.

    Figure 4: Select one-time job

    Figure 4: Select one-time job

  5. For Managed data identifier options, select Custom and then select Use specific managed data identifiers. For Select managed data identifiers, search for STRIPE_CREDENTIALS and then select it. Choose Next.
    Figure 5: Select managed data identifier

    Figure 5: Select managed data identifier

  6. Enter a name and an optional description for the job, and then choose Next.
    Figure 6: Enter job name

    Figure 6: Enter job name

  7. Review the job details and choose Submit. Macie will create and start the job immediately, and the job will run one time.
  8. When the Status of the job shows Complete, select the job, and from the Show results dropdown, select Show findings.
    Figure 7: Select the job and then select Show findings

    Figure 7: Select the job and then select Show findings

  9. You can now review the findings for sensitive data in your S3 bucket. As shown in Figure 8, Macie detected Stripe keys in each of the four files, and categorized the findings as High severity. You can review and manage the findings in the Macie console, retrieve them through the Macie API for further analysis, send them to Amazon EventBridge for automated processing, or publish them to AWS Security Hub for a comprehensive view of your security state.
    Figure 8: Review the findings

    Figure 8: Review the findings

Respond to unintended disclosure of Stripe API keys

If you discover Stripe live-mode keys (or other sensitive data) in an S3 bucket, then through the Stripe dashboard, you can roll your API keys to revoke access to the compromised key and generate a new one. This helps ensure that the key can’t be used to make malicious API requests. Make sure that you install the replacement key into the production services that need it. In the longer term, you can take steps to understand the path by which the key was disclosed and help prevent a recurrence.

Conclusion

In this post, you learned about the importance of safeguarding Stripe API keys on AWS. By using Amazon Macie with managed data identifiers, setting up regular reviews and restricted access to S3 buckets, training developers in security best practices, and monitoring logs and repositories, you can help mitigate the risk of key exposure and potential security breaches. By adhering to these practices, you can help ensure a robust security posture for your sensitive data on AWS.

If you have feedback about this post, submit comments in the Comments section below. If you have questions about this post, start a new thread on Amazon Macie re:Post.

Koulick Ghosh

Koulick Ghosh

Koulick is a Senior Product Manager in AWS Security based in Seattle, WA. He loves speaking with customers about how AWS Security services can help improve their security. In his free time, he enjoys playing the guitar, reading, and exploring the Pacific Northwest.

Sagar Gandha

Sagar Gandha

Sagar is an experienced Senior Technical Account Manager at AWS adept at assisting large customers in enterprise support. He offers expert guidance on best practices, facilitates access to subject matter experts, and delivers actionable insights on optimizing AWS spend, workloads, and events. Outside of work, Sagar loves spending time with his kids.

Mohan Musti

Mohan Musti

Mohan is a Senior Technical Account Manager at AWS based in Dallas. Mohan helps customers architect and optimize applications on AWS. In his spare time, he enjoys spending time with his family and camping.

Build an ETL process for Amazon Redshift using Amazon S3 Event Notifications and AWS Step Functions

Post Syndicated from Ziad Wali original https://aws.amazon.com/blogs/big-data/build-an-etl-process-for-amazon-redshift-using-amazon-s3-event-notifications-and-aws-step-functions/

Data warehousing provides a business with several benefits such as advanced business intelligence and data consistency. It plays a big role within an organization by helping to make the right strategic decision at the right moment which could have a huge impact in a competitive market. One of the major and essential parts in a data warehouse is the extract, transform, and load (ETL) process which extracts the data from different sources, applies business rules and aggregations and then makes the transformed data available for the business users.

This process is always evolving to reflect new business and technical requirements, especially when working in an ambitious market. Nowadays, more verification steps are applied to source data before processing them which so often add an administration overhead. Hence, automatic notifications are more often required in order to accelerate data ingestion, facilitate monitoring and provide accurate tracking about the process.

Amazon Redshift is a fast, fully managed, cloud data warehouse that allows you to process and run your complex SQL analytics workloads on structured and semi-structured data. It also helps you to securely access your data in operational databases, data lakes or third-party datasets with minimal movement or copying. AWS Step Functions is a fully managed service that gives you the ability to orchestrate and coordinate service components. Amazon S3 Event Notifications is an Amazon S3 feature that you can enable in order to receive notifications when specific events occur in your S3 bucket.

In this post we discuss how we can build and orchestrate in a few steps an ETL process for Amazon Redshift using Amazon S3 Event Notifications for automatic verification of source data upon arrival and notification in specific cases. And we show how to use AWS Step Functions for the orchestration of the data pipeline. It can be considered as a starting point for teams within organizations willing to create and build an event driven data pipeline from data source to data warehouse that will help in tracking each phase and in responding to failures quickly. Alternatively, you can also use Amazon Redshift auto-copy from Amazon S3 to simplify data loading from Amazon S3 into Amazon Redshift.

Solution overview

The workflow is composed of the following steps:

  1. A Lambda function is triggered by an S3 event whenever a source file arrives at the S3 bucket. It does the necessary verifications and then classifies the file before processing by sending it to the appropriate Amazon S3 prefix (accepted or rejected).
  2. There are two possibilities:
    • If the file is moved to the rejected Amazon S3 prefix, an Amazon S3 event sends a message to Amazon SNS for further notification.
    • If the file is moved to the accepted Amazon S3 prefix, an Amazon S3 event is triggered and sends a message with the file path to Amazon SQS.
  3. An Amazon EventBridge scheduled event triggers the AWS Step Functions workflow.
  4. The workflow executes a Lambda function that pulls out the messages from the Amazon SQS queue and generates a manifest file for the COPY command.
  5. Once the manifest file is generated, the workflow starts the ETL process using stored procedure.

The following image shows the workflow.

Prerequisites

Before configuring the previous solution, you can use the following AWS CloudFormation template to set up and create the infrastructure

  • Give the stack a name, select a deployment VPC and define the master user for the Amazon Redshift cluster by filling in the two parameters MasterUserName and MasterUserPassword.

The template will create the following services:

  • An S3 bucket
  • An Amazon Redshift cluster composed of two ra3.xlplus nodes
  • An empty AWS Step Functions workflow
  • An Amazon SQS queue
  • An Amazon SNS topic
  • An Amazon EventBridge scheduled rule with a 5-minute rate
  • Two empty AWS Lambda functions
  • IAM roles and policies for the services to communicate with each other

The names of the created services are usually prefixed by the stack’s name or the word blogdemo. You can find the names of the created services in the stack’s resources tab.

Step 1: Configure Amazon S3 Event Notifications

Create the following four folders in the S3 bucket:

  • received
  • rejected
  • accepted
  • manifest

In this scenario, we will create the following three Amazon S3 event notifications:

  1. Trigger an AWS Lambda function on the received folder.
  2. Send a message to the Amazon SNS topic on the rejected folder.
  3. Send a message to Amazon SQS on the accepted folder.

To create an Amazon S3 event notification:

  1. Go to the bucket’s Properties tab.
  2. In the Event Notifications section, select Create Event Notification.
  3. Fill in the necessary properties:
    • Give the event a name.
    • Specify the appropriate prefix or folder (accepted/, rejected/ or received/).
    • Select All object create events as an event type.
    • Select and choose the destination (AWS lambda, Amazon SNS or Amazon SQS).
      Note: for an AWS Lambda destination, choose the function that starts with ${stackname}-blogdemoVerify_%

At the end, you should have three Amazon S3 events:

  • An event for the received prefix with an AWS Lambda function as a destination type.
  • An event for the accepted prefix with an Amazon SQS queue as a destination type.
  • An event for the rejected prefix with an Amazon SNS topic as a destination type.

The following image shows what you should have after creating the three Amazon S3 events:

Step 2: Create objects in Amazon Redshift

Connect to the Amazon Redshift cluster and create the following objects:

  1. Three schemas:
    create schema blogdemo_staging; -- for staging tables
    create schema blogdemo_core; -- for target tables
    create schema blogdemo_proc; -- for stored procedures

  2. A table in the blogdemo_staging and blogdemo_core schemas:
    create table ${schemaname}.rideshare
    (
      id_ride bigint not null,
      date_ride timestamp not null,
      country varchar (20),
      city varchar (20),
      distance_km smallint,
      price decimal (5,2),
      feedback varchar (10)
    ) distkey(id_ride);

  3. A stored procedure to extract and load data into the target schema:
    create or replace procedure blogdemo_proc.elt_rideshare (bucketname in varchar(200),manifestfile in varchar (500))
    as $$
    begin
    -- purge staging table
    truncate blogdemo_staging.rideshare;
    
    -- copy data from s3 bucket to staging schema
    execute 'copy blogdemo_staging.rideshare from ''s3://' + bucketname + '/' + manifestfile + ''' iam_role default delimiter ''|'' manifest;';
    
    -- apply transformation rules here
    
    -- insert data into target table
    insert into blogdemo_core.rideshare
    select * from blogdemo_staging.rideshare;
    
    end;
    $$ language plpgsql;

  4. Set the role ${stackname}-blogdemoRoleRedshift_% as a default role:
    1. In the Amazon Redshift console, go to clusters and click on the cluster blogdemoRedshift%.
    2. Go to the Properties tab.
    3. In the Cluster permissions section, select the role ${stackname}-blogdemoRoleRedshift%.
    4. Click on Set default then Make default.

Step 3: Configure Amazon SQS queue

The Amazon SQS queue can be used as it is; this means with the default values. The only thing you need to do for this demo is to go to the created queue ${stackname}-blogdemoSQS% and purge the test messages generated (if any) by the Amazon S3 event configuration. Copy its URL in a text file for further use (more precisely, in one of the AWS Lambda functions).

Step 4: Setup Amazon SNS topic

  1. In the Amazon SNS console, go to the topic ${stackname}-blogdemoSNS%
  2. Click on the Create subscription button.
  3. Choose the blogdemo topic ARN, email protocol, type your email and then click on Create subscription.
  4. Confirm your subscription in your email that you received.

Step 5: Customize the AWS Lambda functions

  1. The following code verifies the name of a file. If it respects the naming convention, it will move it to the accepted folder. If it does not respect the naming convention, it will move it to the rejected one. Copy it to the AWS Lambda function ${stackname}-blogdemoLambdaVerify and then deploy it:
    import boto3
    import re
    
    def lambda_handler (event, context):
        objectname = event['Records'][0]['s3']['object']['key']
        bucketname = event['Records'][0]['s3']['bucket']['name']
        
        result = re.match('received/rideshare_data_20[0-5][0-9]((0[1-9])|(1[0-2]))([0-2][1-9]|3[0-1])\.csv',objectname)
        targetfolder = ''
        
        if result: targetfolder = 'accepted'
        else: targetfolder = 'rejected'
        
        s3 = boto3.resource('s3')
        copy_source = {
            'Bucket': bucketname,
            'Key': objectname
        }
        target_objectname=objectname.replace('received',targetfolder)
        s3.meta.client.copy(copy_source, bucketname, target_objectname)
        
        s3.Object(bucketname,objectname).delete()
        
        return {'Result': targetfolder}

  2. The second AWS Lambda function ${stackname}-blogdemonLambdaGenerate% retrieves the messages from the Amazon SQS queue and generates and stores a manifest file in the S3 bucket manifest folder. Copy the following content, replace the variable ${sqs_url} by the value retrieved in Step 3 and then click on Deploy.
    import boto3
    import json
    import datetime
    
    def lambda_handler(event, context):
    
        sqs_client = boto3.client('sqs')
        queue_url='${sqs_url}'
        bucketname=''
        keypath='none'
        
        manifest_content='{\n\t"entries": ['
        
        while True:
            response = sqs_client.receive_message(
                QueueUrl=queue_url,
                AttributeNames=['All'],
                MaxNumberOfMessages=1
            )
            try:
                message = response['Messages'][0]
            except KeyError:
                break
            
            message_body=message['Body']
            message_data = json.loads(message_body)
            
            objectname = message_data['Records'][0]['s3']['object']['key']
            bucketname = message_data['Records'][0]['s3']['bucket']['name']
    
            manifest_content = manifest_content + '\n\t\t{"url":"s3://' +bucketname + '/' + objectname + '","mandatory":true},'
            receipt_handle = message['ReceiptHandle']
    
            sqs_client.delete_message(
                QueueUrl=queue_url,
                ReceiptHandle=receipt_handle
            )
            
        if bucketname != '':
            manifest_content=manifest_content[:-1]+'\n\t]\n}'
            s3 = boto3.resource("s3")
            encoded_manifest_content=manifest_content.encode('utf-8')
            current_datetime=datetime.datetime.now()
            keypath='manifest/files_list_'+current_datetime.strftime("%Y%m%d-%H%M%S")+'.manifest'
            s3.Bucket(bucketname).put_object(Key=keypath, Body=encoded_manifest_content)
    
        sf_tasktoken = event['TaskToken']
        
        step_function_client = boto3.client('stepfunctions')
        step_function_client.send_task_success(taskToken=sf_tasktoken,output='{"manifestfilepath":"' + keypath + '",\"bucketname":"' + bucketname +'"}')

Step 6: Add tasks to the AWS Step Functions workflow

Create the following workflow in the state machine ${stackname}-blogdemoStepFunctions%.

If you would like to accelerate this step, you can drag and drop the content of the following JSON file in the definition part when you click on Edit. Make sure to replace the three variables:

  • ${GenerateManifestFileFunctionName} by the ${stackname}-blogdemoLambdaGenerate% arn.
  • ${RedshiftClusterIdentifier} by the Amazon Redshift cluster identifier.
  • ${MasterUserName} by the username that you defined while deploying the CloudFormation template.

Step 7: Enable Amazon EventBridge rule

Enable the rule and add the AWS Step Functions workflow as a rule target:

  1. Go to the Amazon EventBridge console.
  2. Select the rule created by the Amazon CloudFormation template and click on Edit.
  3. Enable the rule and click Next.
  4. You can change the rate if you want. Then select Next.
  5. Add the AWS Step Functions state machine created by the CloudFormation template blogdemoStepFunctions% as a target and use an existing role created by the CloudFormation template ${stackname}-blogdemoRoleEventBridge%
  6. Click on Next and then Update rule.

Test the solution

In order to test the solution, the only thing you should do is upload some csv files in the received prefix of the S3 bucket. Here are some sample data; each file contains 1000 rows of rideshare data.

If you upload them in one click, you should receive an email because the ridesharedata2022.csv does not respect the naming convention. The other three files will be loaded in the target table blogdemo_core.rideshare. You can check the Step Functions workflow to verify that the process finished successfully.

Clean up

  1. Go to the Amazon EventBridge console and delete the rule ${stackname}-blogdemoevenbridge%.
  2. In the Amazon S3 console, select the bucket created by the CloudFormation template ${stackname}-blogdemobucket% and click on Empty.
  3. Go to Subscriptions in the Amazon SNS console and delete the subscription created in Step 4.
  4. In the AWS CloudFormation console, select the stack and delete it.

Conclusion

In this post, we showed how different AWS services can be easily implemented together in order to create an event-driven architecture and automate its data pipeline, which targets the cloud data warehouse Amazon Redshift for business intelligence applications and complex queries.


About the Author

Ziad WALI is an Acceleration Lab Solutions Architect at Amazon Web Services. He has over 10 years of experience in databases and data warehousing where he enjoys building reliable, scalable and efficient solutions. Outside of work, he enjoys sports and spending time in nature.

Automate the archive and purge data process for Amazon RDS for PostgreSQL using pg_partman, Amazon S3, and AWS Glue

Post Syndicated from Anand Komandooru original https://aws.amazon.com/blogs/big-data/automate-the-archive-and-purge-data-process-for-amazon-rds-for-postgresql-using-pg_partman-amazon-s3-and-aws-glue/

The post Archive and Purge Data for Amazon RDS for PostgreSQL and Amazon Aurora with PostgreSQL Compatibility using pg_partman and Amazon S3 proposes data archival as a critical part of data management and shows how to efficiently use PostgreSQL’s native range partition to partition current (hot) data with pg_partman and archive historical (cold) data in Amazon Simple Storage Service (Amazon S3). Customers need a cloud-native automated solution to archive historical data from their databases. Customers want the business logic to be maintained and run from outside the database to reduce the compute load on the database server. This post proposes an automated solution by using AWS Glue for automating the PostgreSQL data archiving and restoration process, thereby streamlining the entire procedure.

AWS Glue is a serverless data integration service that makes it easier to discover, prepare, move, and integrate data from multiple sources for analytics, machine learning (ML), and application development. There is no need to pre-provision, configure, or manage infrastructure. It can also automatically scale resources to meet the requirements of your data processing job, providing a high level of abstraction and convenience. AWS Glue integrates seamlessly with AWS services like Amazon S3, Amazon Relational Database Service (Amazon RDS), Amazon Redshift, Amazon DynamoDB, Amazon Kinesis Data Streams, and Amazon DocumentDB (with MongoDB compatibility) to offer a robust, cloud-native data integration solution.

The features of AWS Glue, which include a scheduler for automating tasks, code generation for ETL (extract, transform, and load) processes, notebook integration for interactive development and debugging, as well as robust security and compliance measures, make it a convenient and cost-effective solution for archival and restoration needs.

Solution overview

The solution combines PostgreSQL’s native range partitioning feature with pg_partman, the Amazon S3 export and import functions in Amazon RDS, and AWS Glue as an automation tool.

The solution involves the following steps:

  1. Provision the required AWS services and workflows using the provided AWS Cloud Development Kit (AWS CDK) project.
  2. Set up your database.
  3. Archive the older table partitions to Amazon S3 and purge them from the database with AWS Glue.
  4. Restore the archived data from Amazon S3 to the database with AWS Glue when there is a business need to reload the older table partitions.

The solution is based on AWS Glue, which takes care of archiving and restoring databases with Availability Zone redundancy. The solution is comprised of the following technical components:

  • An Amazon RDS for PostgreSQL Multi-AZ database runs in two private subnets.
  • AWS Secrets Manager stores database credentials.
  • An S3 bucket stores Python scripts and database archives.
  • An S3 Gateway endpoint allows Amazon RDS and AWS Glue to communicate privately with the Amazon S3.
  • AWS Glue uses a Secrets Manager interface endpoint to retrieve database secrets from Secrets Manager.
  • AWS Glue ETL jobs run in either private subnet. They use the S3 endpoint to retrieve Python scripts. The AWS Glue jobs read the database credentials from Secrets Manager to establish JDBC connections to the database.

You can create an AWS Cloud9 environment in one of the private subnets available in your AWS account to set up test data in Amazon RDS. The following diagram illustrates the solution architecture.

Solution Architecture

Prerequisites

For instructions to set up your environment for implementing the solution proposed in this post, refer to Deploy the application in the GitHub repo.

Provision the required AWS resources using AWS CDK

Complete the following steps to provision the necessary AWS resources:

  1. Clone the repository to a new folder on your local desktop.
  2. Create a virtual environment and install the project dependencies.
  3. Deploy the stacks to your AWS account.

The CDK project includes three stacks: vpcstack, dbstack, and gluestack, implemented in the vpc_stack.py, db_stack.py, and glue_stack.py modules, respectively.

These stacks have preconfigured dependencies to simplify the process for you. app.py declares Python modules as a set of nested stacks. It passes a reference from vpcstack to dbstack, and a reference from both vpcstack and dbstack to gluestack.

gluestack reads the following attributes from the parent stacks:

  • The S3 bucket, VPC, and subnets from vpcstack
  • The secret, security group, database endpoint, and database name from dbstack

The deployment of the three stacks creates the technical components listed earlier in this post.

Set up your database

Prepare the database using the information provided in Populate and configure the test data on GitHub.

Archive the historical table partition to Amazon S3 and purge it from the database with AWS Glue

The “Maintain and Archive” AWS Glue workflow created in the first step consists of two jobs: “Partman run maintenance” and “Archive Cold Tables.”

The “Partman run maintenance” job runs the Partman.run_maintenance_proc() procedure to create new partitions and detach old partitions based on the retention setup in the previous step for the configured table. The “Archive Cold Tables” job identifies the detached old partitions and exports the historical data to an Amazon S3 destination using aws_s3.query_export_to_s3. In the end, the job drops the archived partitions from the database, freeing up storage space. The following screenshot shows the results of running this workflow on demand from the AWS Glue console.

Archive job run result

Additionally, you can set up this AWS Glue workflow to be triggered on a schedule, on demand, or with an Amazon EventBridge event. You need to use your business requirement to select the right trigger.

Restore archived data from Amazon S3 to the database

The “Restore from S3” Glue workflow created in the first step consists of one job: “Restore from S3.”

This job initiates the run of the partman.create_partition_time procedure to create a new table partition based on your specified month. It subsequently calls aws_s3.table_import_from_s3 to restore the matched data from Amazon S3 to the newly created table partition.

To start the “Restore from S3” workflow, navigate to the workflow on the AWS Glue console and choose Run.

The following screenshot shows the “Restore from S3” workflow run details.

Restore job run result

Validate the results

The solution provided in this post automated the PostgreSQL data archival and restoration process using AWS Glue.

You can use the following steps to confirm that the historical data in the database is successfully archived after running the “Maintain and Archive” AWS Glue workflow:

  1. On the Amazon S3 console, navigate to your S3 bucket.
  2. Confirm the archived data is stored in an S3 object as shown in the following screenshot.
    Archived data in S3
  3. From a psql command line tool, use the \dt command to list the available tables and confirm the archived table ticket_purchase_hist_p2020_01 does not exist in the database.List table result after post archival

You can use the following steps to confirm that the archived data is restored to the database successfully after running the “Restore from S3” AWS Glue workflow.

  1. From a psql command line tool, use the \dt command to list the available tables and confirm the archived table ticket_history_hist_p2020_01 is restored to the database.List table results after restore

Clean up

Use the information provided in Cleanup to clean up your test environment created for testing the solution proposed in this post.

Summary

This post showed how to use AWS Glue workflows to automate the archive and restore process in RDS for PostgreSQL database table partitions using Amazon S3 as archive storage. The automation is run on demand but can be set up to be trigged on a recurring schedule. It allows you to define the sequence and dependencies of jobs, track the progress of each workflow job, view run logs, and monitor the overall health and performance of your tasks. Although we used Amazon RDS for PostgreSQL as an example, the same solution works for Amazon Aurora-PostgreSQL Compatible Edition as well. Modernize your database cron jobs using AWS Glue by using this post and the GitHub repo. Gain a high-level understanding of AWS Glue and its components by using the following hands-on workshop.


About the Authors

Anand Komandooru is a Senior Cloud Architect at AWS. He joined AWS Professional Services organization in 2021 and helps customers build cloud-native applications on AWS cloud. He has over 20 years of experience building software and his favorite Amazon leadership principle is “Leaders are right a lot.”

Li Liu is a Senior Database Specialty Architect with the Professional Services team at Amazon Web Services. She helps customers migrate traditional on-premise databases to the AWS Cloud. She specializes in database design, architecture, and performance tuning.

Neil Potter is a Senior Cloud Application Architect at AWS. He works with AWS customers to help them migrate their workloads to the AWS Cloud. He specializes in application modernization and cloud-native design and is based in New Jersey.

Vivek Shrivastava is a Principal Data Architect, Data Lake in AWS Professional Services. He is a big data enthusiast and holds 14 AWS Certifications. He is passionate about helping customers build scalable and high-performance data analytics solutions in the cloud. In his spare time, he loves reading and finds areas for home automation.

S3 URI Parsing is now available in AWS SDK for Java 2.x

Post Syndicated from David Ho original https://aws.amazon.com/blogs/devops/s3-uri-parsing-is-now-available-in-aws-sdk-for-java-2-x/

The AWS SDK for Java team is pleased to announce the general availability of Amazon Simple Storage Service (Amazon S3) URI parsing in the AWS SDK for Java 2.x. You can now parse path-style and virtual-hosted-style S3 URIs to easily retrieve the bucket, key, region, style, and query parameters. The new parseUri() API and S3Uri class provide the highly-requested parsing features that many customers miss from the AWS SDK for Java 1.x. Please note that Amazon S3 AccessPoints and Amazon S3 on Outposts URI parsing are not supported.

Motivation

Users often need to extract important components like bucket and key from stored S3 URIs to use in S3Client operations. The new parsing APIs allow users to conveniently do so, bypassing the need for manual parsing or storing the components separately.

Getting Started

To begin, first add the dependency for S3 to your project.

<dependency>
    <groupId>software.amazon.awssdk</groupId>
    <artifactId>s3</artifactId>
    <version>${s3.version}</version>
</dependency>

Next, instantiate S3Client and S3Utilities objects.

S3Client s3Client = S3Client.create();
S3Utilities s3Utilities = s3Client.utilities();

Parsing an S3 URI

To parse your S3 URI, call parseUri() from S3Utilities, passing in the URI. This will return a parsed S3Uri object. If you have a String of the URI, you’ll need to convert it into an URI object first.

String url = "https://s3.us-west-1.amazonaws.com/myBucket/resources/doc.txt?versionId=abc123&partNumber=77&partNumber=88";
URI uri = URI.create(url);
S3Uri s3Uri = s3Utilities.parseUri(uri);

With the S3Uri, you can call the appropriate getter methods to retrieve the bucket, key, region, style, and query parameters. If the bucket, key, or region is not specified in the URI, an empty Optional will be returned. If query parameters are not specified in the URI, an empty map will be returned. If the field is encoded in the URI, it will be returned decoded.

Region region = s3Uri.region().orElse(null); // Region.US_WEST_1
String bucket = s3Uri.bucket().orElse(null); // "myBucket"
String key = s3Uri.key().orElse(null); // "resources/doc.txt"
boolean isPathStyle = s3Uri.isPathStyle(); // true

Retrieving query parameters

There are several APIs for retrieving the query parameters. You can return a Map<String, List<String>> of the query parameters. Alternatively, you can specify a query parameter to return the first value for the given query, or return the list of values for the given query.

Map<String, List<String>> queryParams = s3Uri.rawQueryParameters(); // {versionId=["abc123"], partNumber=["77", "88"]}
String versionId = s3Uri.firstMatchingRawQueryParameter("versionId").orElse(null); // "abc123"
String partNumber = s3Uri.firstMatchingRawQueryParameter("partNumber").orElse(null); // "77"
List<String> partNumbers = s3Uri.firstMatchingRawQueryParameters("partNumber"); // ["77", "88"]

Caveats

Special Characters

If you work with object keys or query parameters with reserved or unsafe characters, they must be URL-encoded, e.g., replace whitespace " " with "%20".

Valid:
"https://s3.us-west-1.amazonaws.com/myBucket/object%20key?query=%5Bbrackets%5D"

Invalid:
"https://s3.us-west-1.amazonaws.com/myBucket/object key?query=[brackets]"

Virtual-hosted-style URIs

If you work with virtual-hosted-style URIs with bucket names that contain a dot, i.e., ".", the dot must not be URL-encoded.

Valid:
"https://my.Bucket.s3.us-west-1.amazonaws.com/key"

Invalid:
"https://my%2EBucket.s3.us-west-1.amazonaws.com/key"

Conclusion

In this post, I discussed parsing S3 URIs in the AWS SDK for Java 2.x and provided code examples for retrieving the bucket, key, region, style, and query parameters. To learn more about how to set up and begin using the feature, visit our Developer Guide. If you are curious about how it is implemented, check out the source code on GitHub. As always, the AWS SDK for Java team welcomes bug reports, feature requests, and pull requests on the aws-sdk-java-v2 GitHub repository.

How to use Amazon Macie to reduce the cost of discovering sensitive data

Post Syndicated from Nicholas Doropoulos original https://aws.amazon.com/blogs/security/how-to-use-amazon-macie-to-reduce-the-cost-of-discovering-sensitive-data/

Amazon Macie is a fully managed data security service that uses machine learning and pattern matching to discover and help protect your sensitive data, such as personally identifiable information (PII), payment card data, and Amazon Web Services (AWS) credentials. Analyzing large volumes of data for the presence of sensitive information can be expensive, due to the nature of compute-intensive operations involved in the process.

Macie offers several capabilities to help customers reduce the cost of discovering sensitive data, including automated data discovery, which can reduce your spend with new data sampling techniques that are custom-built for Amazon Simple Storage Service (Amazon S3). In this post, we will walk through such Macie capabilities and best practices so that you can cost-efficiently discover sensitive data with Macie.

Overview of the Macie pricing plan

Let’s do a quick recap of how customers pay for the Macie service. With Macie, you are charged based on three dimensions: the number of S3 buckets evaluated for bucket inventory and monitoring, the number of S3 objects monitored for automated data discovery, and the quantity of data inspected for sensitive data discovery. You can read more about these dimensions on the Macie pricing page.

The majority of the cost incurred by customers is driven by the quantity of data inspected for sensitive data discovery. For this reason, we will limit the scope of this post to techniques that you can use to optimize the quantity of data that you scan with Macie.

Not all security use cases require the same quantity of data for scanning

Broadly speaking, you can choose to scan your data in two ways—run full scans on your data or sample a portion of it. When to use which method depends on your use cases and business objectives. Full scans are useful when customers have identified what they want to scan. A few examples of such use cases are: scanning buckets that are open to the internet, monitoring a bucket for unintentionally added sensitive data by scanning every new object, or performing analysis on a bucket after a security incident.

The other option is to use sampling techniques for sensitive data discovery. This method is useful when security teams want to reduce data security risks. For example, just knowing that an S3 bucket contains credit card numbers is enough information to prioritize it for remediation activities.

Macie offers both options, and you can discover sensitive data either by creating and running sensitive data discovery jobs that perform full scans on targeted locations, or by configuring Macie to perform automated sensitive data discovery for your account or organization. You can also use both options simultaneously in Macie.

Use automated data discovery as a best practice

Automated data discovery in Macie minimizes the quantity of data scanning that is needed to a fraction of your S3 estate.

When you enable Macie for the first time, automated data discovery is enabled by default. When you already use Macie in your organization, you can enable automatic data discovery in the management console of the Amazon Macie administrator account. This Macie capability automatically starts discovering sensitive data in your S3 buckets and builds a sensitive data profile for each bucket. The profiles are organized in a visual, interactive data map, and you can use the data map to identify data security risks that need immediate attention.

Automated data discovery in Macie starts to evaluate the level of sensitivity of each of your buckets by using intelligent and fully managed data sampling techniques to minimize the quantity of data scanning needed. During evaluation, objects are organized with similar S3 metadata, such as bucket names, object-key prefixes, file-type extensions, and storage class, into groups that are likely to have similar content. Macie then selects small, but representative, samples from each identified group of objects and scans them to detect the presence of sensitive data. Macie has a feedback loop that uses the results of previously scanned samples to prioritize the next set of samples to inspect.

The automated sensitive data discovery feature is designed to detect sensitive data at scale across hundreds of buckets and accounts, which makes it easier to identify the S3 buckets that need to be prioritized for more focused scanning. Because the amount of data that needs to be scanned is reduced, this task can be done at fraction of the cost of running a full data inspection across all your S3 buckets. The Macie console displays the scanning results as a heat map (Figure 1), which shows the consolidated information grouped by account, and whether a bucket is sensitive, not sensitive, or not analyzed yet.

Figure 1: A heat map showing the results of automated sensitive data discovery

Figure 1: A heat map showing the results of automated sensitive data discovery

There is a 30-day free trial period when you enable automatic data discovery on your AWS account. During the trial period, in the Macie console, you can see the estimated cost of running automated sensitive data discovery after the trial period ends. After the evaluation period, we charge based on the total quantity of S3 objects in your account, as well as the bytes that are scanned for sensitive content. Charges are prorated per day. You can disable this capability at any time.

Tune your monthly spend on automated sensitive data discovery

To further reduce your monthly spend on automated sensitive data, Macie allows you to exclude buckets from automated discovery. For example, you might consider excluding buckets that are used for storing operational logs, if you’re sure they don’t contain any sensitive information. Your monthly spend is reduced roughly by the percentage of data in those excluded buckets compared to your total S3 estate.

Figure 2 shows the setting in the heatmap area of the Macie console that you can use to exclude a bucket from automated discovery.

Figure 2: Excluding buckets from automated sensitive data discovery from the heatmap

Figure 2: Excluding buckets from automated sensitive data discovery from the heatmap

You can also use the automated data discovery settings page to specify multiple buckets to be excluded, as shown in Figure 3.

Figure 3: Excluding buckets from the automated sensitive data discovery settings page

Figure 3: Excluding buckets from the automated sensitive data discovery settings page

How to run targeted, cost-efficient sensitive data discovery jobs

Making your sensitive data discovery jobs more targeted make them more cost-efficient, because it reduces the quantity of data scanned. Consider using the following strategies:

  1. Make your sensitive data discovery jobs as targeted and specific as possible in their scope by using the Object criteria settings on the Refine the scope page, shown in Figure 4.
    Figure 4: Adjusting the scope of a sensitive data discovery job

    Figure 4: Adjusting the scope of a sensitive data discovery job

    Options to make discovery jobs more targeted include:

    • Include objects by using the “last modified” criterion — If you are aware of the frequency at which your classifiable S3-hosted objects get modified, and you want to scan the resources that changed at a particular point in time, include in your scope the objects that were modified at a certain date or time by using the “last modified” criterion.
    • Don’t scan CloudTrail logs — Identify the S3 bucket prefixes that contain AWS CloudTrail logs and exclude them from scanning.
    • Consider using random object sampling — With this option, you specify the percentage of eligible S3 objects that you want Macie to analyze when a sensitive data discovery job runs. If this value is less than 100%, Macie selects eligible objects to analyze at random, up to the specified percentage, and analyzes the data in those objects. If your data is highly consistent and you want to determine whether a specific S3 bucket, rather than each object, contains sensitive information, adjust the sampling depth accordingly.
    • Include objects with specific extensions, tags, or storage size — To fine tune the scope of a sensitive data discovery job, you can also define custom criteria that determine which S3 objects Macie includes or excludes from a job’s analysis. These criteria consist of one or more conditions that derive from properties of S3 objects. You can exclude objects with specific file name extensions, exclude objects by using tags as the criterion, and exclude objects on the basis of their storage size. For example, you can use a criteria-based job to scan the buckets associated with specific tag key/value pairs such as Environment: Production.
  2. Specify S3 bucket criteria in your job — Use a criteria-based job to scan only buckets that have public read/write access. For example, if you have 100 buckets with 10 TB of data, but only two of those buckets containing 100 GB are public, you could reduce your overall Macie cost by 99% by using a criteria-based job to classify only the public buckets.
  3. Consider scheduling jobs based on how long objects live in your S3 buckets. Running jobs at a higher frequency than needed can result in unnecessary costs in cases where objects are added and deleted frequently. For example, if you’ve determined that the S3 objects involved contain high velocity data that is expected to reside in your S3 bucket for a few days, and you’re concerned that sensitive data might remain, scheduling your jobs to run at a lower frequency will help in driving down costs. In addition, you can deselect the Include existing objects checkbox to scan only new objects.
    Figure 5: Specifying the frequency of a sensitive data discovery job

    Figure 5: Specifying the frequency of a sensitive data discovery job

  4. As a best practice, review your scheduled jobs periodically to verify that they are still meaningful to your organization. If you aren’t sure whether one of your periodic jobs continues to be fit for purpose, you can pause it so that you can investigate whether it is still needed, without incurring potentially unnecessary costs in the meantime. If you determine that a periodic job is no longer required, you can cancel it completely.
    Figure 6: Pausing a scheduled sensitive data discovery job

    Figure 6: Pausing a scheduled sensitive data discovery job

  5. If you don’t know where to start to make your jobs more targeted, use the results of Macie automated data discovery to plan your scanning strategy. Start with small buckets and the ones that have policy findings associated with them.
  6. In multi-account environments, you can monitor Macie’s usage across your organization in AWS Organizations through the usage page of the delegated administrator account. This will enable you to identify member accounts that are incurring higher costs than expected, and you can then investigate and take appropriate actions to keep expenditure low.
  7. Take advantage of the Macie pricing calculator so that you get an estimate of your Macie fees in advance.

Conclusion

In this post, we highlighted the best practices to keep in mind and configuration options to use when you discover sensitive data with Amazon Macie. We hope that you will walk away with a better understanding of when to use the automated data discovery capability and when to run targeted sensitive data discovery jobs. You can use the pointers in this post to tune the quantity of data you want to scan with Macie, so that you can continuously optimize your Macie spend.

If you have feedback about this post, submit comments in the Comments section below. If you have questions about this post, start a new thread on Amazon Macie re:Post.

Want more AWS Security news? Follow us on Twitter.

Nicholas Doropoulos

Nicholas Doropoulos

Nicholas is an AWS Cloud Security Engineer, a Bestselling Udemy Instructor, and a subject matter expert in AWS Shield, GuardDuty and Certificate Manager. Outside work, he enjoys spending his time with his wife and their beautiful baby son.

Koulick Ghosh

Koulick Ghosh

Koulick is a Senior Product Manager in AWS Security based in Seattle, WA. He loves speaking with customers on how AWS Security services can help make them more secure. In his free-time, he enjoys playing the guitar, reading, and exploring the Pacific Northwest.

The anatomy of ransomware event targeting data residing in Amazon S3

Post Syndicated from Megan O'Neil original https://aws.amazon.com/blogs/security/anatomy-of-a-ransomware-event-targeting-data-in-amazon-s3/

Ransomware events have significantly increased over the past several years and captured worldwide attention. Traditional ransomware events affect mostly infrastructure resources like servers, databases, and connected file systems. However, there are also non-traditional events that you may not be as familiar with, such as ransomware events that target data stored in Amazon Simple Storage Service (Amazon S3). There are important steps you can take to help prevent these events, and to identify possible ransomware events early so that you can take action to recover. The goal of this post is to help you learn about the AWS services and features that you can use to protect against ransomware events in your environment, and to investigate possible ransomware events if they occur.

Ransomware is a type of malware that bad actors can use to extort money from entities. The actors can use a range of tactics to gain unauthorized access to their target’s data and systems, including but not limited to taking advantage of unpatched software flaws, misuse of weak credentials or previous unintended disclosure of credentials, and using social engineering. In a ransomware event, a legitimate entity’s access to their data and systems is restricted by the bad actors, and a ransom demand is made for the safe return of these digital assets. There are several methods actors use to restrict or disable authorized access to resources including a) encryption or deletion, b) modified access controls, and c) network-based Denial of Service (DoS) attacks. In some cases, after the target’s data access is restored by providing the encryption key or transferring the data back, bad actors who have a copy of the data demand a second ransom—promising not to retain the data in order to sell or publicly release it.

In the next sections, we’ll describe several important stages of your response to a ransomware event in Amazon S3, including detection, response, recovery, and protection.

Observable activity

The most common event that leads to a ransomware event that targets data in Amazon S3, as observed by the AWS Customer Incident Response Team (CIRT), is unintended disclosure of Identity and Access Management (IAM) access keys. Another likely cause is if there is an application with a software flaw that is hosted on an Amazon Elastic Compute Cloud (Amazon EC2) instance with an attached IAM instance profile and associated permissions, and the instance is using Instance Metadata Service Version 1 (IMDSv1). In this case, an unauthorized user might be able to use AWS Security Token Service (AWS STS) session keys from the IAM instance profile for your EC2 instance to ransom objects in S3 buckets. In this post, we will focus on the most common scenario, which is unintended disclosure of static IAM access keys.

Detection

After a bad actor has obtained credentials, they use AWS API actions that they iterate through to discover the type of access that the exposed IAM principal has been granted. Bad actors can do this in multiple ways, which can generate different levels of activity. This activity might alert your security teams because of an increase in API calls that result in errors. Other times, if a bad actor’s goal is to ransom S3 objects, then the API calls will be specific to Amazon S3. If access to Amazon S3 is permitted through the exposed IAM principal, then you might see an increase in API actions such as s3:ListBuckets, s3:GetBucketLocation, s3:GetBucketPolicy, and s3:GetBucketAcl.

Analysis

In this section, we’ll describe where to find the log and metric data to help you analyze this type of ransomware event in more detail.

When a ransomware event targets data stored in Amazon S3, often the objects stored in S3 buckets are deleted, without the bad actor making copies. This is more like a data destruction event than a ransomware event where objects are encrypted.

There are several logs that will capture this activity. You can enable AWS CloudTrail event logging for Amazon S3 data, which allows you to review the activity logs to understand read and delete actions that were taken on specific objects.

In addition, if you have enabled Amazon CloudWatch metrics for Amazon S3 prior to the ransomware event, you can use the sum of the BytesDownloaded metric to gain insight into abnormal transfer spikes.

Another way to gain information is to use the region-DataTransfer-Out-Bytes metric, which shows the amount of data transferred from Amazon S3 to the internet. This metric is enabled by default and is associated with your AWS billing and usage reports for Amazon S3.

For more information, see the AWS CIRT team’s Incident Response Playbook: Ransom Response for S3, as well as the other publicly available response frameworks available at the AWS customer playbooks GitHub repository.

Response

Next, we’ll walk through how to respond to the unintended disclosure of IAM access keys. Based on the business impact, you may decide to create a second set of access keys to replace all legitimate use of those credentials so that legitimate systems are not interrupted when you deactivate the compromised access keys. You can deactivate the access keys by using the IAM console or through automation, as defined in your incident response plan. However, you also need to document specific details for the event within your secure and private incident response documentation so that you can reference them in the future. If the activity was related to the use of an IAM role or temporary credentials, you need to take an additional step and revoke any active sessions. To do this, in the IAM console, you choose the Revoke active session button, which will attach a policy that denies access to users who assumed the role before that moment. Then you can delete the exposed access keys.

In addition, you can use the AWS CloudTrail dashboard and event history (which includes 90 days of logs) to review the IAM related activities by that compromised IAM user or role. Your analysis can show potential persistent access that might have been created by the bad actor. In addition, you can use the IAM console to look at the IAM credential report (this report is updated every 4 hours) to review activity such as access key last used, user creation time, and password last used. Alternatively, you can use Amazon Athena to query the CloudTrail logs for the same information. See the following example of an Athena query that will take an IAM user Amazon Resource Number (ARN) to show activity for a particular time frame.

SELECT eventtime, eventname, awsregion, sourceipaddress, useragent
FROM cloudtrail
WHERE useridentity.arn = 'arn:aws:iam::1234567890:user/Name' AND
-- Enter timeframe
(event_date >= '2022/08/04' AND event_date <= '2022/11/04')
ORDER BY eventtime ASC

Recovery

After you’ve removed access from the bad actor, you have multiple options to recover data, which we discuss in the following sections. Keep in mind that there is currently no undelete capability for Amazon S3, and AWS does not have the ability to recover data after a delete operation. In addition, many of the recovery options require configuration upon bucket creation.

S3 Versioning

Using versioning in S3 buckets is a way to keep multiple versions of an object in the same bucket, which gives you the ability to restore a particular version during the recovery process. You can use the S3 Versioning feature to preserve, retrieve, and restore every version of every object stored in your buckets. With versioning, you can recover more easily from both unintended user actions and application failures. Versioning-enabled buckets can help you recover objects from accidental deletion or overwrite. For example, if you delete an object, Amazon S3 inserts a delete marker instead of removing the object permanently. The previous version remains in the bucket and becomes a noncurrent version. You can restore the previous version. Versioning is not enabled by default and incurs additional costs, because you are maintaining multiple copies of the same object. For more information about cost, see the Amazon S3 pricing page.

AWS Backup

Using AWS Backup gives you the ability to create and maintain separate copies of your S3 data under separate access credentials that can be used to restore data during a recovery process. AWS Backup provides centralized backup for several AWS services, so you can manage your backups in one location. AWS Backup for Amazon S3 provides you with two options: continuous backups, which allow you to restore to any point in time within the last 35 days; and periodic backups, which allow you to retain data for a specified duration, including indefinitely. For more information, see Using AWS Backup for Amazon S3.

Protection

In this section, we’ll describe some of the preventative security controls available in AWS.

S3 Object Lock

You can add another layer of protection against object changes and deletion by enabling S3 Object Lock for your S3 buckets. With S3 Object Lock, you can store objects using a write-once-read-many (WORM) model and can help prevent objects from being deleted or overwritten for a fixed amount of time or indefinitely.

AWS Backup Vault Lock

Similar to S3 Object lock, which adds additional protection to S3 objects, if you use AWS Backup you can consider enabling AWS Backup Vault Lock, which enforces the same WORM setting for all the backups you store and create in a backup vault. AWS Backup Vault Lock helps you to prevent inadvertent or malicious delete operations by the AWS account root user.

Amazon S3 Inventory

To make sure that your organization understands the sensitivity of the objects you store in Amazon S3, you should inventory your most critical and sensitive data across Amazon S3 and make sure that the appropriate bucket configuration is in place to protect and enable recovery of your data. You can use Amazon S3 Inventory to understand what objects are in your S3 buckets, and the existing configurations, including encryption status, replication status, and object lock information. You can use resource tags to label the classification and owner of the objects in Amazon S3, and take automated action and apply controls that match the sensitivity of the objects stored in a particular S3 bucket.

MFA delete

Another preventative control you can use is to enforce multi-factor authentication (MFA) delete in S3 Versioning. MFA delete provides added security and can help prevent accidental bucket deletions, by requiring the user who initiates the delete action to prove physical or virtual possession of an MFA device with an MFA code. This adds an extra layer of friction and security to the delete action.

Use IAM roles for short-term credentials

Because many ransomware events arise from unintended disclosure of static IAM access keys, AWS recommends that you use IAM roles that provide short-term credentials, rather than using long-term IAM access keys. This includes using identity federation for your developers who are accessing AWS, using IAM roles for system-to-system access, and using IAM Roles Anywhere for hybrid access. For most use cases, you shouldn’t need to use static keys or long-term access keys. Now is a good time to audit and work toward eliminating the use of these types of keys in your environment. Consider taking the following steps:

  1. Create an inventory across all of your AWS accounts and identify the IAM user, when the credentials were last rotated and last used, and the attached policy.
  2. Disable and delete all AWS account root access keys.
  3. Rotate the credentials and apply MFA to the user.
  4. Re-architect to take advantage of temporary role-based access, such as IAM roles or IAM Roles Anywhere.
  5. Review attached policies to make sure that you’re enforcing least privilege access, including removing wild cards from the policy.

Server-side encryption with customer managed KMS keys

Another protection you can use is to implement server-side encryption with AWS Key Management Service (SSE-KMS) and use customer managed keys to encrypt your S3 objects. Using a customer managed key requires you to apply a specific key policy around who can encrypt and decrypt the data within your bucket, which provides an additional access control mechanism to protect your data. You can also centrally manage AWS KMS keys and audit their usage with an audit trail of when the key was used and by whom.

GuardDuty protections for Amazon S3

You can enable Amazon S3 protection in Amazon GuardDuty. With S3 protection, GuardDuty monitors object-level API operations to identify potential security risks for data in your S3 buckets. This includes findings related to anomalous API activity and unusual behavior related to your data in Amazon S3, and can help you identify a security event early on.

Conclusion

In this post, you learned about ransomware events that target data stored in Amazon S3. By taking proactive steps, you can identify potential ransomware events quickly, and you can put in place additional protections to help you reduce the risk of this type of security event in the future.

 
If you have feedback about this post, submit comments in the Comments section below. If you have questions about this post, start a new thread on the Security, Identity and Compliance re:Post or contact AWS Support.

Want more AWS Security news? Follow us on Twitter.

Author

Megan O’Neil

Megan is a Principal Specialist Solutions Architect focused on threat detection and incident response. Megan and her team enable AWS customers to implement sophisticated, scalable, and secure solutions that solve their business challenges.

Karthik Ram

Karthik Ram

Karthik is a Senior Solutions Architect with Amazon Web Services based in Columbus, Ohio. He has a background in IT networking, infrastructure architecture and Security. At AWS, Karthik helps customers build secure and innovative cloud solutions, solving their business problems using data driven approaches. Karthik’s Area of Depth is Cloud Security with a focus on Threat Detection and Incident Response (TDIR).

Kyle Dickinson

Kyle Dickinson

Kyle is a Sr. Security Solution Architect, specializing in threat detection, incident response. He focuses on working with customers to respond to security events with confidence. He also hosts AWS on Air: Lockdown, a livestream security show. When he’s not – he enjoys hockey, BBQ, and trying to convince his Shitzu that he’s in-fact, not a large dog.

Setting up a secure CI/CD pipeline in a private Amazon Virtual Private Cloud with no public internet access

Post Syndicated from MJ Kubba original https://aws.amazon.com/blogs/devops/setting-up-a-secure-ci-cd-pipeline-in-a-private-amazon-virtual-private-cloud-with-no-public-internet-access/

With the rise of the cloud and increased security awareness, the use of private Amazon VPCs with no public internet access also expanded rapidly. This setup is recommended to make sure of proper security through isolation. The isolation requirement also applies to code pipelines, in which developers deploy their application modules, software packages, and other dependencies and bundles throughout the development lifecycle. This is done without having to push larger bundles from the developer space to the staging space or the target environment. Furthermore, AWS CodeArtifact is used as an artifact management service that will help organizations of any size to securely store, publish, and share software packages used in their software development process.

We’ll walk through the steps required to build a secure, private continuous integration/continuous development (CI/CD) pipeline with no public internet access while maintaining log retention in Amazon CloudWatch. We’ll utilize AWS CodeCommit for source, CodeArtifact for the Modules and software packages, and Amazon Simple Storage Service (Amazon S3) as artifact storage.

Prerequisites

The prerequisites for following along with this post include:

  • An AWS Account
  • A Virtual Private Cloud (Amazon VPC)
  • A CI/CD pipeline – This can be CodePipeline, Jenkins or any CI/CD tool you want to integrate CodeArtifact with, we will use CodePipeline in our walkthrough here.

Solution walkthrough

The main service we’ll focus on is CodeArtifact, a fully managed artifact repository service that makes it easy for organizations of any size to securely store, publish, and share software packages used in their software development process. CodeArtifact works with commonly used package managers and build tools, such as Maven and Gradle (Java), npm and yarn (JavaScript), pip and twine (Python), or NuGet (.NET).

user checkin code to CodeCommit, CodePipeline will detect the change and start the pipeline, in CodeBuild the build stage will utilize the private endpoints and download the software packages needed without the need to go over the internet.

Users push code to CodeCommit, CodePipeline will detect the change and start the pipeline, in CodeBuild the build stage will utilize the private endpoints and download the software packages needed without the need to go over the internet.

The preceding diagram shows how the requests remain private within the VPC and won’t go through the Internet gateway, by going from CodeBuild over the private endpoint to CodeArtifact service, all within the private subnet.

The requests will use the following VPC endpoints to connect to these AWS services:

  • CloudWatch Logs endpoint (for CodeBuild to put logs in CloudWatch)
  • CodeArtifact endpoints
  • AWS Security Token Service (AWS STS) endpoint
  • Amazon Simple Storage Service (Amazon S3) endpoint

Walkthrough

  1. Create a CodeCommit Repository:
    1. Navigate to your CodeCommit Console then click on Create repository
Screenshot: Create repository button

Figure 2. Screenshot: Create repository button.

    1. Type in name for the repository then click Create
Screenshot: Repository setting with name shown as "Private" and empty Description

Figure 3. Screenshot: Repository setting with name shown as “Private” and empty Description.

    1. Scroll down and click Create file
Figure 4. Create file button.

Figure 4. Create file button.

    1. Copy the example buildspec.yml file and paste it to the editor

Example buildspec.yml file:

version: 0.2
phases:
  install:
    runtime-versions:
        nodejs: 16
    
commands:
      - export AWS_STS_REGIONAL_ENDPOINTS=regional
      - ACCT=`aws sts get-caller-identity --region ${AWS_REGION} --query Account --output text`
      - aws codeartifact login --tool npm --repository Private --domain private --domain-owner ${ACCT}
      - npm install
  build:
    commands:
      - node index.js
    1. Name the file buildspec.yml, type in your name and your email address then Commit changes
Figure 5. Screenshot: Create file page.

Figure 5. Screenshot: Create file page.

  1. Create CodeArtifact
    1. Navigate to your CodeArtifact Console then click on Create repository
    2. Give it a name and select npm-store as public upsteam repository
Figure 6. Screenshot: Create repository page with Repository name "Private".

Figure 6. Screenshot: Create repository page with Repository name “Private”.

    1. For the Domain Select this AWS account and enter a domain name
Figure 7. Screenshot: Select domain page.

Figure 7. Screenshot: Select domain page.

    1. Click Next then Create repository
Figure 8. Screenshot: Create repository review page.

Figure 8. Screenshot: Create repository review page.

  1. Create a CI/CD using CodePipeline
    1. Navigate to your CodePipeline Console then click on Create pipeline
Figure 9. Screenshot: Create pipeline button.

Figure 9. Screenshot: Create pipeline button.

    1. Type a name, leave the Service role as “New service role” and click next
Figure 10. Screenshot: Choose pipeline setting page with pipeline name "Private".

Figure 10. Screenshot: Choose pipeline setting page with pipeline name “Private”.

    1. Select AWS CodeCommit as your Source provider
    2. Then choose the CodeCommit repository you created earlier and for branch select main then click Next
Figure 11. Screenshot: Create pipeline add source stage.

Figure 11. Screenshot: Create pipeline add source stage.

    1. For the Build Stage, Choose AWS CodeBuild as the build provider, then click Create Project
Figure 12. Screenshot: Create pipeline add build stage.

Figure 12. Screenshot: Create pipeline add build stage.

    1. This will open new window to create the new Project, Give this project a name
Figure 13. Screenshot: Create pipeline create build project window.

Figure 13. Screenshot: Create pipeline create build project window.

    1.  Scroll down to the Environment section: select pick Managed image,
    2. For Operating system select “Amazon Linux 2”,
    3. Runtime “Standard” and
    4. For Image select the aws/codebuild/amazonlinux2-x86+64-standard:4.0
      For the Image version: Always use the latest image for this runtime version
    5. Select Linux for the Environment type
    6. Leave the Privileged option unchecked and set Service Role to “New service role”
Figure 14. Screenshot: Create pipeline create build project, setting up environment window.

Figure 14. Screenshot: Create pipeline create build project, setting up environment window.

    1. Expand Additional configurations and scroll down to the VPC section, select the desired VPC, your Subnets (we recommend selecting multiple AZs, to ensure high availability), and Security Group (the security group rules must allow resources that will use the VPC endpoint to communicate with the AWS service to communicate with the endpoint network interface, default VPC security group will be used here as an example)
Figure 15. Screenshot: Create pipeline create build project networking window.

Figure 15. Screenshot: Create pipeline create build project networking window.

    1. Scroll down to the Buildspec and select “Use a buildspec file” and type “buildspec.yml” for the Buildspec name
Figure 16. Screenshot: Create pipeline create build project buildspec window.

Figure 16. Screenshot: Create pipeline create build project buildspec window.

    1. Select the CloudWatch logs option you can leave the group name and stream empty this will let the service use the default values and click Continue to CodePipeline
Figure 17. Screenshot: Create pipeline create build project logs window.

Figure 17. Screenshot: Create pipeline create build project logs window.

    1. This will create the new CodeBuild Project, update the CodePipeline page, now you can click Next
Figure 18. Screenshot: Create pipeline add build stage window.

Figure 18. Screenshot: Create pipeline add build stage window.

    1.  Since we are not deploying this to any environment, you can skip the deploy stage and click “Skip deploy stage”

Figure 19. Screenshot: Create pipeline add deploy stage.

Figure 20. Screenshot: Create pipeline skip deployment stage confirmation.

Figure 20. Screenshot: Create pipeline skip deployment stage confirmation.

    1. After you get the popup click skip again you’ll see the review page, scroll all the way down and click Create Pipeline
  1. Create a VPC endpoint for Amazon CloudWatch Logs. This will enable CodeBuild to send execution logs to CloudWatch:
    1. Navigate to your VPC console, and from the navigation menu on the left select “Endpoints”.
Figure 21. Screenshot: VPC endpoint.

Figure 21. Screenshot: VPC endpoint.

    1.  click Create endpoint Button.
Figure 22. Screenshot: Create endpoint.

Figure 22. Screenshot: Create endpoint.

    1. For service Category, select “AWS Services”. You can set a name for the new endpoint, and make sure to use something descriptive.
Figure 23. Screenshot: Create endpoint page.

Figure 23. Screenshot: Create endpoint page.

    1. From the list of services, search for the endpoint by typing logs in the search bar and selecting the one with com.amazonaws.us-west-2.logs.
      This walkthrough can be done in any region that supports the services. I am going to be using us-west-2, please select the appropriate region for your workload.
Figure 24. Screenshot: create endpoint select services with com.amazonaws.us-west-2.logs selected.

Figure 24. Screenshot: create endpoint select services with com.amazonaws.us-west-2.logs selected.

    1. Select the VPC that you want the endpoint to be associated with, and make sure that the Enable DNS name option is checked under additional settings.
Figure 25. Screenshot: create endpoint VPC setting shows VPC selected.

Figure 25. Screenshot: create endpoint VPC setting shows VPC selected.

    1. Select the Subnets where you want the endpoint to be associated, and you can leave the security group as default and the policy as empty.
Figure 26. Screenshot: create endpoint subnet setting shows 2 subnet selected and default security group selected.

Figure 26. Screenshot: create endpoint subnet setting shows 2 subnet selected and default security group selected.

    1. Select Create Endpoint.
Figure 27. Screenshot: create endpoint button.

Figure 27. Screenshot: create endpoint button.

  1. Create a VPC endpoint for CodeArtifact. At the time of writing this article, CodeArifact has two endpoints: one is for API operations like service level operations and authentication, and the other is for using the service such as getting modules for our code. We’ll need both endpoints to automate working with CodeArtifact. Therefore, we’ll create both endpoints with DNS enabled.

In addition, we’ll need AWS Security Token Service (AWS STS) endpoint for get-caller-identity API call:

Follow steps a-c from the steps that were used from the creating the Logs endpoint above.

a. From the list of services, you can search for the endpoint by typing codeartifact in the search bar and selecting the one with com.amazonaws.us-west-2.codeartifact.api.

Figure 28. Screenshot: create endpoint select services with com.amazonaws.us-west-2.codeartifact.api selected.

Figure 28. Screenshot: create endpoint select services with com.amazonaws.us-west-2.codeartifact.api selected.

Follow steps e-g from Part 4.

Then, repeat the same for com.amazon.aws.us-west-2.codeartifact.repositories service.

Figure 29. Screenshot: create endpoint select services with com.amazonaws.us-west-2.codeartifact.api selected.

Figure 29. Screenshot: create endpoint select services with com.amazonaws.us-west-2.codeartifact.api selected.

  1. Enable a VPC endpoint for AWS STS:

Follow steps a-c from Part 4

a. From the list of services you can search for the endpoint by typing sts in the search bar and selecting the one with com.amazonaws.us-west-2.sts.

Figure 30.Screenshot: create endpoint select services with com.amazon.aws.us-west-2.codeartifact.repositories selected.

Figure 30.Screenshot: create endpoint select services with com.amazon.aws.us-west-2.codeartifact.repositories selected.

Then follow steps e-g from Part 4.

  1. Create a VPC endpoint for S3:

Follow steps a-c from Part 4

a. From the list of services you can search for the endpoint by typing sts in the search bar and selecting the one with com.amazonaws.us-west-2.s3, select the one with type of Gateway

Then select your VPC, and select the route tables for your subnets, this will auto update the route table with the new S3 endpoint.

Figure 31. Screenshot: create endpoint select services with com.amazonaws.us-west-2.s3 selected.

Figure 31. Screenshot: create endpoint select services with com.amazonaws.us-west-2.s3 selected.

  1. Now we have all of the endpoints set. The last step is to update your pipeline to point at the CodeArtifact repository when pulling your code dependencies. I’ll use CodeBuild buildspec.yml as an example here.

Make sure that your CodeBuild AWS Identity and Access Management (IAM) role has the permissions to perform STS and CodeArtifact actions.

Navigate to IAM console and click Roles from the left navigation menu, then search for your IAM role name, in our case since we selected “New service role” option in step 2.k was created with the name “codebuild-Private-service-role” (codebuild-<BUILD PROJECT NAME>-service-role)

Figure 32. Screenshot: IAM roles with codebuild-Private-service-role role shown in search.

Figure 32. Screenshot: IAM roles with codebuild-Private-service-role role shown in search.

From the Add permissions menu, click on Create inline policy

Search for STS in the services then select STS

Figure 34. Screenshot: IAM visual editor with sts shown in search.

Figure 34. Screenshot: IAM visual editor with sts shown in search.

Search for “GetCallerIdentity” and select the action

Figure 35. Screenshot: IAM visual editor with GetCallerIdentity in search and action selected.

Figure 35. Screenshot: IAM visual editor with GetCallerIdentity in search and action selected.

Repeat the same with “GetServiceBearerToken”

Figure 36. Screenshot: IAM visual editor with GetServiceBearerToken in search and action selected.

Figure 36. Screenshot: IAM visual editor with GetServiceBearerToken in search and action selected.

Click on Review, add a name then click on Create policy

Figure 37. Screenshot: Review page and Create policy button.

Figure 37. Screenshot: Review page and Create policy button.

You should see the new inline policy added to the list

Figure 38. Screenshot: shows the new in-line policy in the list.

Figure 38. Screenshot: shows the new in-line policy in the list.

For CodeArtifact actions we will do the same on that role, click on Create inline policy

Figure 39. Screenshot: attach policies.

Figure 39. Screenshot: attach policies.

Search for CodeArtifact in the services then select CodeArtifact

Figure 40. Screenshot: select service with CodeArtifact in search.

Figure 40. Screenshot: select service with CodeArtifact in search.

Search for “GetAuthorizationToken” in actions and select that action in the check box

Figure 41. CodeArtifact: with GetAuthorizationToken in search.

Figure 41. CodeArtifact: with GetAuthorizationToken in search.

Repeat for “GetRepositoryEndpoint” and “ReadFromRepository”

Click on Resources to fix the 2 warnings, then click on Add ARN on the first one “Specify domain resource ARN for the GetAuthorizationToken action.”

Figure 42. Screenshot: with all selected filed and 2 warnings.

Figure 42. Screenshot: with all selected filed and 2 warnings.

You’ll get a pop up with fields for Region, Account and Domain name, enter your region, your account number, and the domain name, we used “private” when we created our domain earlier.

Figure 43. Screenshot: Add ARN page.

Figure 43. Screenshot: Add ARN page.

Then click Add

Repeat the same process for “Specify repository resource ARN for the ReadFromRepository and 1 more”, and this time we will provide Region, Account ID, Domain name and Repository name, we used “Private” for the repository we created earlier and “private” for domain

Figure 44. Screenshot: add ARN page.

Figure 44. Screenshot: add ARN page.

Note it is best practice to specify the resource we are targeting, we can use the checkbox for “Any” but we want to narrow the scope of our IAM role best we can.

  1. Navigate to CodeCommit then click on the repo you created earlier in step1
Figure 45. Screenshot: CodeCommit repo.

Figure 45. Screenshot: CodeCommit repo.

Click on Add file dropdown, then Create file button

Paste the following in the editor space:

{
  "dependencies": {
    "mathjs": "^11.2.0"
  }
}

Name the file “package.json”

Add your name and email, and optional commit message

Repeat this process for “index.js” and paste the following in the editor space:

const { sqrt } = require('mathjs')
console.log(sqrt(49).toString())

Figure 46. Screenshot: CodeCommit Commit changes button.

Figure 46. Screenshot: CodeCommit Commit changes button.


This will force the pipeline to kick off and start building the application

Figure 47. Screenshot: CodePipeline.

Figure 47. Screenshot: CodePipeline.

This is a very simple application that gets the square root of 49 and log it to the screen, if you click on the Details link from the pipeline build stage, you’ll see the output of running the NodeJS application, the logs are stored in CloudWatch and you can navigate there by clicking on the link the View entire log “Showing the last xx lines of the build log. View entire log”

Figure 48. Screenshot: Showing the last 54 lines of the build log. View entire log.

Figure 48. Screenshot: Showing the last 54 lines of the build log. View entire log.

We used npm example in the buildspec.yml above, Similar setup will be used for pip and twine,

For Maven, Gradle, and NuGet, you must set Environment variables and change your settings.xml and build.gradle, as well as install the plugin for your IDE. For more information, see here.

Cleanup

Navigate to VPC endpoint from the AWS console and delete the endpoints that you created.

Navigate to CodePipeline and delete the Pipeline you created.

Navigate to CodeBuild and delete the Build Project created.

Navigate to CodeCommit and delete the Repository you created.

Navigate to CodeArtifact and delete the Repository and the domain you created.

Navigate to IAM and delete the Roles created:

For CodeBuild: codebuild-<Build Project Name>-service-role

For CodePipeline: AWSCodePipelineServiceRole-<Region>-<Project Name>

Conclusion

In this post, we deployed a full CI/CD pipeline with CodePipeline orchestrating CodeBuild to build and test a small NodeJS application, using CodeArtifact to download the application code dependencies. All without going to the public internet and maintaining the logs in CloudWatch.

About the author:

MJ Kubba

MJ Kubba is a Solutions Architect who enjoys working with public sector customers to build solutions that meet their business needs. MJ has over 15 years of experience designing and implementing software solutions. He has a keen passion for DevOps and cultural transformation.

How to query and visualize Macie sensitive data discovery results with Athena and QuickSight

Post Syndicated from Keith Rozario original https://aws.amazon.com/blogs/security/how-to-query-and-visualize-macie-sensitive-data-discovery-results-with-athena-and-quicksight/

Amazon Macie is a fully managed data security service that uses machine learning and pattern matching to help you discover and protect sensitive data in Amazon Simple Storage Service (Amazon S3). With Macie, you can analyze objects in your S3 buckets to detect occurrences of sensitive data, such as personally identifiable information (PII), financial information, personal health information, and access credentials.

In this post, we walk you through a solution to gain comprehensive and organization-wide visibility into which types of sensitive data are present in your S3 storage, where the data is located, and how much is present. Once enabled, Macie automatically starts discovering sensitive data in your S3 storage and builds a sensitive data profile for each bucket. The profiles are organized in a visual, interactive data map, and you can use the data map to run targeted sensitive data discovery jobs. Both automated data discovery and targeted jobs produce rich, detailed sensitive data discovery results. This solution uses Amazon Athena and Amazon QuickSight to deep-dive on the Macie results, and to help you analyze, visualize, and report on sensitive data discovered by Macie, even when the data is distributed across millions of objects, thousands of S3 buckets, and thousands of AWS accounts. Athena is an interactive query service that makes it simpler to analyze data directly in Amazon S3 using standard SQL. QuickSight is a cloud-scale business intelligence tool that connects to multiple data sources, including Athena databases and tables.

This solution is relevant to data security, data governance, and security operations engineering teams.

The challenge: how to summarize sensitive data discovered in your growing S3 storage

Macie issues findings when an object is found to contain sensitive data. In addition to findings, Macie keeps a record of each S3 object analyzed in a bucket of your choice for long-term storage. These records are known as sensitive data discovery results, and they include additional context about your data in Amazon S3. Due to the large size of the results file, Macie exports the sensitive data discovery results to an S3 bucket, so you need to take additional steps to query and visualize the results. We discuss the differences between findings and results in more detail later in this post.

With the increasing number of data privacy guidelines and compliance mandates, customers need to scale their monitoring to encompass thousands of S3 buckets across their organization. The growing volume of data to assess, and the growing list of findings from discovery jobs, can make it difficult to review and remediate issues in a timely manner. In addition to viewing individual findings for specific objects, customers need a way to comprehensively view, summarize, and monitor sensitive data discovered across their S3 buckets.

To illustrate this point, we ran a Macie sensitive data discovery job on a dataset created by AWS. The dataset contains about 7,500 files that have sensitive information, and Macie generated a finding for each sensitive file analyzed, as shown in Figure 1.

Figure 1: Macie findings from the dataset

Figure 1: Macie findings from the dataset

Your security team could spend days, if not months, analyzing these individual findings manually. Instead, we outline how you can use Athena and QuickSight to query and visualize the Macie sensitive data discovery results to understand your data security posture.

The additional information in the sensitive data discovery results will help you gain comprehensive visibility into your data security posture. With this visibility, you can answer questions such as the following:

  • What are the top 5 most commonly occurring sensitive data types?
  • Which AWS accounts have the most findings?
  • How many S3 buckets are affected by each of the sensitive data types?

Your security team can write their own customized queries to answer questions such as the following:

  • Is there sensitive data in AWS accounts that are used for development purposes?
  • Is sensitive data present in S3 buckets that previously did not contain sensitive information?
  • Was there a change in configuration for S3 buckets containing the greatest amount of sensitive data?

How are findings different from results?

As a Macie job progresses, it produces two key types of output: sensitive data findings (or findings for short), and sensitive data discovery results (or results).

Findings provide a report of potential policy violations with an S3 bucket, or the presence of sensitive data in a specific S3 object. Each finding provides a severity rating, information about the affected resource, and additional details, such as when Macie found the issue. Findings are published to the Macie console, AWS Security Hub, and Amazon EventBridge.

In contrast, results are a collection of records for each S3 object that a Macie job analyzed. These records contain information about objects that do and do not contain sensitive data, including up to 1,000 occurrences of each sensitive data type that Macie found in a given object, and whether Macie was unable to analyze an object because of issues such as permissions settings or use of an unsupported format. If an object contains sensitive data, the results record includes detailed information that isn’t available in the finding for the object.

One of the key benefits of querying results is to uncover gaps in your data protection initiatives—these gaps can occur when data in certain buckets can’t be analyzed because Macie was denied access to those buckets, or was unable to decrypt specific objects. The following table maps some of the key differences between findings and results.

Findings Results
Enabled by default Yes No
Location of published results Macie console, Security Hub, and EventBridge S3 bucket
Details of S3 objects that couldn’t be scanned No Yes
Details of S3 objects in which no sensitive data was found No Yes
Identification of files inside compressed archives that contain sensitive data No Yes
Number of occurrences reported per object Up to 15 Up to 1,000
Retention period 90 days in Macie console Defined by customer

Architecture

As shown in Figure 2, you can build out the solution in three steps:

  1. Enable the results and publish them to an S3 bucket
  2. Build out the Athena table to query the results by using SQL
  3. Visualize the results with QuickSight
Figure 2: Architecture diagram showing the flow of the solution

Figure 2: Architecture diagram showing the flow of the solution

Prerequisites

To implement the solution in this blog post, you must first complete the following prerequisites:

Figure 3: Sample data loaded into three different AWS accounts

Figure 3: Sample data loaded into three different AWS accounts

Note: All data in this blog post has been artificially created by AWS for demonstration purposes and has not been collected from any individual person. Similarly, such data does not, nor is it intended, to relate back to any individual person.

Step 1: Enable the results and publish them to an S3 bucket

Publication of the discovery results to Amazon S3 is not enabled by default. The setup requires that you specify an S3 bucket to store the results (we also refer to this as the discovery results bucket), and use an AWS Key Management Service (AWS KMS) key to encrypt the bucket.

If you are analyzing data across multiple accounts in your organization, then you need to enable the results in your delegated Macie administrator account. You do not need to enable results in individual member accounts. However, if you’re running Macie jobs in a standalone account, then you should enable the Macie results directly in that account.

To enable the results

  1. Open the Macie console.
  2. Select the AWS Region from the upper right of the page.
  3. From the left navigation pane, select Discovery results.
  4. Select Configure now.
  5. Select Create Bucket, and enter a unique bucket name. This will be the discovery results bucket name. Make note of this name because you will use it when you configure the Athena tables later in this post.
  6. Under Encryption settings, select Create new key. This takes you to the AWS KMS console in a new browser tab.
  7. In the AWS KMS console, do the following:
    1. For Key type, choose symmetric, and for Key usage, choose Encrypt and Decrypt.
    2. Enter a meaningful key alias (for example, macie-results-key) and description.
    3. (Optional) For simplicity, set your current user or role as the Key Administrator.
    4. Set your current user/role as a user of this key in the key usage permissions step. This will give you the right permissions to run the Athena queries later.
    5. Review the settings and choose Finish.
  8. Navigate to the browser tab with the Macie console.
  9. From the AWS KMS Key dropdown, select the new key.
  10. To view KMS key policy statements that were automatically generated for your specific key, account, and Region, select View Policy. Copy these statements in their entirety to your clipboard.
  11. Navigate back to the browser tab with the AWS KMS console and then do the following:
    1. Select Customer managed keys.
    2. Choose the KMS key that you created, choose Switch to policy view, and under Key policy, select Edit.
    3. In the key policy, paste the statements that you copied. When you add the statements, do not delete any existing statements and make sure that the syntax is valid. Policies are in JSON format.
  12. Navigate back to the Macie console browser tab.
  13. Review the inputs in the Settings page for Discovery results and then choose Save. Macie will perform a check to make sure that it has the right access to the KMS key, and then it will create a new S3 bucket with the required permissions.
  14. If you haven’t run a Macie discovery job in the last 90 days, you will need to run a new discovery job to publish the results to the bucket.

In this step, you created a new S3 bucket and KMS key that you are using only for Macie. For instructions on how to enable and configure the results using existing resources, see Storing and retaining sensitive data discovery results with Amazon Macie. Make sure to review Macie pricing details before creating and running a sensitive data discovery job.

Step 2: Build out the Athena table to query the results using SQL

Now that you have enabled the discovery results, Macie will begin publishing them into your discovery results bucket in the form of jsonl.gz files. Depending on the amount of data, there could be thousands of individual files, with each file containing multiple records. To identify the top five most commonly occurring sensitive data types in your organization, you would need to query all of these files together.

In this step, you will configure Athena so that it can query the results using SQL syntax. Before you can run an Athena query, you must specify a query result bucket location in Amazon S3. This is different from the Macie discovery results bucket that you created in the previous step.

If you haven’t set up Athena previously, we recommend that you create a separate S3 bucket, and specify a query result location using the Athena console. After you’ve set up the query result location, you can configure Athena.

To create a new Athena database and table for the Macie results

  1. Open the Athena console, and in the query editor, enter the following data definition language (DDL) statement. In the context of SQL, a DDL statement is a syntax for creating and modifying database objects, such as tables. For this example, we named our database macie_results.
    CREATE DATABASE macie_results;
    

    After running this step, you’ll see a new database in the Database dropdown. Make sure that the new macie_results database is selected for the next queries.

    Figure 4: Create database in the Athena console

    Figure 4: Create database in the Athena console

  2. Create a table in the database by using the following DDL statement. Make sure to replace <RESULTS-BUCKET-NAME> with the name of the discovery results bucket that you created previously.
    CREATE EXTERNAL TABLE maciedetail_all_jobs(
    	accountid string,
    	category string,
    	classificationdetails struct<jobArn:string,result:struct<status:struct<code:string,reason:string>,sizeClassified:string,mimeType:string,sensitiveData:array<struct<category:string,totalCount:string,detections:array<struct<type:string,count:string,occurrences:struct<lineRanges:array<struct<start:string,`end`:string,`startColumn`:string>>,pages:array<struct<pageNumber:string>>,records:array<struct<recordIndex:string,jsonPath:string>>,cells:array<struct<row:string,`column`:string,`columnName`:string,cellReference:string>>>>>>>,customDataIdentifiers:struct<totalCount:string,detections:array<struct<arn:string,name:string,count:string,occurrences:struct<lineRanges:array<struct<start:string,`end`:string,`startColumn`:string>>,pages:array<string>,records:array<string>,cells:array<string>>>>>>,detailedResultsLocation:string,jobId:string>,
    	createdat string,
    	description string,
    	id string,
    	partition string,
    	region string,
    	resourcesaffected struct<s3Bucket:struct<arn:string,name:string,createdAt:string,owner:struct<displayName:string,id:string>,tags:array<string>,defaultServerSideEncryption:struct<encryptionType:string,kmsMasterKeyId:string>,publicAccess:struct<permissionConfiguration:struct<bucketLevelPermissions:struct<accessControlList:struct<allowsPublicReadAccess:boolean,allowsPublicWriteAccess:boolean>,bucketPolicy:struct<allowsPublicReadAccess:boolean,allowsPublicWriteAccess:boolean>,blockPublicAccess:struct<ignorePublicAcls:boolean,restrictPublicBuckets:boolean,blockPublicAcls:boolean,blockPublicPolicy:boolean>>,accountLevelPermissions:struct<blockPublicAccess:struct<ignorePublicAcls:boolean,restrictPublicBuckets:boolean,blockPublicAcls:boolean,blockPublicPolicy:boolean>>>,effectivePermission:string>>,s3Object:struct<bucketArn:string,key:string,path:string,extension:string,lastModified:string,eTag:string,serverSideEncryption:struct<encryptionType:string,kmsMasterKeyId:string>,size:string,storageClass:string,tags:array<string>,embeddedFileDetails:struct<filePath:string,fileExtension:string,fileSize:string,fileLastModified:string>,publicAccess:boolean>>,
    	schemaversion string,
    	severity struct<description:string,score:int>,
    	title string,
    	type string,
    	updatedat string)
    ROW FORMAT SERDE
    	'org.openx.data.jsonserde.JsonSerDe'
    WITH SERDEPROPERTIES (
    	'paths'='accountId,category,classificationDetails,createdAt,description,id,partition,region,resourcesAffected,schemaVersion,severity,title,type,updatedAt')
    STORED AS INPUTFORMAT
    	'org.apache.hadoop.mapred.TextInputFormat'
    OUTPUTFORMAT
    	'org.apache.hadoop.hive.ql.io.HiveIgnoreKeyTextOutputFormat'
    LOCATION
    	's3://<RESULTS-BUCKET-NAME>/AWSLogs/'
    

    After you complete this step, you will see a new table named maciedetail_all_jobs in the Tables section of the query editor.

  3. Query the results to start gaining insights. For example, to identify the top five most common sensitive data types, run the following query:
    select sensitive_data.category,
    	detections_data.type,
    	sum(cast(detections_data.count as INT)) total_detections
    from maciedetail_all_jobs,
    	unnest(classificationdetails.result.sensitiveData) as t(sensitive_data),
    	unnest(sensitive_data.detections) as t(detections_data)
    where classificationdetails.result.sensitiveData is not null
    and resourcesaffected.s3object.embeddedfiledetails is null
    group by sensitive_data.category, detections_data.type
    order by total_detections desc
    LIMIT 5
    

    Running this query on the sample dataset gives the following output.

    Results of a query showing the five most common sensitive data types in the dataset

    Figure 5: Results of a query showing the five most common sensitive data types in the dataset

  4. (Optional) The previous query ran on all of the results available for Macie. You can further query which accounts have the greatest amount of sensitive data detected.
    select accountid,
    	sum(cast(detections_data.count as INT)) total_detections
    from maciedetail_all_jobs,
    	unnest(classificationdetails.result.sensitiveData) as t(sensitive_data),
    	unnest(sensitive_data.detections) as t(detections_data)
    where classificationdetails.result.sensitiveData is not null
    and resourcesaffected.s3object.embeddedfiledetails is null
    group by accountid
    order by total_detections desc
    

    To test this query, we distributed the synthetic dataset across three member accounts in our organization, ran the query, and received the following output. If you enable Macie in just a single account, then you will only receive results for that one account.

    Figure 6: Query results for total number of sensitive data detections across all accounts in an organization

    Figure 6: Query results for total number of sensitive data detections across all accounts in an organization

For a list of more example queries, see the amazon-macie-results-analytics GitHub repository.

Step 3: Visualize the results with QuickSight

In the previous step, you used Athena to query your Macie discovery results. Although the queries were powerful, they only produced tabular data as their output. In this step, you will use QuickSight to visualize the results of your Macie jobs.

Before creating the visualizations, you first need to grant QuickSight the right permissions to access Athena, the results bucket, and the KMS key that you used to encrypt the results.

To allow QuickSight access to the KMS key

  1. Open the AWS Identity and Access Management (IAM) console, and then do the following:
    1. In the navigation pane, choose Roles.
    2. In the search pane for roles, search for aws-quicksight-s3-consumers-role-v0. If this role does not exist, search for aws-quicksight-service-role-v0.
    3. Select the role and copy the role ARN. You will need this role ARN to modify the KMS key policy to grant permissions for this role.
  2. Open the AWS KMS console and then do the following:
    1. Select Customer managed keys.
    2. Choose the KMS key that you created.
    3. Paste the following statement in the key policy. When you add the statement, do not delete any existing statements, and make sure that the syntax is valid. Replace <QUICKSIGHT_SERVICE_ROLE_ARN> and <KMS_KEY_ARN> with your own information. Policies are in JSON format.
	{ "Sid": "Allow Quicksight Service Role to use the key",
		"Effect": "Allow",
		"Principal": {
			"AWS": <QUICKSIGHT_SERVICE_ROLE_ARN>
		},
		"Action": "kms:Decrypt",
		"Resource": <KMS_KEY_ARN>
	}

To allow QuickSight access to Athena and the discovery results S3 bucket

  1. In QuickSight, in the upper right, choose your user icon to open the profile menu, and choose US East (N.Virginia). You can only modify permissions in this Region.
  2. In the upper right, open the profile menu again, and select Manage QuickSight.
  3. Select Security & permissions.
  4. Under QuickSight access to AWS services, choose Manage.
  5. Make sure that the S3 checkbox is selected, click on Select S3 buckets, and then do the following:
    1. Choose the discovery results bucket.
    2. You do not need to check the box under Write permissions for Athena workgroup. The write permissions are not required for this post.
    3. Select Finish.
  6. Make sure that the Amazon Athena checkbox is selected.
  7. Review the selections and be careful that you don’t inadvertently disable AWS services and resources that other users might be using.
  8. Select Save.
  9. In QuickSight, in the upper right, open the profile menu, and choose the Region where your results bucket is located.

Now that you’ve granted QuickSight the right permissions, you can begin creating visualizations.

To create a new dataset referencing the Athena table

  1. On the QuickSight start page, choose Datasets.
  2. On the Datasets page, choose New dataset.
  3. From the list of data sources, select Athena.
  4. Enter a meaningful name for the data source (for example, macie_datasource) and choose Create data source.
  5. Select the database that you created in Athena (for example, macie_results).
  6. Select the table that you created in Athena (for example, maciedetail_all_jobs), and choose Select.
  7. You can either import the data into SPICE or query the data directly. We recommend that you use SPICE for improved performance, but the visualizations will still work if you query the data directly.
  8. To create an analysis using the data as-is, choose Visualize.

You can then visualize the Macie results in the QuickSight console. The following example shows a delegated Macie administrator account that is running a visualization, with account IDs on the y axis and the count of affected resources on the x axis.

Figure 7: Visualize query results to identify total number of sensitive data detections across accounts in an organization

Figure 7: Visualize query results to identify total number of sensitive data detections across accounts in an organization

You can also visualize the aggregated data in QuickSight. For example, you can view the number of findings for each sensitive data category in each S3 bucket. The Athena table doesn’t provide aggregated data necessary for visualization. Instead, you need to query the table and then visualize the output of the query.

To query the table and visualize the output in QuickSight

  1. On the Amazon QuickSight start page, choose Datasets.
  2. On the Datasets page, choose New dataset.
  3. Select the data source that you created in Athena (for example, macie_datasource) and then choose Create Dataset.
  4. Select the database that you created in Athena (for example, macie_results).
  5. Choose Use Custom SQL, enter the following query below, and choose Confirm Query.
    	select resourcesaffected.s3bucket.name as bucket_name,
    		sensitive_data.category,
    		detections_data.type,
    		sum(cast(detections_data.count as INT)) total_detections
    	from macie_results.maciedetail_all_jobs,
    		unnest(classificationdetails.result.sensitiveData) as t(sensitive_data),unnest(sensitive_data.detections) as t(detections_data)
    where classificationdetails.result.sensitiveData is not null
    and resourcesaffected.s3object.embeddedfiledetails is null
    group by resourcesaffected.s3bucket.name, sensitive_data.category, detections_data.type
    order by total_detections desc
    	

  6. You can either import the data into SPICE or query the data directly.
  7. To create an analysis using the data as-is, choose Visualize.

Now you can visualize the output of the query that aggregates data across your S3 buckets. For example, we used the name of the S3 bucket to group the results, and then we created a donut chart of the output, as shown in Figure 6.

Figure 8: Visualize query results for total number of sensitive data detections across each S3 bucket in an organization

Figure 8: Visualize query results for total number of sensitive data detections across each S3 bucket in an organization

From the visualizations, we can identify which buckets or accounts in our organizations contain the most sensitive data, for further action. Visualizations can also act as a dashboard to track remediation.

If you encounter permissions issues, see Insufficient permissions when using Athena with Amazon QuickSight and Troubleshooting key access for troubleshooting steps.

You can replicate the preceding steps by using the sample queries from the amazon-macie-results-analytics GitHub repo to view data that is aggregated across S3 buckets, AWS accounts, or individual Macie jobs. Using these queries with the results of your Macie results will help you get started with tracking the security posture of your data in Amazon S3.

Conclusion

In this post, you learned how to enable sensitive data discovery results for Macie, query those results with Athena, and visualize the results in QuickSight.

Because Macie sensitive data discovery results provide more granular data than the findings, you can pursue a more comprehensive incident response when sensitive data is discovered. The sample queries in this post provide answers to some generic questions that you might have. After you become familiar with the structure, you can run other interesting queries on the data.

We hope that you can use this solution to write your own queries to gain further insights into sensitive data discovered in S3 buckets, according to the business needs and regulatory requirements of your organization. You can consider using this solution to better understand and identify data security risks that need immediate attention. For example, you can use this solution to answer questions such as the following:

  • Is financial information present in an AWS account where it shouldn’t be?
  • Are S3 buckets that contain PII properly hardened with access controls and encryption?

You can also use this solution to understand gaps in your data security initiatives by tracking files that Macie couldn’t analyze due to encryption or permission issues. To further expand your knowledge of Macie capabilities and features, see the following resources:

If you have feedback about this post, submit comments in the Comments section below. If you have questions about this post, start a new thread on Amazon Macie re:Post.

Want more AWS Security news? Follow us on Twitter.

Author

Keith Rozario

Keith is a Sr. Solution Architect at Amazon Web Services based in Singapore, where he helps customers develop solutions for their most complex business problems. He loves road cycling, reading comics from DC, and enjoying the sweet sound of music from AC/DC.

Author

Scott Ward

Scott is a Principal Solutions Architect with AWS External Security Services (ESS) and has been with Amazon for over 20 years. Scott provides technical guidance to the ESS services, such as GuardDuty, Security Hub, Macie, Inspector and Detective, and helps customers make their applications secure. Scott has a deep background in supporting, enhancing, and building global financial solutions to meet the needs of large companies, including many years of supporting the global financial systems for Amazon.com.

Author

Koulick Ghosh

Koulick is a Senior Product Manager in AWS Security based in Seattle, WA. He loves speaking with customers on how AWS Security services can help make them more secure. In his free-time, he enjoys playing the guitar, reading, and exploring the Pacific Northwest.

AWS CIRT announces the release of five publicly available workshops

Post Syndicated from Steve de Vera original https://aws.amazon.com/blogs/security/aws-cirt-announces-the-release-of-five-publicly-available-workshops/

Greetings from the AWS Customer Incident Response Team (CIRT)! AWS CIRT is dedicated to supporting customers during active security events on the customer side of the AWS Shared Responsibility Model.

Over the past year, AWS CIRT has responded to hundreds of such security events, including the unauthorized use of AWS Identity and Access Management (IAM) credentials, ransomware and data deletion in an AWS account, and billing increases due to the creation of unauthorized resources to mine cryptocurrency.

We are excited to release five workshops that simulate these security events to help you learn the tools and procedures that AWS CIRT uses on a daily basis to detect, investigate, and respond to such security events. The workshops cover AWS services and tools, such as Amazon GuardDuty, Amazon CloudTrail, Amazon CloudWatch, Amazon Athena, and AWS WAF, as well as some open source tools written and published by AWS CIRT.

To access the workshops, you just need an AWS account, an internet connection, and the desire to learn more about incident response in the AWS Cloud! Choose the following links to access the workshops.

Unauthorized IAM Credential Use – Security Event Simulation and Detection

During this workshop, you will simulate the unauthorized use of IAM credentials by using a script invoked within AWS CloudShell. The script will perform reconnaissance and privilege escalation activities that have been commonly seen by AWS CIRT and that are typically performed during similar events of this nature. You will also learn some tools and processes that AWS CIRT uses, and how to use these tools to find evidence of unauthorized activity by using IAM credentials.

Ransomware on S3 – Security Event Simulation and Detection

During this workshop, you will use an AWS CloudFormation template to replicate an environment with multiple IAM users and five Amazon Simple Storage Service (Amazon S3) buckets. AWS CloudShell will then run a bash script that simulates data exfiltration and data deletion events that replicate a ransomware-based security event. You will also learn the tools and processes that AWS CIRT uses to respond to similar events, and how to use these tools to find evidence of unauthorized S3 bucket and object deletions.

Cryptominer Based Security Events – Simulation and Detection

During this workshop, you will simulate a cryptomining security event by using a CloudFormation template to initialize three Amazon Elastic Compute Cloud (Amazon EC2) instances. These EC2 instances will mimic cryptomining activity by performing DNS requests to known cryptomining domains. You will also learn the tools and processes that AWS CIRT uses to respond to similar events, and how to use these tools to find evidence of unauthorized creation of EC2 instances and communication with known cryptomining domains.

SSRF on IMDSv1 – Simulation and Detection

During this workshop, you will simulate the unauthorized use of a web application that is hosted on an EC2 instance configured to use Instance Metadata Service Version 1 (IMDSv1) and vulnerable to server side request forgery (SSRF). You will learn how web application vulnerabilities, such as SSRF, can be used to obtain credentials from an EC2 instance. You will also learn the tools and processes that AWS CIRT uses to respond to this type of access, and how to use these tools to find evidence of the unauthorized use of EC2 instance credentials through web application vulnerabilities such as SSRF.

AWS CIRT Toolkit For Automating Incident Response Preparedness

During this workshop, you will install and experiment with some common tools and utilities that AWS CIRT uses on a daily basis to detect security misconfigurations, respond to active events, and assist customers with protecting their infrastructure.

If you have feedback about this post, submit comments in the Comments section below. If you have questions about this post, contact AWS Support.

Want more AWS Security news? Follow us on Twitter.

Author

Steve de Vera

Steve is the Incident Response Watch Lead for the US Pacific region of the AWS CIRT. He is passionate about American-style BBQ and is a certified competition BBQ judge. He has a dog named Brisket.

Run a data processing job on Amazon EMR Serverless with AWS Step Functions

Post Syndicated from Siva Ramani original https://aws.amazon.com/blogs/big-data/run-a-data-processing-job-on-amazon-emr-serverless-with-aws-step-functions/

There are several infrastructure as code (IaC) frameworks available today, to help you define your infrastructure, such as the AWS Cloud Development Kit (AWS CDK) or Terraform by HashiCorp. Terraform, an AWS Partner Network (APN) Advanced Technology Partner and member of the AWS DevOps Competency, is an IaC tool similar to AWS CloudFormation that allows you to create, update, and version your AWS infrastructure. Terraform provides friendly syntax (similar to AWS CloudFormation) along with other features like planning (visibility to see the changes before they actually happen), graphing, and the ability to create templates to break infrastructure configurations into smaller chunks, which allows better maintenance and reusability. We use the capabilities and features of Terraform to build an API-based ingestion process into AWS. Let’s get started!

In this post, we showcase how to build and orchestrate a Scala Spark application using Amazon EMR Serverless, AWS Step Functions, and Terraform. In this end-to-end solution, we run a Spark job on EMR Serverless that processes sample clickstream data in an Amazon Simple Storage Service (Amazon S3) bucket and stores the aggregation results in Amazon S3.

With EMR Serverless, you don’t have to configure, optimize, secure, or operate clusters to run applications. You will continue to get the benefits of Amazon EMR, such as open source compatibility, concurrency, and optimized runtime performance for popular data frameworks. EMR Serverless is suitable for customers who want ease in operating applications using open-source frameworks. It offers quick job startup, automatic capacity management, and straightforward cost controls.

Solution overview

We provide the Terraform infrastructure definition and the source code for an AWS Lambda function using sample customer user clicks for online website inputs, which are ingested into an Amazon Kinesis Data Firehose delivery stream. The solution uses Kinesis Data Firehose to convert the incoming data into a Parquet file (an open-source file format for Hadoop) before pushing it to Amazon S3 using the AWS Glue Data Catalog. The generated output S3 Parquet file logs are then processed by an EMR Serverless process, which outputs a report detailing aggregate clickstream statistics in an S3 bucket. The EMR Serverless operation is triggered using Step Functions. The sample architecture and code are spun up as shown in the following diagram.

emr serverless application

The provided samples have the source code for building the infrastructure using Terraform for running the Amazon EMR application. Setup scripts are provided to create the sample ingestion using Lambda for the incoming application logs. For a similar ingestion pattern sample, refer to Provision AWS infrastructure using Terraform (By HashiCorp): an example of web application logging customer data.

The following are the high-level steps and AWS services used in this solution:

  • The provided application code is packaged and built using Apache Maven.
  • Terraform commands are used to deploy the infrastructure in AWS.
  • The EMR Serverless application provides the option to submit a Spark job.
  • The solution uses two Lambda functions:
    • Ingestion – This function processes the incoming request and pushes the data into the Kinesis Data Firehose delivery stream.
    • EMR Start Job – This function starts the EMR Serverless application. The EMR job process converts the ingested user click logs into output in another S3 bucket.
  • Step Functions triggers the EMR Start Job Lambda function, which submits the application to EMR Serverless for processing of the ingested log files.
  • The solution uses four S3 buckets:
    • Kinesis Data Firehose delivery bucket – Stores the ingested application logs in Parquet file format.
    • Loggregator source bucket – Stores the Scala code and JAR for running the EMR job.
    • Loggregator output bucket – Stores the EMR processed output.
    • EMR Serverless logs bucket – Stores the EMR process application logs.
  • Sample invoke commands (run as part of the initial setup process) insert the data using the ingestion Lambda function. The Kinesis Data Firehose delivery stream converts the incoming stream into a Parquet file and stores it in an S3 bucket.

For this solution, we made the following design decisions:

  • We use Step Functions and Lambda in this use case to trigger the EMR Serverless application. In a real-world use case, the data processing application could be long running and may exceed Lambda’s timeout limits. In this case, you can use tools like Amazon Managed Workflows for Apache Airflow (Amazon MWAA). Amazon MWAA is a managed orchestration service makes it easier to set up and operate end-to-end data pipelines in the cloud at scale.
  • The Lambda code and EMR Serverless log aggregation code are developed using Java and Scala, respectively. You can use any supported languages in these use cases.
  • The AWS Command Line Interface (AWS CLI) V2 is required for querying EMR Serverless applications from the command line. You can also view these from the AWS Management Console. We provide a sample AWS CLI command to test the solution later in this post.

Prerequisites

To use this solution, you must complete the following prerequisites:

  • Install the AWS CLI. For this post, we used version 2.7.18. This is required in order to query the aws emr-serverless AWS CLI commands from your local machine. Optionally, all the AWS services used in this post can be viewed and operated via the console.
  • Make sure to have Java installed, and JDK/JRE 8 is set in the environment path of your machine. For instructions, see the Java Development Kit.
  • Install Apache Maven. The Java Lambda functions are built using mvn packages and are deployed using Terraform into AWS.
  • Install the Scala Build Tool. For this post, we used version 1.4.7. Make sure to download and install based on your operating system needs.
  • Set up Terraform. For steps, see Terraform downloads. We use version 1.2.5 for this post.
  • Have an AWS account.

Configure the solution

To spin up the infrastructure and the application, complete the following steps:

  1. Clone the following GitHub repository.
    The provided exec.sh shell script builds the Java application JAR (for the Lambda ingestion function) and the Scala application JAR (for the EMR processing) and deploys the AWS infrastructure that is needed for this use case.
  2. Run the following commands:
    $ chmod +x exec.sh
    $ ./exec.sh

    To run the commands individually, set the application deployment Region and account number, as shown in the following example:

    $ APP_DIR=$PWD
    $ APP_PREFIX=clicklogger
    $ STAGE_NAME=dev
    $ REGION=us-east-1
    $ ACCOUNT_ID=$(aws sts get-caller-identity | jq -r '.Account')

    The following is the Maven build Lambda application JAR and Scala application package:

    $ cd $APP_DIR/source/clicklogger
    $ mvn clean package
    $ sbt reload
    $ sbt compile
    $ sbt package

  3. Deploy the AWS infrastructure using Terraform:
    $ terraform init
    $ terraform plan
    $ terraform apply --auto-approve

Test the solution

After you build and deploy the application, you can insert sample data for Amazon EMR processing. We use the following code as an example. The exec.sh script has multiple sample insertions for Lambda. The ingested logs are used by the EMR Serverless application job.

The sample AWS CLI invoke command inserts sample data for the application logs:

aws lambda invoke --function-name clicklogger-dev-ingestion-lambda —cli-binary-format raw-in-base64-out —payload '{"requestid":"OAP-guid-001","contextid":"OAP-ctxt-001","callerid":"OrderingApplication","component":"login","action":"load","type":"webpage"}' out

To validate the deployments, complete the following steps:

  1. On the Amazon S3 console, navigate to the bucket created as part of the infrastructure setup.
  2. Choose the bucket to view the files.
    You should see that data from the ingested stream was converted into a Parquet file.
  3. Choose the file to view the data.
    The following screenshot shows an example of our bucket contents.
    Now you can run Step Functions to validate the EMR Serverless application.
  4. On the Step Functions console, open clicklogger-dev-state-machine.
    The state machine shows the steps to run that trigger the Lambda function and EMR Serverless application, as shown in the following diagram.
  5. Run the state machine.
  6. After the state machine runs successfully, navigate to the clicklogger-dev-output-bucket on the Amazon S3 console to see the output files.
  7. Use the AWS CLI to check the deployed EMR Serverless application:
    $ aws emr-serverless list-applications \
          | jq -r '.applications[] | select(.name=="clicklogger-dev-loggregrator-emr-<Your-Account-Number>").id'

  8. On the Amazon EMR console, choose Serverless in the navigation pane.
  9. Select clicklogger-dev-studio and choose Manage applications.
  10. The Application created by the stack will be as shown below clicklogger-dev-loggregator-emr-<Your-Account-Number>
    Now you can review the EMR Serverless application output.
  11. On the Amazon S3 console, open the output bucket (us-east-1-clicklogger-dev-loggregator-output-).
    The EMR Serverless application writes the output based on the date partition, such as 2022/07/28/response.md.The following code shows an example of the file output:

    |*createdTime*|*callerid*|*component*|*count*
    |------------|-----------|-----------|-------
    *07-28-2022*|OrderingApplication|checkout|2
    *07-28-2022*|OrderingApplication|login|2
    *07-28-2022*|OrderingApplication|products|2

Clean up

The provided ./cleanup.sh script has the required steps to delete all the files from the S3 buckets that were created as part of this post. The terraform destroy command cleans up the AWS infrastructure that you created earlier. See the following code:

$ chmod +x cleanup.sh
$ ./cleanup.sh

To do the steps manually, you can also delete the resources via the AWS CLI:

# CLI Commands to delete the Amazon S3  

aws s3 rb s3://clicklogger-dev-emr-serverless-logs-bucket-<your-account-number> --force
aws s3 rb s3://clicklogger-dev-firehose-delivery-bucket-<your-account-number> --force
aws s3 rb s3://clicklogger-dev-loggregator-output-bucket-<your-account-number> --force
aws s3 rb s3://clicklogger-dev-loggregator-source-bucket-<your-account-number> --force

# Destroy the AWS Infrastructure 
terraform destroy --auto-approve

Conclusion

In this post, we built, deployed, and ran a data processing Spark job in EMR Serverless that interacts with various AWS services. We walked through deploying a Lambda function packaged with Java using Maven, and a Scala application code for the EMR Serverless application triggered with Step Functions with infrastructure as code. You can use any combination of applicable programming languages to build your Lambda functions and EMR job application. EMR Serverless can be triggered manually, automated, or orchestrated using AWS services like Step Functions and Amazon MWAA.

We encourage you to test this example and see for yourself how this overall application design works within AWS. Then, it’s just the matter of replacing your individual code base, packaging it, and letting EMR Serverless handle the process efficiently.

If you implement this example and run into any issues, or have any questions or feedback about this post, please leave a comment!

References


About the Authors

Sivasubramanian Ramani (Siva Ramani) is a Sr Cloud Application Architect at Amazon Web Services. His expertise is in application optimization & modernization, serverless solutions and using Microsoft application workloads with AWS.

Naveen Balaraman is a Sr Cloud Application Architect at Amazon Web Services. He is passionate about Containers, serverless Applications, Architecting Microservices and helping customers leverage the power of AWS cloud.

How to export AWS Security Hub findings to CSV format

Post Syndicated from Andy Robinson original https://aws.amazon.com/blogs/security/how-to-export-aws-security-hub-findings-to-csv-format/

AWS Security Hub is a central dashboard for security, risk management, and compliance findings from AWS Audit Manager, AWS Firewall Manager, Amazon GuardDuty, IAM Access Analyzer, Amazon Inspector, and many other AWS and third-party services. You can use the insights from Security Hub to get an understanding of your compliance posture across multiple AWS accounts. It is not unusual for a single AWS account to have more than a thousand Security Hub findings. Multi-account and multi-Region environments may have tens or hundreds of thousands of findings. With so many findings, it is important for you to get a summary of the most important ones. Navigating through duplicate findings, false positives, and benign positives can take time.

In this post, we demonstrate how to export those findings to comma separated values (CSV) formatted files in an Amazon Simple Storage Service (Amazon S3) bucket. You can analyze those files by using a spreadsheet, database applications, or other tools. You can use the CSV formatted files to change a set of status and workflow values to align with your organizational requirements, and update many or all findings at once in Security Hub.

The solution described in this post, called CSV Manager for Security Hub, uses an AWS Lambda function to export findings to a CSV object in an S3 bucket, and another Lambda function to update Security Hub findings by modifying selected values in the downloaded CSV file from an S3 bucket. You use an Amazon EventBridge scheduled rule to perform periodic exports (for example, once a week). CSV Manager for Security Hub also has an update function that allows you to update the workflow, customer-specific notation, and other customer-updatable values for many or all findings at once. If you’ve set up a Region aggregator in Security Hub, you should configure the primary CSV Manager for Security Hub stack to export findings only from the aggregator Region. However, you may configure other CSV Manager for Security Hub stacks that export findings from specific Regions or from all applicable Regions in specific accounts. This allows application and account owners to view their own Security Hub findings without having access to other findings for the organization.

How it works

CSV Manager for Security Hub has two main features:

  • Export Security Hub findings to a CSV object in an S3 bucket
  • Update Security Hub findings from a CSV object in an S3 bucket

Overview of the export function

The overview of the export function CsvExporter is shown in Figure 1.

Figure 1: Architecture diagram of the export function

Figure 1: Architecture diagram of the export function

Figure 1 shows the following numbered steps:

  1. In the AWS Management Console, you invoke the CsvExporter Lambda function with a test event.
  2. The export function calls the Security Hub GetFindings API action and gets a list of findings to export from Security Hub.
  3. The export function converts the most important fields to identify and sort findings to a 37-column CSV format (which includes 12 updatable columns) and writes to an S3 bucket.

Overview of the update function

To update existing Security Hub findings that you previously exported, you can use the update function CsvUpdater to modify the respective rows and columns of the CSV file you exported, as shown in Figure 2. There are 12 modifiable columns out of 37 (any changes to other columns are ignored), which are described in more detail in Step 3: View or update findings in the CSV file later in this post.

Figure 2: Architecture diagram of the update function

Figure 2 shows the following numbered steps:

Figure 2 shows the following numbered steps:

  1. You download the CSV file that the CsvExporter function generated from the S3 bucket and update as needed.
  2. You upload the CSV file that contains your updates to the S3 bucket.
  3. In the AWS Management Console, you invoke the CsvUpdater Lambda function with a test event containing the URI of the CSV file.
  4. CsvUpdater reads the updated CSV file from the S3 bucket.
  5. CsvUpdater identifies the minimum set of updates and invokes the Security Hub BatchUpdateFindings API action.

Step 1: Use the CloudFormation template to deploy the solution

You can set up and use CSV Manager for Security Hub by using either AWS CloudFormation or the AWS Cloud Development Kit (AWS CDK).

To deploy the solution (AWS CDK)

You can find the latest code in the aws-security-hub-csv-manager GitHub repository, where you can also contribute to the sample code. The following commands show how to deploy the solution by using the AWS CDK. First, the AWS CDK initializes your environment and uploads the AWS Lambda assets to an S3 bucket. Then, you deploy the solution to your account by using the following commands. Replace <INSERT_AWS_ACCOUNT> with your account number, and replace <INSERT_REGION> with the AWS Region that you want the solution deployed to, for example us-east-1.

cdk bootstrap aws://<INSERT_AWS_ACCOUNT>/<INSERT_REGION>
cdk deploy

To deploy the solution (CloudFormation)

  1. Choose the following Launch Stack button to open the AWS CloudFormation console pre-loaded with the template for this solution:

    Launch Stack

  2. In the Parameters section, as shown in Figure 3, enter your values.
    Figure 3: CloudFormation template variables

    Figure 3: CloudFormation template variables

    1. For What folder for CSV Manager for Security Hub Lambda code, leave the default Code. For What folder for CSV Manager for Security Hub exports, leave the default Findings.

      These are the folders within the S3 bucket that the CSV Manager for Security Hub CloudFormation template creates to store the Lambda code, as well as where the findings are exported by the Lambda function.

    2. For Frequency, for this solution you can leave the default value cron(0 8 ? * SUN *). This default causes automatic exports to occur every Sunday at 8:00 AM local time using an EventBridge scheduled rule. For more information about how to update this value to meet your needs, see Schedule Expressions for Rules in the Amazon CloudWatch Events User Guide.
    3. The values you enter for the Regions field depend on whether you have configured an aggregation Region in Security Hub.
      • If you have configured an aggregation Region, enter only that Region code, for example eu-north-1, as shown in Figure 3.
      • If you haven’t configured an aggregation Region, enter a comma-separated list of Regions in which you have enabled Security Hub, for example us-east-1, eu-west-1, eu-west-2.
      • If you would like to export findings from all Regions where Security Hub is enabled, leave the Regions field blank. Regions where Security Hub is not enabled will generate a message and will be skipped.
  3. Choose Next.

The CloudFormation stack deploys the necessary resources, including an EventBridge scheduling rule, AWS System Managers Automation documents, an S3 bucket, and Lambda functions for exporting and updating Security Hub findings.

After you deploy the CloudFormation stack

After you create the CSV Manager for Security Hub stack, you can do the following:

  1. Perform the export function to write some or all Security Hub findings to a CSV file by following the instructions in Step 2: Export Security Hub findings to a CSV file later in this post.
  2. Perform a bulk update of Security Hub findings by following the instructions in Step 3: View or update findings in the CSV file later in this post. You can make changes to one or more of the 12 updatable columns of the CSV file, and perform the update function to update some or all Security Hub findings.

Step 2: Export Security Hub findings to a CSV file

You can export Security Hub findings from the AWS Lambda console. To do this, you create a test event and invoke the CsvExporter Lambda function. CsvExporter exports all Security Hub findings from all applicable Regions to a single CSV file in the S3 bucket for CSV Manager for Security Hub.

To export Security Hub findings to a CSV file

  1. In the AWS Lambda console, find the CsvExporter Lambda function and select it.
  2. On the Code tab, choose the down arrow at the right of the Test button, as shown in Figure 4, and select Configure test event.
    Figure 4: The down arrow at the right of the Test button

    Figure 4: The down arrow at the right of the Test button

  3. To create an empty test event, on the Configure test event page, do the following:
    1. Choose Create a new event.
    2. Enter an event name; in this example we used testEvent.
    3. For Template, leave the default hello-world.
    4. For Event JSON, enter the JSON object {} as shown in Figure 5.
    Figure 5: Creating an empty test event

    Figure 5: Creating an empty test event

  4. Choose Save to save the empty test event.
  5. To invoke the Lambda function, choose the Test button, as shown in Figure 6.
    Figure 6: Test button to invoke the Lambda function

    Figure 6: Test button to invoke the Lambda function

  6. On the Execution Results tab, note the following details, which you will need for the next step.
    {
    "message": "Export succeeded", 
    "bucket": DOC-EXAMPLE-BUCKET,
    "exportKey”: DOC-EXAMPLE-OBJECT,
    "resultCode": 200
    }

  7. Locate the CSV object that matches the value of “exportKey” (in this example, DOC-EXAMPLE-OBJECT) in the S3 bucket that matches the value of “bucket” (in this example, DOC-EXAMPLE-BUCKET).

Now you can view or update the findings in the CSV file, as described in the next section.

Step 3: (Optional) Using filters to limit CSV results

In your test event, you can specify any filter that is accepted by the GetFindings API action. You do this by adding a filter key to your test event. The filter key can either contain the word HighActive (which is a predefined filter configured as a default for selecting active high-severity and critical findings, as shown in Figure 8), or a JSON filter object.

Figure 8 depicts an example JSON filter that performs the same filtering as the HighActive predefined filter.

To use filters to limit CSV results

  1. In the AWS Lambda console, find the CsvExporter Lambda function and select it.
  2. On the Code tab, choose the down arrow at the right of the Test button, as shown in Figure 7, and select Configure test event.
    Figure 7: The down arrow at the right of the Test button

    Figure 7: The down arrow at the right of the Test button

  3. To create a test event containing a filter, on the Configure test event page, do the following:
    1. Choose Create a new event.
    2. Enter an event name; in this example we used filterEvent.
    3. For Template, select testEvent,
    4. For Event JSON, enter the following JSON object, as shown in Figure 8.
      {
         "SeverityLabel":[
            {
               "Value":"CRITICAL",
               "Comparison":"EQUALS"
            },
            {
               "Value":"HIGH",
               "Comparison":"EQUALS"
            }
         ],
         "RecordState":[
            {
               "Comparison":"EQUALS",
               "Value":"ACTIVE"
            }
         ]
      }

      Figure 8: Test button to invoke the Lambda function

      Figure 8: Test button to invoke the Lambda function

    5. Choose Save.
  4. To invoke the Lambda function, choose the Test button as shown in Figure 9.
    Figure 9: Test button to invoke the Lambda function

    Figure 9: Test button to invoke the Lambda function

  5. On the Execution Results tab, note the following details, which you will need for the next step.
    {
    "message": "Export succeeded", 
    "bucket": DOC-EXAMPLE-BUCKET,
    "exportKey": DOC-EXAMPLE-OBJECT,
    "resultCode": 200
    }

  6. Locate the CSV object that matches the value of “exportKey” (in this example, DOC-EXAMPLE-OBJECT) in the S3 bucket that matches the value of “bucket” (in this example, DOC-EXAMPLE-BUCKET).

The results in this CSV file should be a filtered set of Security Hub findings according to the filter you specified above. You can now proceed to step 4 if you want to view or update findings.

Step 4: View or update findings in the CSV file

You can use any program that allows you to view or edit CSV files, such as Microsoft Excel. The first row in the CSV file are the column names. These column names correspond to fields in the JSON objects that are returned by the GetFindings API action.

Warning: Do not modify the first two columns, Id (column A) or ProductArn (column B). If you modify these columns, Security Hub will not be able to locate the finding to update, and any other changes to that finding will be discarded.

You can locally modify any of the columns in the CSV file, but only 12 columns out of 37 columns will actually be updated if you use CsvUpdater to update Security Hub findings. The following are the 12 columns you can update. These correspond to columns C through N in the CSV file.

Column name Spreadsheet column Description
Criticality C An integer value between 0 and 100.
Confidence D An integer value between 0 and 100.
NoteText E Any text you wish
NoteUpdatedBy F Automatically updated with your AWS principal user ID.
CustomerOwner* G Information identifying the owner of this finding (for example, email address).
CustomerIssue* H A Jira issue or another identifier tracking a specific issue.
CustomerTicket* I A ticket number or other trouble/problem tracking identification.
ProductSeverity** J A floating-point number from 0.0 to 99.9.
NormalizedSeverity** K An integer between 0 and 100.
SeverityLabel L One of the following:

  • INFORMATIONAL
  • LOW
  • MEDIUM
  • HIGH
  • HIGH
  • CRITICAL
VerificationState M One of the following:

  • UNKNOWN — Finding has not been verified yet.
  • TRUE_POSITIVE — This is a valid finding and should be treated as a risk.
  • FALSE_POSITIVE — This an incorrect finding and should be ignored or suppressed.
  • BENIGN_POSITIVE — This is a valid finding, but the risk is not applicable or has been accepted, transferred, or mitigated.
Workflow N One of the following:

  • NEW — This is a new finding that has not been reviewed.
  • NOTIFIED — The responsible party or parties have been notified of this finding.
  • RESOLVED — The finding has been resolved.
  • SUPPRESSED — A false or benign finding has been suppressed so that it does not appear as a current finding in Security Hub.

* These columns are stored inside the UserDefinedFields field of the updated findings. The column names imply a certain kind of information, but you can put any information you wish.

** These columns are stored inside the Severity field of the updated findings. These values have a fixed format and will be rejected if they do not meet that format.

Columns with fixed text values (L, M, N) in the previous table can be specified in mixed case and without underscores—they will be converted to all uppercase and underscores added in the CsvUpdater Lambda function. For example, “false positive” will be converted to “FALSE_POSITIVE”.

Step 5: Create a test event and update Security Hub by using the CSV file

If you want to update Security Hub findings, make your changes to columns C through N as described in the previous table. After you make your changes in the CSV file, you can update the findings in Security Hub by using the CSV file and the CsvUpdater Lambda function.

Use the following procedure to create a test event and run the CsvUpdater Lambda function.

To create a test event and run the CsvUpdater Lambda function

  1. In the AWS Lambda console, find the CsvUpdater Lambda function and select it.
  2. On the Code tab, choose the down arrow to the right of the Test button, as shown in Figure 10, and select Configure test event.
    Figure 10: The down arrow to the right of the Test button

    Figure 10: The down arrow to the right of the Test button

  3. To create a test event as shown in Figure 11, on the Configure test event page, do the following:
    1. Choose Create a new event.
    2. Enter an event name; in this example we used testEvent.
    3. For Template, leave the default hello-world.
    4. For Event JSON, enter the following:
      {
      "input": <s3ObjectUri>,
      "primaryRegion": <aggregationRegionName>
      }

      Replace <s3ObjectUri> with the full URI of the S3 object where the updated CSV file is located.

      Replace <aggregationRegionName> with your Security Hub aggregation Region, or the primary Region in which you initially enabled Security Hub.

      Figure 11: Create and save a test event for the CsvUpdater Lambda function

      Figure 11: Create and save a test event for the CsvUpdater Lambda function

  4. Choose Save.
  5. Choose the Test button, as shown in Figure 12, to invoke the Lambda function.
    Figure 12: Test button to invoke the Lambda function

    Figure 12: Test button to invoke the Lambda function

  6. To verify that the Lambda function ran successfully, on the Execution Results tab, review the results for “message”: “Success”, as shown in the following example. Note that the results may be thousands of lines long.
    {
    "message": "Success",
    "details": {
    "processed": [{"Id": arn:aws:securityhub:us-east-1: 111122223333:subscription/cis-aws-foundations-benchmark/v/1.2.0/1.7/finding/6d543b22-6a3d-405c-ae7f-224469bde7d2, "ProductArn": arn:aws:securityhub:us-east-1::product/aws/securityhub}, … ],
    "unprocessed": [],
    "message": "Updated succeeded",
    "success": true
    },
    "input": s3://DOC-EXAMPLE-BUCKET/DOC-EXAMPLE-OBJECT,
    "resultCode": 200
    }

    The processed array lists every successfully updated finding by Id and ProductArn.

    If any of the findings were not successfully updated, their Id and ProductArn appear in the unprocessed array. In the previous example, no findings were unprocessed.

    The value s3://DOC-EXAMPLE-BUCKET/DOC-EXAMPLE-OBJECT is the URI of the S3 object from which your updates were read.

Cleaning up

To avoid incurring future charges, first delete the CloudFormation stack that you deployed in Step 1: Use the CloudFormation template to deploy the solution. Next, you need to manually delete the S3 bucket deployed with the stack. For instructions, see Deleting a bucket in the Amazon Simple Storage Service User Guide.

Conclusion

In this post, we showed you how you can export Security Hub findings to a CSV file in an S3 bucket and update the exported findings by using CSV Manager for Security Hub. We showed you how you can automate this process by using AWS Lambda, Amazon S3, and AWS Systems Manager. Full documentation for CSV Manager for Security Hub is available in the aws-security-hub-csv-manager GitHub repository. You can also investigate other ways to manage Security Hub findings by checking out our blog posts about Security Hub integration with Amazon OpenSearch Service, Amazon QuickSight, Slack, PagerDuty, Jira, or ServiceNow.

If you have feedback about this post, submit comments in the Comments section below. If you have questions about this post, start a new thread on the Security Hub re:Post. To learn more or get started, visit AWS Security Hub.

Want more AWS Security news? Follow us on Twitter.

Andy Robinson

Andy Robinson

Andy wrote CSV Manager for Security Hub in response to requests from several customers. He is an AWS Professional Services Senior Security Consultant with over 30 years of security, software product management, and software design experience. Andy is also a pilot, scuba instructor, martial arts instructor, ham radio enthusiast, and photographer.

Murat Eksi

Murat Eksi

Murat is a full-stack technologist at AWS Professional Services. He has worked with various industries, including finance, sports, media, gaming, manufacturing, and automotive, to accelerate their business outcomes through application development, security, IoT, analytics, devops and infrastructure. Outside of work, he loves traveling around the world, learning new languages while setting up local events for entrepreneurs and business owners in Stockholm, or taking flight lessons.

Shikhar Mishra

Shikhar Mishra

Shikhar is a Senior Solutions Architect at Amazon Web Services. He is a cloud security enthusiast and enjoys helping customers design secure, reliable, and cost-effective solutions on AWS.

Rohan Raizada

Rohan Raizada

Rohan is a Solutions Architect for Amazon Web Services. He works with enterprises of all sizes with their cloud adoption to build scalable and secure solutions using AWS. During his free time, he likes to spend time with family and go cycling outdoors.

Jonathan Nguyen

Jonathan Nguyen

Jonathan is a Shared Delivery Team Senior Security Consultant at AWS. His background is in AWS Security with a focus on threat detection and incident response. Today, he helps enterprise customers develop a comprehensive security strategy and deploy security solutions at scale, and he trains customers on AWS Security best practices.

Top 2021 AWS service launches security professionals should review – Part 2

Post Syndicated from Marta Taggart original https://aws.amazon.com/blogs/security/top-2021-aws-service-launches-security-professionals-should-review-part-2/

In Part 1 of this two-part series, we shared an overview of some of the most important 2021 Amazon Web Services (AWS) Security service and feature launches. In this follow-up, we’ll dive deep into additional launches that are important for security professionals to be aware of and understand across all AWS services. There have already been plenty in the first half of 2022, so we’ll highlight those soon, as well.

AWS Identity

You can use AWS Identity Services to build Zero Trust architectures, help secure your environments with a robust data perimeter, and work toward the security best practice of granting least privilege. In 2021, AWS expanded the identity source options, AWS Region availability, and support for AWS services. There is also added visibility and power in the permission management system. New features offer new integrations, additional policy checks, and secure resource sharing across AWS accounts.

AWS Single Sign-On

For identity management, AWS Single Sign-On (AWS SSO) is where you create, or connect, your workforce identities in AWS once and manage access centrally across your AWS accounts in AWS Organizations. In 2021, AWS SSO announced new integrations for JumpCloud and CyberArk users. This adds to the list of providers that you can use to connect your users and groups, which also includes Microsoft Active Directory Domain Services, Okta Universal Directory, Azure AD, OneLogin, and Ping Identity.

AWS SSO expanded its availability to new Regions: AWS GovCloud (US), Europe (Paris), and South America (São Paulo) Regions. Another very cool AWS SSO development is its integration with AWS Systems Manager Fleet Manager. This integration enables you to log in interactively to your Windows servers running on Amazon Elastic Compute Cloud (Amazon EC2) while using your existing corporate identities—try it, it’s fantastic!

AWS Identity and Access Management

For access management, there have been a range of feature launches with AWS Identity and Access Management (IAM) that have added up to more power and visibility in the permissions management system. Here are some key examples.

IAM made it simpler to relate a user’s IAM role activity to their corporate identity. By setting the new source identity attribute, which persists through role assumption chains and gets logged in AWS CloudTrail, you can find out who is responsible for actions that IAM roles performed.

IAM added support for policy conditions, to help manage permissions for AWS services that access your resources. This important feature launch of service principal conditions helps you to distinguish between API calls being made on your behalf by a service principal, and those being made by a principal inside your account. You can choose to allow or deny the calls depending on your needs. As a security professional, you might find this especially useful in conjunction with the aws:CalledVia condition key, which allows you to scope permissions down to specify that this account principal can only call this API if they are calling it using a particular AWS service that’s acting on their behalf. For example, your account principal can’t generally access a particular Amazon Simple Storage Service (Amazon S3) bucket, but if they are accessing it by using Amazon Athena, they can do so. These conditions can also be used in service control policies (SCPs) to give account principals broader scope across an account, organizational unit, or organization; they need not be added to individual principal policies or resource policies.

Another very handy new IAM feature launch is additional information about the reason for an access denied error message. With this additional information, you can now see which of the relevant access control policies (for example, IAM, resource, SCP, or VPC endpoint) was the cause of the denial. As of now, this new IAM feature is supported by more than 50% of all AWS services in the AWS SDK and AWS Command Line Interface, and a fast-growing number in the AWS Management Console. We will continue to add support for this capability across services, as well as add more features that are designed to make the journey to least privilege simpler.

IAM Access Analyzer

AWS Identity and Access Management (IAM) Access Analyzer provides actionable recommendations to set secure and functional permissions. Access Analyzer introduced the ability to preview the impact of policy changes before deployment and added over 100 policy checks for correctness. Both of these enhancements are integrated into the console and are also available through APIs. Access Analyzer also provides findings for external access allowed by resource policies for many services, including a previous launch in which IAM Access Analyzer was directly integrated into the Amazon S3 management console.

IAM Access Analyzer also launched the ability to generate fine-grained policies based on analyzing past AWS CloudTrail activity. This feature provides a great new capability for DevOps teams or central security teams to scope down policies to just the permissions needed, making it simpler to implement least privilege permissions. IAM Access Analyzer launched further enhancements to expand policy checks, and the ability to generate a sample least-privilege policy from past activity was expanded beyond the account level to include an analysis of principal behavior within the entire organization by analyzing log activity stored in AWS CloudTrail.

AWS Resource Access Manager

AWS Resource Access Manager (AWS RAM) helps you securely share your resources across unrelated AWS accounts within your organization or organizational units (OUs) in AWS Organizations. Now you can also share your resources with IAM roles and IAM users for supported resource types. This update enables more granular access using managed permissions that you can use to define access to shared resources. In addition to the default managed permission defined for each shareable resource type, you now have more flexibility to choose which permissions to grant to whom for resource types that support additional managed permissions. Additionally, AWS RAM added support for global resource types, enabling you to provision a global resource once, and share that resource across your accounts. A global resource is one that can be used in multiple AWS Regions; the first example of a global resource is found in AWS Cloud WAN, currently in preview as of this publication. AWS RAM helps you more securely share an AWS Cloud WAN core network, which is a managed network containing AWS and on-premises networks. With AWS RAM global resource sharing, you can use the Cloud WAN core network to centrally operate a unified global network across Regions and accounts.

AWS Directory Service

AWS Directory Service for Microsoft Active Directory, also known as AWS Managed Microsoft Active Directory (AD), was updated to automatically provide domain controller and directory utilization metrics in Amazon CloudWatch for new and existing directories. Analyzing these utilization metrics helps you quantify your average and peak load times to identify the need for additional domain controllers. With this, you can define the number of domain controllers to meet your performance, resilience, and cost requirements.

Amazon Cognito

Amazon Cognito identity pools (federated identities) was updated to enable you to use attributes from social and corporate identity providers to make access control decisions and simplify permissions management in AWS resources. In Amazon Cognito, you can choose predefined attribute-tag mappings, or you can create custom mappings using the attributes from social and corporate providers’ access and ID tokens, or SAML assertions. You can then reference the tags in an IAM permissions policy to implement attribute-based access control (ABAC) and manage access to your AWS resources. Amazon Cognito also launched a new console experience for user pools and now supports targeted sign out through refresh token revocation.

Governance, control, and logging services

There were a number of important releases in 2021 in the areas of governance, control, and logging services.

AWS Organizations

AWS Organizations added a number of important import features and integrations during 2021. Security-relevant services like Amazon Detective, Amazon Inspector, and Amazon Virtual Private Cloud (Amazon VPC) IP Address Manager (IPAM), as well as others like Amazon DevOps Guru, launched integrations with Organizations. Others like AWS SSO and AWS License Manager upgraded their Organizations support by adding support for a Delegated Administrator account, reducing the need to use the management account for operational tasks. Amazon EC2 and EC2 Image Builder took advantage of the account grouping capabilities provided by Organizations to allow cross-account sharing of Amazon Machine Images (AMIs) (for more details, see the Amazon EC2 section later in this post). Organizations also got an updated console, increased quotas for tag policies, and provided support for the launch of an API that allows for programmatic creation and maintenance of AWS account alternate contacts, including the very important security contact (although that feature doesn’t require Organizations). For more information on the value of using the security contact for your accounts, see the blog post Update the alternate security contact across your AWS accounts for timely security notifications.

AWS Control Tower

2021 was also a good year for AWS Control Tower, beginning with an important launch of the ability to take over governance of existing OUs and accounts, as well as bulk update of new settings and guardrails with a single button click or API call. Toward the end of 2021, AWS Control Tower added another valuable enhancement that allows it to work with a broader set of customers and use cases, namely support for nested OUs within an organization.

AWS CloudFormation Guard 2.0

Another important milestone in 2021 for creating and maintaining a well-governed cloud environment was the re-launch of CloudFormation Guard as Cfn-Guard 2.0. This launch was a major overhaul of the Cfn-Guard domain-specific language (DSL), a DSL designed to provide the ability to test infrastructure-as-code (IaC) templates such as CloudFormation and Terraform to make sure that they conform with a set of constraints written in the DSL by a central team, such as a security organization or network management team.

This approach provides a powerful new middle ground between the older security models of prevention (which provide developers only an access denied message, and often can’t distinguish between an acceptable and an unacceptable use of the same API) and a detect and react model (when undesired states have already gone live). The Cfn-Guard 2.0 model gives builders the freedom to build with IaC, while allowing central teams to have the ability to reject infrastructure configurations or changes that don’t conform to central policies—and to do so with completely custom error messages that invite dialog between the builder team and the central team, in case the rule is unnuanced and needs to be refined, or if a specific exception needs to be created.

For example, a builder team might be allowed to provision and attach an internet gateway to a VPC, but the team can do this only if the routes to the internet gateway are limited to a certain pre-defined set of CIDR ranges, such as the public addresses of the organization’s branch offices. It’s not possible to write an IAM policy that takes into account the CIDR values of a VPC route table update, but you can write a Cfn-Guard 2.0 rule that allows the creation and use of an internet gateway, but only with a defined and limited set of IP addresses.

AWS Systems Manager Incident Manager

An important launch that security professionals should know about is AWS Systems Manager Incident Manager. Incident Manager provides a number of powerful capabilities for managing incidents of any kind, including operational and availability issues but also security issues. With Incident Manager, you can automatically take action when a critical issue is detected by an Amazon CloudWatch alarm or Amazon EventBridge event. Incident Manager runs pre-configured response plans to engage responders by using SMS and phone calls, can enable chat commands and notifications using AWS Chatbot, and runs automation workflows with AWS Systems Manager Automation runbooks. The Incident Manager console integrates with AWS Systems Manager OpsCenter to help you track incidents and post-incident action items from a central place that also synchronizes with third-party management tools such as Jira Service Desk and ServiceNow. Incident Manager enables cross-account sharing of incidents using AWS RAM, and provides cross-Region replication of incidents to achieve higher availability.

AWS CloudTrail

AWS CloudTrail added some great new logging capabilities in 2021, including logging data-plane events for Amazon DynamoDB and Amazon Elastic Block Store (Amazon EBS) direct APIs (direct APIs allow access to EBS snapshot content through a REST API). CloudTrail also got further enhancements to its machine-learning based CloudTrail Insights feature, including a new one called ErrorRate Insights.

Amazon S3

Amazon Simple Storage Service (Amazon S3) is one of the most important services at AWS, and its steady addition of security-related enhancements is always big news. Here are the 2021 highlights.

Access Points aliases

Amazon S3 introduced a new feature, Amazon S3 Access Points aliases. With Amazon S3 Access Points aliases, you can make the access points backwards-compatible with a large amount of existing code that is programmed to interact with S3 buckets rather than access points.

To understand the importance of this launch, we have to go back to 2019 to the launch of Amazon S3 Access Points. Access points are a powerful mechanism for managing S3 bucket access. They provide a great simplification for managing and controlling access to shared datasets in S3 buckets. You can create up to 1,000 access points per Region within each of your AWS accounts. Although bucket access policies remain fully enforced, you can delegate access control from the bucket to its access points, allowing for distributed and granular control. Each access point enforces a customizable policy that can be managed by a particular workgroup, while also avoiding the problem of bucket policies needing to grow beyond their maximum size. Finally, you can also bind an access point to a particular VPC for its lifetime, to prevent access directly from the internet.

With the 2021 launch of Access Points aliases, Amazon S3 now generates a unique DNS name, or alias, for each access point. The Access Points aliases look and acts just like an S3 bucket to existing code. This means that you don’t need to make changes to older code to use Amazon S3 Access Points; just substitute an Access Points aliases wherever you previously used a bucket name. As a security team, it’s important to know that this flexible and powerful administrative feature is backwards-compatible and can be treated as a drop-in replacement in your various code bases that use Amazon S3 but haven’t been updated to use access point APIs. In addition, using Access Points aliases adds a number of powerful security-related controls, such as permanent binding of S3 access to a particular VPC.

Bucket Keys

Amazon S3 launched support for S3 Inventory and S3 Batch Operations to identify and copy objects to use S3 Bucket Keys, which can help reduce the costs of server-side encryption (SSE) with AWS Key Management Service (AWS KMS).

S3 Bucket Keys were launched at the end of 2020, another great launch that security professionals should know about, so here is an overview in case you missed it. S3 Bucket Keys are data keys generated by AWS KMS to provide another layer of envelope encryption in which the outer layer (the S3 Bucket Key) is cached by S3 for a short period of time. This extra key layer increases performance and reduces the cost of requests to AWS KMS. It achieves this by decreasing the request traffic from Amazon S3 to AWS KMS from a one-to-one model—one request to AWS KMS for each object written to or read from Amazon S3—to a one-to-many model using the cached S3 Bucket Key. The S3 Bucket Key is never stored persistently in an unencrypted state outside AWS KMS, and so Amazon S3 ultimately must always return to AWS KMS to encrypt and decrypt the S3 Bucket Key, and thus, the data. As a result, you still retain control of the key hierarchy and resulting encrypted data through AWS KMS, and are still able to audit Amazon S3 returning periodically to AWS KMS to refresh the S3 Bucket Keys, as logged in CloudTrail.

Returning to our review of 2021, S3 Bucket Keys gained the ability to use Amazon S3 Inventory and Amazon S3 Batch Operations automatically to migrate objects from the higher cost, slightly lower-performance SSE-KMS model to the lower-cost, higher-performance S3 Bucket Keys model.

Simplified ownership and access management

The final item from 2021 for Amazon S3 is probably the most important of all. Last year was the year that Amazon S3 achieved fully modernized object ownership and access management capabilities. You can now disable access control lists to simplify ownership and access management for data in Amazon S3.

To understand this launch, we need to go in time to the origins of Amazon S3, which is one of the oldest services in AWS, created even before IAM was launched in 2011. In those pre-IAM days, a storage system like Amazon S3 needed to have some kind of access control model, so Amazon S3 invented its own: Amazon S3 access control lists (ACLs). Using ACLs, you could add access permissions down to the object level, but only with regard to access by other AWS account principals (the only kind of identity that was available at the time), or public access (read-only or read-write) to an object. And in this model, objects were always owned by the creator of the object, not the bucket owner.

After IAM was introduced, Amazon S3 added the bucket policy feature, a type of resource policy that provides the rich features of IAM, including full support for all IAM principals (users and roles), time-of-day conditions, source IP conditions, ability to require encryption, and more. For many years, Amazon S3 access decisions have been made by combining IAM policy permissions and ACL permissions, which has served customers well. But the object-writer-is-owner issue has often caused friction. The good news for security professionals has been that a deny by either type of access control type overrides an allow by the other, so there were no security issues with this bi-modal approach. The challenge was that it could be administratively difficult to manage both resource policies—which exist at the bucket and access point level—and ownership and ACLs—which exist at the object level. Ownership and ACLs might potentially impact the behavior of only a handful of objects, in a bucket full of millions or billions of objects.

With the features released in 2021, Amazon S3 has removed these points of friction, and now provides the features needed to reduce ownership issues and to make IAM-based policies the only access control system for a specified bucket. The first step came in 2020 with the ability to make object ownership track bucket ownership, regardless of writer. But that feature applied only to newly-written objects. The final step is the 2021 launch we’re highlighting here: the ability to disable at the bucket level the evaluation of all existing ACLs—including ownership and permissions—effectively nullifying all object ACLs. From this point forward, you have the mechanisms you need to govern Amazon S3 access with a combination of S3 bucket policies, S3 access point policies, and (within the same account) IAM principal policies, without worrying about legacy models of ACLs and per-object ownership.

Additional database and storage service features

AWS Backup Vault Lock

AWS Backup added an important new additional layer for backup protection with the availability of AWS Backup Vault Lock. A vault lock feature in AWS is the ability to configure a storage policy such that even the most powerful AWS principals (such as an account or Org root principal) can only delete data if the deletion conforms to the preset data retention policy. Even if the credentials of a powerful administrator are compromised, the data stored in the vault remains safe. Vault lock features are extremely valuable in guarding against a wide range of security and resiliency risks (including accidental deletion), notably in an era when ransomware represents a rising threat to data.

Prior to AWS Backup Vault Lock, AWS provided the extremely useful Amazon S3 and Amazon S3 Glacier vault locking features, but these previous vaulting features applied only to the two Amazon S3 storage classes. AWS Backup, on the other hand, supports a wide range of storage types and databases across the AWS portfolio, including Amazon EBS, Amazon Relational Database Service (Amazon RDS) including Amazon Aurora, Amazon DynamoDB, Amazon Neptune, Amazon DocumentDB, Amazon Elastic File System (Amazon EFS), Amazon FSx for Lustre, Amazon FSx for Windows File Server, Amazon EC2, and AWS Storage Gateway. While built on top of Amazon S3, AWS Backup even supports backup of data stored in Amazon S3. Thus, this new AWS Backup Vault Lock feature effectively serves as a vault lock for all the data from most of the critical storage and database technologies made available by AWS.

Finally, as a bonus, AWS Backup added two more features in 2021 that should delight security and compliance professionals: AWS Backup Audit Manager and compliance reporting.

Amazon DynamoDB

Amazon DynamoDB added a long-awaited feature: data-plane operations integration with AWS CloudTrail. DynamoDB has long supported the recording of management operations in CloudTrail—including a long list of operations like CreateTable, UpdateTable, DeleteTable, ListTables, CreateBackup, and many others. What has been added now is the ability to log the potentially far higher volume of data operations such as PutItem, BatchWriteItem, GetItem, BatchGetItem, and DeleteItem. With this launch, full database auditing became possible. In addition, DynamoDB added more granular control of logging through DynamoDB Streams filters. This feature allows users to vary the recording in CloudTrail of both control plane and data plane operations, at the table or stream level.

Amazon EBS snapshots

Let’s turn now to a simple but extremely useful feature launch affecting Amazon Elastic Block Store (Amazon EBS) snapshots. In the past, it was possible to accidently delete an EBS snapshot, which is a problem for security professionals because data availability is a part of the core security triad of confidentiality, integrity, and availability. Now you can manage that risk and recover from accidental deletions of your snapshots by using Recycle Bin. You simply define a retention policy that applies to all deleted snapshots, and then you can define other more granular policies, for example using longer retention periods based on snapshot tag values, such as stage=prod. Along with this launch, the Amazon EBS team announced EBS Snapshots Archive, a major price reduction for long-term storage of snapshots.

AWS Certificate Manager Private Certificate Authority

2021 was a big year for AWS Certificate Manager (ACM) Private Certificate Authority (CA) with the following updates and new features:

Network and application protection

We saw a lot of enhancements in network and application protection in 2021 that will help you to enforce fine-grained security policies at important network control points across your organization. The services and new capabilities offer flexible solutions for inspecting and filtering traffic to help prevent unauthorized resource access.

AWS WAF

AWS WAF launched AWS WAF Bot Control, which gives you visibility and control over common and pervasive bots that consume excess resources, skew metrics, cause downtime, or perform other undesired activities. The Bot Control managed rule group helps you monitor, block, or rate-limit pervasive bots, such as scrapers, scanners, and crawlers. You can also allow common bots that you consider acceptable, such as status monitors and search engines. AWS WAF also added support for custom responses, managed rule group versioning, in-line regular expressions, and Captcha. The Captcha feature has been popular with customers, removing another small example of “undifferentiated work” for customers.

AWS Shield Advanced

AWS Shield Advanced now automatically protects web applications by blocking application layer (L7) DDoS events with no manual intervention needed by you or the AWS Shield Response Team (SRT). When you protect your resources with AWS Shield Advanced and enable automatic application layer DDoS mitigation, Shield Advanced identifies patterns associated with L7 DDoS events and isolates this anomalous traffic by automatically creating AWS WAF rules in your web access control lists (ACLs).

Amazon CloudFront

In other edge networking news, Amazon CloudFront added support for response headers policies. This means that you can now add cross-origin resource sharing (CORS), security, and custom headers to HTTP responses returned by your CloudFront distributions. You no longer need to configure your origins or use custom Lambda@Edge or CloudFront Functions to insert these headers.

CloudFront Functions were another great 2021 addition to edge computing, providing a simple, inexpensive, and yet highly secure method for running customer-defined code as part of any CloudFront-managed web request. CloudFront functions allow for the creation of very efficient, fine-grained network access filters, such the ability to block or allow web requests at a region or city level.

Amazon Virtual Private Cloud and Route 53

Amazon Virtual Private Cloud (Amazon VPC) added more-specific routing (routing subnet-to-subnet traffic through a virtual networking device) that allows for packet interception and inspection between subnets in a VPC. This is particularly useful for highly-available, highly-scalable network virtual function services based on Gateway Load Balancer, including both AWS services like AWS Network Firewall, as well as third-party networking services such as the recently announced integration between AWS Firewall Manager and Palo Alto Networks Cloud Next Generation Firewall, powered by Gateway Load Balancer.

Another important set of enhancements to the core VPC experience came in the area of VPC Flow Logs. Amazon VPC launched out-of-the-box integration with Amazon Athena. This means with a few clicks, you can now use Athena to query your VPC flow logs delivered to Amazon S3. Additionally, Amazon VPC launched three associated new log features that make querying more efficient by supporting Apache Parquet, Hive-compatible prefixes, and hourly partitioned files.

Following Route 53 Resolver’s much-anticipated launch of DNS logging in 2020, the big news for 2021 was the launch of its DNS Firewall capability. Route 53 Resolver DNS Firewall lets you create “blocklists” for domains you don’t want your VPC resources to communicate with, or you can take a stricter, “walled-garden” approach by creating “allowlists” that permit outbound DNS queries only to domains that you specify. You can also create alerts for when outbound DNS queries match certain firewall rules, allowing you to test your rules before deploying for production traffic. Route 53 Resolver DNS Firewall launched with two managed domain lists—malware domains and botnet command and control domains—enabling you to get started quickly with managed protections against common threats. It also integrated with Firewall Manager (see the following section) for easier centralized administration.

AWS Network Firewall and Firewall Manager

Speaking of AWS Network Firewall and Firewall Manager, 2021 was a big year for both. Network Firewall added support for AWS Managed Rules, which are groups of rules based on threat intelligence data, to enable you to stay up to date on the latest security threats without writing and maintaining your own rules. AWS Network Firewall features a flexible rules engine enabling you to define firewall rules that give you fine-grained control over network traffic. As of the launch in late 2021, you can enable managed domain list rules to block HTTP and HTTPS traffic to domains identified as low-reputation, or that are known or suspected to be associated with malware or botnets. Prior to that, another important launch was new configuration options for rule ordering and default drop, making it simpler to write and process rules to monitor your VPC traffic. Also in 2021, Network Firewall announced a major regional expansion following its initial launch in 2020, and a range of compliance achievements and eligibility including HIPAA, PCI DSS, SOC, and ISO.

Firewall Manager also had a strong 2021, adding a number of additional features beyond its initial core area of managing network firewalls and VPC security groups that provide centralized, policy-based control over many other important network security capabilities: Amazon Route 53 Resolver DNS Firewall configurations, deployment of the new AWS WAF Bot Control, monitoring of VPC routes for AWS Network Firewall, AWS WAF log filtering, AWS WAF rate-based rules, and centralized logging of AWS Network Firewall logs.

Elastic Load Balancing

Elastic Load Balancing now supports forwarding traffic directly from Network Load Balancer (NLB) to Application Load Balancer (ALB). With this important new integration, you can take advantage of many critical NLB features such as support for AWS PrivateLink and exposing static IP addresses for applications that still require ALB.

In addition, Network Load Balancer now supports version 1.3 of the TLS protocol. This adds to the existing TLS 1.3 support in Amazon CloudFront, launched in 2020. AWS plans to add TLS 1.3 support for additional services.

The AWS Networking team also made Amazon VPC private NAT gateways available in both AWS GovCloud (US) Regions. The expansion into the AWS GovCloud (US) Regions enables US government agencies and contractors to move more sensitive workloads into the cloud by helping them to address certain regulatory and compliance requirements.

Compute

Security professionals should also be aware of some interesting enhancements in AWS compute services that can help improve their organization’s experience in building and operating a secure environment.

Amazon Elastic Compute Cloud (Amazon EC2) launched the Global View on the console to provide visibility to all your resources across Regions. Global View helps you monitor resource counts, notice abnormalities sooner, and find stray resources. A few days into 2022, another simple but extremely useful EC2 launch was the new ability to obtain instance tags from the Instance Metadata Service (IMDS). Many customers run code on Amazon EC2 that needs to introspect about the EC2 tags associated with the instance and then change its behavior depending on the content of the tags. Prior to this launch, you had to associate an EC2 role and call the EC2 API to get this information. That required access to API endpoints, either through a NAT gateway or a VPC endpoint for Amazon EC2. Now, that information can be obtained directly from the IMDS, greatly simplifying a common use case.

Amazon EC2 launched sharing of Amazon Machine Images (AMIs) with AWS Organizations and Organizational Units (OUs). Previously, you could share AMIs only with specific AWS account IDs. To share AMIs within AWS Organizations, you had to explicitly manage sharing of AMIs on an account-by-account basis, as they were added to or removed from AWS Organizations. With this new feature, you no longer have to update your AMI permissions because of organizational changes. AMI sharing is automatically synchronized when organizational changes occur. This feature greatly helps both security professionals and governance teams to centrally manage and govern AMIs as you grow and scale your AWS accounts. As previously noted, this feature was also added to EC2 Image Builder. Finally, Amazon Data Lifecycle Manager, the tool that manages all your EBS volumes and AMIs in a policy-driven way, now supports automatic deprecation of AMIs. As a security professional, you will find this helpful as you can set a timeline on your AMIs so that, if the AMIs haven’t been updated for a specified period of time, they will no longer be considered valid or usable by development teams.

Looking ahead

In 2022, AWS continues to deliver experiences that meet administrators where they govern, developers where they code, and applications where they run. We will continue to summarize important launches in future blog posts. If you’re interested in learning more about AWS services, join us for AWS re:Inforce, the AWS conference focused on cloud security, identity, privacy, and compliance. AWS re:Inforce 2022 will take place July 26–27 in Boston, MA. Registration is now open. Register now with discount code SALxUsxEFCw to get $150 off your full conference pass to AWS re:Inforce. For a limited time only and while supplies last. We look forward to seeing you there!

To stay up to date on the latest product and feature launches and security use cases, be sure to read the What’s New with AWS announcements (or subscribe to the RSS feed) and the AWS Security Blog.

 
If you have feedback about this post, submit comments in the Comments section below. If you have questions about this post, contact AWS Support.

Want more AWS Security news? Follow us on Twitter.

Author

Marta Taggart

Marta is a Seattle-native and Senior Product Marketing Manager in AWS Security Product Marketing, where she focuses on data protection services. Outside of work you’ll find her trying to convince Jack, her rescue dog, not to chase squirrels and crows (with limited success).

Mark Ryland

Mark Ryland

Mark is the director of the Office of the CISO for AWS. He has over 30 years of experience in the technology industry and has served in leadership roles in cybersecurity, software engineering, distributed systems, technology standardization and public policy. Previously, he served as the Director of Solution Architecture and Professional Services for the AWS World Public Sector team.

Optimize Federated Query Performance using EXPLAIN and EXPLAIN ANALYZE in Amazon Athena

Post Syndicated from Nishchai JM original https://aws.amazon.com/blogs/big-data/optimize-federated-query-performance-using-explain-and-explain-analyze-in-amazon-athena/

Amazon Athena is an interactive query service that makes it easy to analyze data in Amazon Simple Storage Service (Amazon S3) using standard SQL. Athena is serverless, so there is no infrastructure to manage, and you pay only for the queries that you run. In 2019, Athena added support for federated queries to run SQL queries across data stored in relational, non-relational, object, and custom data sources.

In 2021, Athena added support for the EXPLAIN statement, which can help you understand and improve the efficiency of your queries. The EXPLAIN statement provides a detailed breakdown of a query’s run plan. You can analyze the plan to identify and reduce query complexity and improve its runtime. You can also use EXPLAIN to validate SQL syntax prior to running the query. Doing so helps prevent errors that would have occurred while running the query.

Athena also added EXPLAIN ANALYZE, which displays the computational cost of your queries alongside their run plans. Administrators can benefit from using EXPLAIN ANALYZE because it provides a scanned data count, which helps you reduce financial impact due to user queries and apply optimizations for better cost control.

In this post, we demonstrate how to use and interpret EXPLAIN and EXPLAIN ANALYZE statements to improve Athena query performance when querying multiple data sources.

Solution overview

To demonstrate using EXPLAIN and EXPLAIN ANALYZE statements, we use the following services and resources:

Athena uses the AWS Glue Data Catalog to store and retrieve table metadata for the Amazon S3 data in your AWS account. The table metadata lets the Athena query engine know how to find, read, and process the data that you want to query. We use Athena data source connectors to connect to data sources external to Amazon S3.

Prerequisites

To deploy the CloudFormation template, you must have the following:

Provision resources with AWS CloudFormation

To deploy the CloudFormation template, complete the following steps:

  1. Choose Launch Stack:

  1. Follow the prompts on the AWS CloudFormation console to create the stack.
  2. Note the key-value pairs on the stack’s Outputs tab.

You use these values when configuring the Athena data source connectors.

The CloudFormation template creates the following resources:

  • S3 buckets to store data and act as temporary spill buckets for Lambda
  • AWS Glue Data Catalog tables for the data in the S3 buckets
  • A DynamoDB table and Amazon RDS for MySQL tables, which are used to join multiple tables from different sources
  • A VPC, subnets, and endpoints, which are needed for Amazon RDS for MySQL and DynamoDB

The following figure shows the high-level data model for the data load.

Create the DynamoDB data source connector

To create the DynamoDB connector for Athena, complete the following steps:

  1. On the Athena console, choose Data sources in the navigation pane.
  2. Choose Create data source.
  3. For Data sources, select Amazon DynamoDB.
  4. Choose Next.

  1. For Data source name, enter DDB.

  1. For Lambda function, choose Create Lambda function.

This opens a new tab in your browser.

  1. For Application name, enter AthenaDynamoDBConnector.
  2. For SpillBucket, enter the value from the CloudFormation stack for AthenaSpillBucket.
  3. For AthenaCatalogName, enter dynamodb-lambda-func.
  4. Leave the remaining values at their defaults.
  5. Select I acknowledge that this app creates custom IAM roles and resource policies.
  6. Choose Deploy.

You’re returned to the Connect data sources section on the Athena console.

  1. Choose the refresh icon next to Lambda function.
  2. Choose the Lambda function you just created (dynamodb-lambda-func).

  1. Choose Next.
  2. Review the settings and choose Create data source.
  3. If you haven’t already set up the Athena query results location, choose View settings on the Athena query editor page.

  1. Choose Manage.
  2. For Location of query result, browse to the S3 bucket specified for the Athena spill bucket in the CloudFormation template.
  3. Add Athena-query to the S3 path.
  4. Choose Save.

  1. In the Athena query editor, for Data source, choose DDB.
  2. For Database, choose default.

You can now explore the schema for the sportseventinfo table; the data is the same in DynamoDB.

  1. Choose the options icon for the sportseventinfo table and choose Preview Table.

Create the Amazon RDS for MySQL data source connector

Now let’s create the connector for Amazon RDS for MySQL.

  1. On the Athena console, choose Data sources in the navigation pane.
  2. Choose Create data source.
  3. For Data sources, select MySQL.
  4. Choose Next.

  1. For Data source name, enter MySQL.

  1. For Lambda function, choose Create Lambda function.

  1. For Application name, enter AthenaMySQLConnector.
  2. For SecretNamePrefix, enter AthenaMySQLFederation.
  3. For SpillBucket, enter the value from the CloudFormation stack for AthenaSpillBucket.
  4. For DefaultConnectionString, enter the value from the CloudFormation stack for MySQLConnection.
  5. For LambdaFunctionName, enter mysql-lambda-func.
  6. For SecurityGroupIds, enter the value from the CloudFormation stack for RDSSecurityGroup.
  7. For SubnetIds, enter the value from the CloudFormation stack for RDSSubnets.
  8. Select I acknowledge that this app creates custom IAM roles and resource policies.
  9. Choose Deploy.

  1. On the Lambda console, open the function you created (mysql-lambda-func).
  2. On the Configuration tab, under Environment variables, choose Edit.

  1. Choose Add environment variable.
  2. Enter a new key-value pair:
    • For Key, enter MYSQL_connection_string.
    • For Value, enter the value from the CloudFormation stack for MySQLConnection.
  3. Choose Save.

  1. Return to the Connect data sources section on the Athena console.
  2. Choose the refresh icon next to Lambda function.
  3. Choose the Lambda function you created (mysql-lamdba-function).

  1. Choose Next.
  2. Review the settings and choose Create data source.
  3. In the Athena query editor, for Data Source, choose MYSQL.
  4. For Database, choose sportsdata.

  1. Choose the options icon by the tables and choose Preview Table to examine the data and schema.

In the following sections, we demonstrate different ways to optimize our queries.

Optimal join order using EXPLAIN plan

A join is a basic SQL operation to query data on multiple tables using relations on matching columns. Join operations affect how much data is read from a table, how much data is transferred to the intermediate stages through networks, and how much memory is needed to build up a hash table to facilitate a join.

If you have multiple join operations and these join tables aren’t in the correct order, you may experience performance issues. To demonstrate this, we use the following tables from difference sources and join them in a certain order. Then we observe the query runtime and improve performance by using the EXPLAIN feature from Athena, which provides some suggestions for optimizing the query.

The CloudFormation template you ran earlier loaded data into the following services:

AWS Storage Table Name Number of Rows
Amazon DynamoDB sportseventinfo 657
Amazon S3 person 7,025,585
Amazon S3 ticketinfo 2,488

Let’s construct a query to find all those who participated in the event by type of tickets. The query runtime with the following join took approximately 7 mins to complete:

SELECT t.id AS ticket_id, 
e.eventid, 
p.first_name 
FROM 
"DDB"."default"."sportseventinfo" e, 
"AwsDataCatalog"."athenablog"."person" p, 
"AwsDataCatalog"."athenablog"."ticketinfo" t 
WHERE 
t.sporting_event_id = cast(e.eventid as double) 
AND t.ticketholder_id = p.id

Now let’s use EXPLAIN on the query to see its run plan. We use the same query as before, but add explain (TYPE DISTRIBUTED):

EXPLAIN (TYPE DISTRIBUTED)
SELECT t.id AS ticket_id, 
e.eventid, 
p.first_name 
FROM 
"DDB"."default"."sportseventinfo" e, 
"AwsDataCatalog"."athenablog"."person" p, 
"AwsDataCatalog"."athenablog"."ticketinfo" t 
WHERE 
t.sporting_event_id = cast(e.eventid as double) 
AND t.ticketholder_id = p.id

The following screenshot shows our output

Notice the cross-join in Fragment 1. The joins are converted to a Cartesian product for each table, where every record in a table is compared to every record in another table. Therefore, this query takes a significant amount of time to complete.

To optimize our query, we can rewrite it by reordering the joining tables as sportseventinfo first, ticketinfo second, and person last. The reason for this is because the WHERE clause, which is being converted to a JOIN ON clause during the query plan stage, doesn’t have the join relationship between the person table and sportseventinfo table. Therefore, the query plan generator converted the join type to cross-joins (a Cartesian product), which less efficient. Reordering the tables aligns the WHERE clause to the INNER JOIN type, which satisfies the JOIN ON clause and runtime is reduced from 7 minutes to 10 seconds.

The code for our optimized query is as follows:

SELECT t.id AS ticket_id, 
e.eventid, 
p.first_name 
FROM 
"DDB"."default"."sportseventinfo" e, 
"AwsDataCatalog"."athenablog"."ticketinfo" t, 
"AwsDataCatalog"."athenablog"."person" p 
WHERE 
t.sporting_event_id = cast(e.eventid as double) 
AND t.ticketholder_id = p.id

The following is the EXPLAIN output of our query after reordering the join clause:

EXPLAIN (TYPE DISTRIBUTED) 
SELECT t.id AS ticket_id, 
e.eventid, 
p.first_name 
FROM 
"DDB"."default"."sportseventinfo" e, 
"AwsDataCatalog"."athenablog"."ticketinfo" t, 
"AwsDataCatalog"."athenablog"."person" p 
WHERE t.sporting_event_id = cast(e.eventid as double) 
AND t.ticketholder_id = p.id

The following screenshot shows our output.

The cross-join changed to INNER JOIN with join on columns (eventid, id, ticketholder_id), which results in the query running faster. Joins between the ticketinfo and person tables converted to the PARTITION distribution type, where both left and right tables are hash-partitioned across all worker nodes due to the size of the person table. The join between the sportseventinfo table and ticketinfo are converted to the REPLICATED distribution type, where one table is hash-partitioned across all worker nodes and the other table is replicated to all worker nodes to perform the join operation.

For more information about how to analyze these results, refer to Understanding Athena EXPLAIN statement results.

As a best practice, we recommend having a JOIN statement along with an ON clause, as shown in the following code:

SELECT t.id AS ticket_id, 
e.eventid, 
p.first_name 
FROM 
"AwsDataCatalog"."athenablog"."person" p 
JOIN "AwsDataCatalog"."athenablog"."ticketinfo" t ON t.ticketholder_id = p.id 
JOIN "ddb"."default"."sportseventinfo" e ON t.sporting_event_id = cast(e.eventid as double)

Also as a best practice when you join two tables, specify the larger table on the left side of join and the smaller table on the right side of the join. Athena distributes the table on the right to worker nodes, and then streams the table on the left to do the join. If the table on the right is smaller, then less memory is used and the query runs faster.

In the following sections, we present examples of how to optimize pushdowns for filter predicates and projection filter operations for the Athena data source using EXPLAIN ANALYZE.

Pushdown optimization for the Athena connector for Amazon RDS for MySQL

A pushdown is an optimization to improve the performance of a SQL query by moving its processing as close to the data as possible. Pushdowns can drastically reduce SQL statement processing time by filtering data before transferring it over the network and filtering data before loading it into memory. The Athena connector for Amazon RDS for MySQL supports pushdowns for filter predicates and projection pushdowns.

The following table summarizes the services and tables we use to demonstrate a pushdown using Aurora MySQL.

Table Name Number of Rows Size in KB
player_partitioned 5,157 318.86
sport_team_partitioned 62 5.32

We use the following query as an example of a filtering predicate and projection filter:

SELECT full_name,
name 
FROM "sportsdata"."player_partitioned" a 
JOIN "sportsdata"."sport_team_partitioned" b ON a.sport_team_id=b.id 
WHERE a.id='1.0'

This query selects the players and their team based on their ID. It serves as an example of both filter operations in the WHERE clause and projection because it selects only two columns.

We use EXPLAIN ANALYZE to get the cost for the running this query:

EXPLAIN ANALYZE 
SELECT full_name,
name 
FROM "MYSQL"."sportsdata"."player_partitioned" a 
JOIN "MYSQL"."sportsdata"."sport_team_partitioned" b ON a.sport_team_id=b.id 
WHERE a.id='1.0'

The following screenshot shows the output in Fragment 2 for the table player_partitioned, in which we observe that the connector has a successful pushdown filter on the source side, so it tries to scan only one record out of the 5,157 records in the table. The output also shows that the query scan has only two columns (full_name as the projection column and sport_team_id and the join column), and uses SELECT and JOIN, which indicates the projection pushdown is successful. This helps reduce the data scan when using Athena data source connectors.

Now let’s look at the conditions in which a filter predicate pushdown doesn’t work with Athena connectors.

LIKE statement in filter predicates

We start with the following example query to demonstrate using the LIKE statement in filter predicates:

SELECT * 
FROM "MYSQL"."sportsdata"."player_partitioned" 
WHERE first_name LIKE '%Aar%'

We then add EXPLAIN ANALYZE:

EXPLAIN ANALYZE 
SELECT * 
FROM "MYSQL"."sportsdata"."player_partitioned" 
WHERE first_name LIKE '%Aar%'

The EXPLAIN ANALYZE output shows that the query performs the table scan (scanning the table player_partitioned, which contains 5,157 records) for all the records even though the WHERE clause only has 30 records matching the condition %Aar%. Therefore, the data scan shows the complete table size even with the WHERE clause.

We can optimize the same query by selecting only the required columns:

EXPLAIN ANALYZE 
SELECT sport_team_id,
full_name 
FROM "MYSQL"."sportsdata"."player_partitioned" 
WHERE first_name LIKE '%Aar%'

From the EXPLAIN ANALYZE output, we can observe that the connector supports the projection filter pushdown, because we select only two columns. This brought the data scan size down to half of the table size.

OR statement in filter predicates

We start with the following query to demonstrate using the OR statement in filter predicates:

SELECT id,
first_name 
FROM "MYSQL"."sportsdata"."player_partitioned" 
WHERE first_name = 'Aaron' OR id ='1.0'

We use EXPLAIN ANALYZE with the preceding query as follows:

EXPLAIN ANALYZE 
SELECT * 
FROM 
"MYSQL"."sportsdata"."player_partitioned" 
WHERE first_name = 'Aaron' OR id ='1.0'

Similar to the LIKE statement, the following output shows that query scanned the table instead of pushing down to only the records that matched the WHERE clause. This query outputs only 16 records, but the data scan indicates a complete scan.

Pushdown optimization for the Athena connector for DynamoDB

For our example using the DynamoDB connector, we use the following data:

Table Number of Rows Size in KB
sportseventinfo 657 85.75

Let’s test the filter predicate and project filter operation for our DynamoDB table using the following query. This query tries to get all the events and sports for a given location. We use EXPLAIN ANALYZE for the query as follows:

EXPLAIN ANALYZE 
SELECT EventId,
Sport 
FROM "DDB"."default"."sportseventinfo" 
WHERE Location = 'Chase Field'

The output of EXPLAIN ANALYZE shows that the filter predicate retrieved only 21 records, and the project filter selected only two columns to push down to the source. Therefore, the data scan for this query is less than the table size.

Now let’s see where filter predicate pushdown doesn’t work. In the WHERE clause, if you apply the TRIM() function to the Location column and then filter, predicate pushdown optimization doesn’t apply, but we still see the projection filter optimization, which does apply. See the following code:

EXPLAIN ANALYZE 
SELECT EventId,
Sport 
FROM "DDB"."default"."sportseventinfo" 
WHERE trim(Location) = 'Chase Field'

The output of EXPLAIN ANALYZE for this query shows that the query scans all the rows but is still limited to only two columns, which shows that the filter predicate doesn’t work when the TRIM function is applied.

We’ve seen from the preceding examples that the Athena data source connector for Amazon RDS for MySQL and DynamoDB do support filter predicates and projection predicates for pushdown optimization, but we also saw that operations such as LIKE, OR, and TRIM when used in the filter predicate don’t support pushdowns to the source. Therefore, if you encounter unexplained charges in your federated Athena query, we recommend using EXPLAIN ANALYZE with the query and determine whether your Athena connector supports the pushdown operation or not.

Please note that running EXPLAIN ANALYZE incurs cost because it scans the data.

Conclusion

In this post, we showcased how to use EXPLAIN and EXPLAIN ANALYZE to analyze Athena SQL queries for data sources on AWS S3 and Athena federated SQL query for data source like DynamoDB and Amazon RDS for MySQL. You can use this as an example to optimize queries which would also result in cost savings.


About the Authors

Nishchai JM is an Analytics Specialist Solutions Architect at Amazon Web services. He specializes in building Big-data applications and help customer to modernize their applications on Cloud. He thinks Data is new oil and spends most of his time in deriving insights out of the Data.

Varad Ram is Senior Solutions Architect in Amazon Web Services. He likes to help customers adopt to cloud technologies and is particularly interested in artificial intelligence. He believes deep learning will power future technology growth. In his spare time, he like to be outdoor with his daughter and son.

Top 10 security best practices for securing data in Amazon S3

Post Syndicated from Megan O'Neil original https://aws.amazon.com/blogs/security/top-10-security-best-practices-for-securing-data-in-amazon-s3/

With more than 100 trillion objects in Amazon Simple Storage Service (Amazon S3) and an almost unimaginably broad set of use cases, securing data stored in Amazon S3 is important for every organization. So, we’ve curated the top 10 controls for securing your data in S3. By default, all S3 buckets are private and can be accessed only by users who are explicitly granted access through ACLs, S3 bucket policies, and identity-based policies. In this post, we review the latest S3 features and Amazon Web Services (AWS) services that you can use to help secure your data in S3, including organization-wide preventative controls such as AWS Organizations service control policies (SCPs). We also provide recommendations for S3 detective controls, such as Amazon GuardDuty for S3, AWS CloudTrail object-level logging, AWS Security Hub S3 controls, and CloudTrail configuration specific to S3 data events. In addition, we provide data protection options and considerations for encrypting data in S3. Finally, we review backup and recovery recommendations for data stored in S3. Given the broad set of use cases that S3 supports, you should determine the priority of controls applied in accordance with your specific use case and associated details.

Block public S3 buckets at the organization level

Designate AWS accounts for public S3 use and prevent all other S3 buckets from inadvertently becoming public by enabling S3 Block Public Access. Use Organizations SCPs to confirm that the S3 Block Public Access setting cannot be changed. S3 Block Public Access provides a level of protection that works at the account level and also on individual buckets, including those that you create in the future. You have the ability to block existing public access—whether it was specified by an ACL or a policy—and to establish that public access isn’t granted to newly created items. This allows only designated AWS accounts to have public S3 buckets while blocking all other AWS accounts. To learn more about Organizations SCPs, see Service control policies.

Use bucket policies to verify all access granted is restricted and specific

Check that the access granted in the Amazon S3 bucket policy is restricted to specific AWS principals, federated users, service principals, IP addresses, or VPCs that you provide. A bucket policy that allows a wildcard identity such as Principal “*” can potentially be accessed by anyone. A bucket policy that allows a wildcard action “*” can potentially allow a user to perform any action in the bucket. For more information, see Using bucket policies.

Ensure that any identity-based policies don’t use wildcard actions

Identity policies are policies assigned to AWS Identity and Access Management (IAM) users and roles and should follow the principle of least privilege to help prevent inadvertent access or changes to resources. Establishing least privilege identity policies includes defining specific actions such as S3:GetObject or S3:PutObject instead of S3:*. In addition, you can use predefined AWS-wide condition keys and S3‐specific condition keys to specify additional controls on specific actions. An example of an AWS-wide condition key commonly used for S3 is IpAddress: { aws:SourceIP: “10.10.10.10”}, where you can specify your organization’s internal IP space for specific actions in S3. See IAM.1 in Monitor S3 using Security Hub and CloudWatch Logs for detecting policies with wildcard actions and wildcard resources are present in your accounts with Security Hub.

Consider splitting read, write, and delete access. Allow only write access to users or services that generate and write data to S3 but don’t need to read or delete objects. Define an S3 lifecycle policy to remove objects on a schedule instead of through manual intervention— see Managing your storage lifecycle. This allows you to remove delete actions from your identity-based policies. Verify your policies with the IAM policy simulator. Use IAM Access Analyzer to help you identify, review, and design S3 bucket policies or IAM policies that grant access to your S3 resources from outside of your AWS account.

Enable S3 protection in GuardDuty to detect suspicious activities

In 2020, GuardDuty announced coverage for S3. Turning this on enables GuardDuty to continuously monitor and profile S3 data access events (data plane operations) and S3 configuration (control plane APIs) to detect suspicious activities. Activities such as requests coming from unusual geolocations, disabling of preventative controls, and API call patterns consistent with an attempt to discover misconfigured bucket permissions. To achieve this, GuardDuty uses a combination of anomaly detection, machine learning, and continuously updated threat intelligence. To learn more, including how to enable GuardDuty for S3, see Amazon S3 protection in Amazon GuardDuty.

Use Macie to scan for sensitive data outside of designated areas

In May of 2020, AWS re-launched Amazon Macie. Macie is a fully managed service that helps you discover and protect your sensitive data by using machine learning to automatically review and classify your data in S3. Enabling Macie organization wide is a straightforward and cost-efficient method for you to get a central, continuously updated view of your entire organization’s S3 environment and monitor your adherence to security best practices through a central console. Macie continually evaluates all buckets for encryption and access control, alerting you of buckets that are public, unencrypted, or shared or replicated outside of your organization. Macie evaluates sensitive data using a fully-managed list of common sensitive data types and custom data types you create, and then issues findings for any object where sensitive data is found.

Encrypt your data in S3

There are four options for encrypting data in S3, including client-side and server-side options. With server-side encryption, S3 encrypts your data at the object level as it writes it to disks in AWS data centers and decrypts it when you access it. As long as you authenticate your request and you have access permissions, there is no difference in the way you access encrypted or unencrypted objects.

The first two options use AWS Key Management Service (AWS KMS). AWS KMS lets you create and manage cryptographic keys and control their use across a wide range of AWS services and their applications. There are options for managing which encryption key AWS uses to encrypt your S3 data.

  • Server-side encryption with Amazon S3-managed encryption keys (SSE-S3). When you use SSE-S3, each object is encrypted with a unique key that’s managed by AWS. This option enables you to encrypt your data by checking a box with no additional steps. The encryption and decryption are handled for you transparently. SSE-S3 is a convenient and cost-effective option.
  • Server-side encryption with customer master keys (CMKs) stored in AWS KMS (SSE-KMS), is similar to SSE-S3, but with some additional benefits and costs compared to SSE-S3. There are separate permissions for the use of a CMK that provide added protection against unauthorized access of your objects in S3. SSE-KMS also provides you with an audit trail that shows when your CMK was used and by whom. SSE-KMS gives you control of the key access policy, which might provide you with more granular control depending on your use case.
  • In server-side encryption with customer-provided keys (SSE-C), you manage the encryption keys and S3 manages the encryption as it writes to disks and decryption when you access your objects. This option is useful if you need to provide and manage your own encryption keys. Keep in mind that you are responsible for the creation, storage, and tracking of the keys used to encrypt each object and AWS has no ability to recover customer-provided keys if they’re lost. The major thing to account for with SSE-C is that you must provide the customer-managed key every-time you PUT or GET an object.
  • Client-side encryption is another option to encrypt your data in S3. You can use a CMK stored in AWS KMS or use a master key that you store within your application. Client-side encryption means that you encrypt the data before you send it to AWS and that you decrypt it after you retrieve it from AWS. AWS doesn’t manage your keys and isn’t responsible for encryption or decryption. Usually, client-side encryption needs to be deeply embedded into your application to work.

Protect data in S3 from accidental deletion using S3 Versioning and S3 Object Lock

Amazon S3 is designed for durability of 99.999999999 percent of objects across multiple Availability Zones, is resilient against events that impact an entire zone, and designed for 99.99 percent availability over a given year. In many cases, when it comes to strategies to back up your data in S3, it’s about protecting buckets and objects from accidental deletion, in which case S3 Versioning can be used to preserve, retrieve, and restore every version of every object stored in your buckets. S3 Versioning lets you keep multiple versions of an object in the same bucket and can help you recover objects from accidental deletion or overwrite. Keep in mind this feature has costs associated. You may consider S3 Versioning in selective scenarios such as S3 buckets that store critical backup data or sensitive data.

With S3 Versioning enabled on your S3 buckets, you can optionally add another layer of security by configuring a bucket to enable multi-factor authentication (MFA) delete. With this configuration, the bucket owner must include two forms of authentication in any request to delete a version or to change the versioning state of the bucket.

S3 Object Lock is a feature that helps you mitigate data loss by storing objects using a write-once-read-many (WORM) model. By using Object Lock, you can prevent an object from being overwritten or deleted for a fixed time or indefinitely. Keep in mind that there are specific use cases for Object Lock, including scenarios where it is imperative that data is not changed or deleted after it has been written.

Enable logging for S3 using CloudTrail and S3 server access logging

Amazon S3 is integrated with CloudTrail. CloudTrail captures a subset of API calls, including calls from the S3 console and code calls to the S3 APIs. In addition, you can enable CloudTrail data events for all your buckets or for a list of specific buckets. Keep in mind that a very active S3 bucket can generate a large amount of log data and increase CloudTrail costs. If this is concern around cost then consider enabling this additional logging only for S3 buckets with critical data.

Server access logging provides detailed records of the requests that are made to a bucket. Server access logs can assist you in security and access audits.

Backup your data in S3

Although S3 stores your data across multiple geographically diverse Availability Zones by default, your compliance requirements might dictate that you store data at even greater distances. Cross-region replication (CRR) allows you to replicate data between distant AWS Regions to help satisfy these requirements. CRR enables automatic, asynchronous copying of objects across buckets in different AWS Regions. For more information on object replication, see Replicating objects. Keep in mind that this feature has costs associated, you might consider CCR in selective scenarios such as S3 buckets that store critical backup data or sensitive data.

Monitor S3 using Security Hub and CloudWatch Logs

Security Hub provides you with a comprehensive view of your security state in AWS and helps you check your environment against security industry standards and best practices. Security Hub collects security data from across AWS accounts, services, and supported third-party partner products and helps you analyze your security trends and identify the highest priority security issues.

The AWS Foundational Security Best Practices standard is a set of controls that detect when your deployed accounts and resources deviate from security best practices, and provides clear remediation steps. The controls contain best practices from across multiple AWS services, including S3. We recommend you enable the AWS Foundational Security Best Practices as it includes the following detective controls for S3 and IAM:

IAM.1: IAM policies should not allow full “*” administrative privileges.
S3.1: Block Public Access setting should be enabled
S3.2: S3 buckets should prohibit public read access
S3.3: S3 buckets should prohibit public write access
S3.4: S3 buckets should have server-side encryption enabled
S3.5: S3 buckets should require requests to use Secure Socket layer
S3.6: Amazon S3 permissions granted to other AWS accounts in bucket policies should be restricted
S3.8: S3 Block Public Access setting should be enabled at the bucket level

For details of each control, including remediation steps, please review the AWS Foundational Security Best Practices controls.

If there is a specific S3 API activity not covered above that you’d like to be alerted on, you can use CloudTrail Logs together with Amazon CloudWatch for S3 to do so. CloudTrail integration with CloudWatch Logs delivers S3 bucket-level API activity captured by CloudTrail to a CloudWatch log stream in the CloudWatch log group that you specify. You create CloudWatch alarms for monitoring specific API activity and receive email notifications when the specific API activity occurs.

Conclusion

By using the ten practices described in this blog post, you can build strong protection mechanisms for your data in Amazon S3, including least privilege access, encryption of data at rest, blocking public access, logging, monitoring, and configuration checks.

Depending on your use case, you should consider additional protection mechanisms. For example, there are security-related controls available for large shared datasets in S3 such as Access Points, which you can use to decompose one large bucket policy into separate, discrete access point policies for each application that needs to access the shared data set. To learn more about S3 security, see Amazon S3 Security documentation.

Now that you’ve reviewed the top 10 security best practices to make your data in S3 more secure, make sure you have these controls set up in your AWS accounts—and go build securely!

If you have feedback about this post, submit comments in the Comments section below. If you have questions about this post, start a new thread on the Amazon S3 forum or contact AWS Support.

Want more AWS Security how-to content, news, and feature announcements? Follow us on Twitter.

Author

Megan O’Neil

Megan is a Senior Specialist Solutions Architect focused on threat detection and incident response. Megan and her team enable AWS customers to implement sophisticated, scalable, and secure solutions that solve their business challenges.

Author

Temi Adebambo

Temi is the Senior Manager for the America’s Security and Network Solutions Architect team. His team is focused on working with customers on cloud migration and modernization, cybersecurity strategy, architecture best practices, and innovation in the cloud. Before AWS, he spent over 14 years as a consultant, advising CISOs and security leaders at some of the largest global enterprises.

How to securely create and store your CRL for ACM Private CA

Post Syndicated from Tracy Pierce original https://aws.amazon.com/blogs/security/how-to-securely-create-and-store-your-crl-for-acm-private-ca/

In this blog post, I show you how to protect your Amazon Simple Storage Service (Amazon S3) bucket while still allowing access to your AWS Certificate Manager (ACM) Private Certificate Authority (CA) certificate revocation list (CRL).

A CRL is a list of certificates that have been revoked by the CA. Certificates can be revoked because they might have inadvertently been shared, or to discontinue their use, such as when someone leaves the company or an IoT device is decommissioned. In this solution, you use a combination of separate AWS accounts, Amazon S3 Block Public Access (BPA) settings, and a new parameter created by ACM Private CA called S3ObjectAcl to mark the CRL as private. This new parameter allows you to set the privacy of your CRL as PUBLIC_READ or BUCKET_OWNER_FULL_CONTROL. If you choose PUBLIC_READ, the CRL will be accessible over the internet. If you choose BUCKET_OWNER_FULL_CONTROL, then only the CRL S3 bucket owner can access it, and you will need to use Amazon CloudFront to serve the CRL stored in Amazon S3 using origin access identity (OAI). This is because most TLS implementations expect a public endpoint for access.

A best practice for Amazon S3 is to apply the principle of least privilege. To support least privilege, you want to ensure you have the BPA settings for Amazon S3 enabled. These settings deny public access to your S3 objects by using ACLs, bucket policies, or access point policies. I’m going to walk you through setting up your CRL as a private object in an isolated secondary account with BPA settings for access, and a CloudFront distribution with OAI settings enabled. This will confirm that access can only be made through the CloudFront distribution and not directly to your S3 bucket. This enables you to maintain your private CA in your primary account, accessible only by your public key infrastructure (PKI) security team.

As part of the private infrastructure setup, you will create a CloudFront distribution to provide access to your CRL. While not required, it allows access to private CRLs, and is helpful in the event you want to move the CRL to a different location later. However, this does come with an extra cost, so that’s something to consider when choosing to make your CRL private instead of public.

Prerequisites

For this walkthrough, you should have the following resources ready to use:

CRL solution overview

The solution consists of creating an S3 bucket in an isolated secondary account, enabling all BPA settings, creating a CloudFront OAI, and a CloudFront distribution.
 

Figure 1: Solution flow diagram

Figure 1: Solution flow diagram

As shown in Figure 1, the steps in the solution are as follows:

  1. Set up the S3 bucket in the secondary account with BPA settings enabled.
  2. Create the CloudFront distribution and point it to the S3 bucket.
  3. Create your private CA in AWS Certificate Manager (ACM).

In this post, I walk you through each of these steps.

Deploying the CRL solution

In this section, you walk through each item in the solution overview above. This will allow access to your CRL stored in an isolated secondary account, away from your private CA.

To create your S3 bucket

  1. Sign in to the AWS Management Console of your secondary account. For Services, select S3.
  2. In the S3 console, choose Create bucket.
  3. Give the bucket a unique name. For this walkthrough, I named my bucket example-test-crl-bucket-us-east-1, as shown in Figure 2. Because S3 buckets are unique across all of AWS and not just within your account, you must create your own unique bucket name when completing this tutorial. Remember to follow the S3 naming conventions when choosing your bucket name.
     
    Figure 2: Creating an S3 bucket

    Figure 2: Creating an S3 bucket

  4. Choose Next, and then choose Next again.
  5. For Block Public Access settings for this bucket, make sure the Block all public access check box is selected, as shown in Figure 3.
     
    Figure 3: S3 block public access bucket settings

    Figure 3: S3 block public access bucket settings

  6. Choose Create bucket.
  7. Select the bucket you just created, and then choose the Permissions tab.
  8. For Bucket Policy, choose Edit, and in the text field, paste the following policy (remember to replace each <user input placeholder> with your own value).
    {
      "Version": "2012-10-17",
      "Statement": [
        {
          "Effect": "Allow",
          "Principal": {
            "Service": "acm-pca.amazonaws.com"
          },
          "Action": [
            "s3:PutObject",
            "s3:PutObjectAcl",
            "s3:GetBucketAcl",
            "s3:GetBucketLocation"
          ],
          "Resource": [
              "arn:aws:s3:::<your-bucket-name>/*",
              "arn:aws:s3:::<your-bucket-name>"
          ]
        }
      ]
    }
    

  9. Choose Save changes.
  10. Next to Object Ownership choose Edit.
  11. Select Bucket owner preferred, and then choose Save changes.

To create your CloudFront distribution

  1. Still in the console of your secondary account, from the Services menu, switch to the CloudFront console.
  2. Choose Create Distribution.
  3. For Select a delivery method for your content, under Web, choose Get Started.
  4. On the Origin Settings page, do the following, as shown in Figure 4:
    1. For Origin Domain Name, select the bucket you created earlier. In this example, my bucket name is example-test-crl-bucket-us-east-1.s3.amazonaws.com.
    2. For Restrict Bucket Access, select Yes.
    3. For Origin Access Identity, select Create a New Identity.
    4. For Comment enter a name. In this example, I entered access-identity-crl.
    5. For Grant Read Permissions on Bucket, select Yes, Update Bucket Policy.
    6. Leave all other defaults.
       
      Figure 4: CloudFront <strong>Origin Settings</strong> page

      Figure 4: CloudFront Origin Settings page

  5. Choose Create Distribution.

To create your private CA

  1. (Optional) If you have already created a private CA, you can update your CRL pointer by using the update-certificate-authority API. You must do this step from the CLI because you can’t select an S3 bucket in a secondary account for the CRL home when you create the CRL through the console. If you haven’t already created a private CA, follow the remaining steps in this procedure.
  2. Use a text editor to create a file named ca_config.txt that holds your CA configuration information. In the following example ca_config.txt file, replace each <user input placeholder> with your own value.
    {
        "KeyAlgorithm": "<RSA_2048>",
        "SigningAlgorithm": "<SHA256WITHRSA>",
        "Subject": {
            "Country": "<US>",
            "Organization": "<Example LLC>",
            "OrganizationalUnit": "<Security>",
            "DistinguishedNameQualifier": "<Example.com>",
            "State": "<Washington>",
            "CommonName": "<Example LLC>",
            "Locality": "<Seattle>"
        }
    }
    

  3. From the CLI configured with a credential profile for your primary account, use the create-certificate-authority command to create your CA. In the following example, replace each <user input placeholder> with your own value.
    aws acm-pca create-certificate-authority --certificate-authority-configuration file://ca_config.txt --certificate-authority-type “ROOT” --profile <primary_account_credentials>
    

  4. With the CA created, use the describe-certificate-authority command to verify success. In the following example, replace each <user input placeholder> with your own value.
    aws acm-pca describe-certificate-authority --certificate-authority-arn <arn:aws:acm-pca:us-east-1:111122223333:certificate-authority/12345678-1234-1234-1234-123456789012> --profile <primary_account_credentials>
    

  5. You should see the CA in the PENDING_CERTIFICATE state. Use the get-certificate-authority-csr command to retrieve the certificate signing request (CSR), and sign it with your ACM private CA. In the following example, replace each <user input placeholder> with your own value.
    aws acm-pca get-certificate-authority-csr --certificate-authority-arn <arn:aws:acm-pca:us-east-1:111122223333:certificate-authority/12345678-1234-1234-1234-123456789012> --output text > <cert_1.csr> --profile <primary_account_credentials>
    

  6. Now that you have your CSR, use it to issue a certificate. Because this example sets up a ROOT CA, you will issue a self-signed RootCACertificate. You do this by using the issue-certificate command. In the following example, replace each <user input placeholder> with your own value. You can find all allowable values in the ACM PCA documentation.
    aws acm-pca issue-certificate --certificate-authority-arn <arn:aws:acm-pca:us-east-1:111122223333:certificate-authority/12345678-1234-1234-1234-123456789012> --template-arn arn:aws:acm-pca:::template/RootCACertificate/V1 --csr fileb://<cert_1.csr> --signing-algorithm SHA256WITHRSA --validity Value=365,Type=DAYS --profile <primary_account_credentials>
    

  7. Now that the certificate is issued, you can retrieve it. You do this by using the get-certificate command. In the following example, replace each <user input placeholder> with your own value.
    aws acm-pca get-certificate --certificate-authority-arn <arn:aws:acm-pca:us-east-1:111122223333:certificate-authority/12345678-1234-1234-1234-123456789012> --certificate-arn <arn:aws:acm-pca:us-east-1:111122223333:certificate-authority/12345678-1234-1234-1234-123456789012/certificate/6707447683a9b7f4055627ffd55cebcc> --output text --profile <primary_account_credentials> > ca_cert.pem
    

  8. Import the certificate ca_cert.pem into your CA to move it into the ACTIVE state for further use. You do this by using the import-certificate-authority-certificate command. In the following example, replace each <user input placeholder> with your own value.
    aws acm-pca import-certificate-authority-certificate --certificate-authority-arn <arn:aws:acm-pca:us-east-1:111122223333:certificate-authority/12345678-1234-1234-1234-123456789012> --certificate fileb://ca_cert.pem --profile <primary_account_credentials>
    

  9. Use a text editor to create a file named revoke_config.txt that holds your CRL information pointing to your CloudFront distribution ID. In the following example revoke_config.txt, replace each <user input placeholder> with your own value.
    {
        "CrlConfiguration": {
            "Enabled": <true>,
            "ExpirationInDays": <365>,
            "CustomCname": "<example1234.cloudfront.net>",
            "S3BucketName": "<example-test-crl-bucket-us-east-1>",
            "S3ObjectAcl": "<BUCKET_OWNER_FULL_CONTROL>"
        }
    }
    

  10. Update your CA CRL CNAME to point to the CloudFront distribution you created. You do this by using the update-certificate-authority command. In the following example, replace each <user input placeholder> with your own value.
    aws acm-pca update-certificate-authority --certificate-authority-arn <arn:aws:acm-pca:us-east-1:111122223333:certificate-authority/12345678-1234-1234-1234-123456789012> --revocation-configuration file://revoke_config.txt --profile <primary_account_credentials>
    

You can use the describe-certificate-authority command to verify that your CA is in the ACTIVE state. After the CA is active, ACM generates your CRL periodically for you, and places it into your specified S3 bucket. It also generates a new CRL list shortly after you revoke any certificate, so you have the most updated copy.

Now that the PCA, CRL, and CloudFront distribution are all set up, you can test to verify the CRL is served appropriately.

To test that the CRL is served appropriately

  1. Create a CSR to issue a new certificate from your PCA. In the following example, replace each <user input placeholder> with your own value. Enter a secure PEM password when prompted and provide the appropriate field data.

    Note: Do not enter any values for the unused attributes, just press Enter with no value.

    openssl req -new -newkey rsa:2048 -days 365 -keyout <test_cert_private_key.pem> -out <test_csr.csr>
    

  2. Issue a new certificate using the issue-certificate command. In the following example, replace each <user input placeholder> with your own value. You can find all allowable values in the ACM PCA documentation.
    aws acm-pca issue-certificate --certificate-authority-arn <arn:aws:acm-pca:us-east-1:111122223333:certificate-authority/12345678-1234-1234-1234-123456789012> --csr file://<test_csr.csr> --signing-algorithm <SHA256WITHRSA> --validity Value=<31>,Type=<DAYS> --idempotency-token 1 --profile <primary_account_credentials>
    

  3. After issuing the certificate, you can use the get-certificate command retrieve it, parse it, then get the CRL URL from the certificate just like a PKI client would. In the following example, replace each <user input placeholder> with your own value. This command uses the JQ package.
    aws acm-pca get-certificate --certificate-authority-arn <arn:aws:acm-pca:us-east-1:111122223333:certificate-authority/12345678-1234-1234-1234-123456789012> --certificate-arn <arn:aws:acm-pca:us-east-1:111122223333:certificate-authority/12345678-1234-1234-1234-123456789012/certificate/6707447683a9b7f4055example1234> | jq -r '.Certificate' > cert.pem openssl x509 -in cert.pem -text -noout | grep crl 
    

    You should see an output similar to the following, but with the domain names of your CloudFront distribution and your CRL file:

    http://<example1234.cloudfront.net>/crl/<7215e983-3828-435c-a458-b9e4dd16bab1.crl>
    

  4. Run the curl command to download your CRL file. In the following example, replace each <user input placeholder> with your own value.
    curl http://<example1234.cloudfront.net>/crl/<7215e983-3828-435c-a458-b9e4dd16bab1.crl>
    

Security best practices

The following are some of the security best practices for setting up and maintaining your private CA in ACM Private CA.

  • Place your root CA in its own account. You want your root CA to be the ultimate authority for your private certificates, limiting access to it is key to keeping it secure.
  • Minimize access to the root CA. This is one of the best ways of reducing the risk of intentional or unintentional inappropriate access or configuration. If the root CA was to be inappropriately accessed, all subordinate CAs and certificates would need to be revoked and recreated.
  • Keep your CRL in a separate account from the root CA. The reason for placing the CRL in a separate account is because some external entities—such as customers or users who aren’t part of your AWS organization, or external applications—might need to access the CRL to check for revocation. To provide access to these external entities, the CRL object and the S3 bucket need to be accessible, so you don’t want to place your CRL in the same account as your private CA.

For more information, see ACM Private CA best practices in the AWS Private CA User Guide.

Conclusion

You’ve now successfully set up your private CA and have stored your CRL in an isolated secondary account. You configured your S3 bucket with Block Public Access settings, created a custom URL through CloudFront, enabled OAI settings, and pointed your DNS to it by using Route 53. This restricts access to your S3 bucket through CloudFront and your OAI only. You walked through the setup of each step, from bucket configurations, hosted zone setup, distribution setup, and finally, private CA configuration and setup. You can now store your private CA in an account with limited access, while your CRL is hosted in a separate account that allows external entity access.

If you have feedback about this post, submit comments in the Comments section below. If you have questions about this post, start a new thread on the AWS Certificate Manager forum or contact AWS Support.

Want more AWS Security how-to content, news, and feature announcements? Follow us on Twitter.

Author

Tracy Pierce

Tracy is a Senior Security Consultant for Engagement Security. She enjoys the peculiar culture of Amazon and uses that to ensure that every day is exciting for her fellow engineers and customers alike. Customer obsession is her highest priority both internally and externally. She has her AS in Computer Security and Forensics from Sullivan College of Technology and Design, Systems Security Certified Practitioner (SSCP) certification, AWS Developer Associate certification, AWS Solutions Architect Associates certificate, and AWS Security Specialist certification. Outside of work, she enjoys time with friends, her fiancé, her Great Dane, and three cats. She also reads (a lot), builds Legos, and loves glitter.

Use IAM Access Analyzer to generate IAM policies based on access activity found in your organization trail

Post Syndicated from Mathangi Ramesh original https://aws.amazon.com/blogs/security/use-iam-access-analyzer-to-generate-iam-policies-based-on-access-activity-found-in-your-organization-trail/

In April 2021, AWS Identity and Access Management (IAM) Access Analyzer added policy generation to help you create fine-grained policies based on AWS CloudTrail activity stored within your account. Now, we’re extending policy generation to enable you to generate policies based on access activity stored in a designated account. For example, you can use AWS Organizations to define a uniform event logging strategy for your organization and store all CloudTrail logs in your management account to streamline governance activities. You can use Access Analyzer to review access activity stored in your designated account and generate a fine-grained IAM policy in your member accounts. This helps you to create policies that provide only the required permissions for your workloads.

Customers that use a multi-account strategy consolidate all access activity information in a designated account to simplify monitoring activities. By using AWS Organizations, you can create a trail that will log events for all Amazon Web Services (AWS) accounts into a single management account to help streamline governance activities. This is sometimes referred to as an organization trail. You can learn more from Creating a trail for an organization. With this launch, you can use Access Analyzer to generate fine-grained policies in your member account and grant just the required permissions to your IAM roles and users based on access activity stored in your organization trail.

When you request a policy, Access Analyzer analyzes your activity in CloudTrail logs and generates a policy based on that activity. The generated policy grants only the required permissions for your workloads and makes it easier for you to implement least privilege permissions. In this blog post, I’ll explain how to set up the permissions for Access Analyzer to access your organization trail and analyze activity to generate a policy. To generate a policy in your member account, you need to grant Access Analyzer limited cross-account access to access the Amazon Simple Storage Service (Amazon S3) bucket where logs are stored and review access activity.

Generate a policy for a role based on its access activity in the organization trail

In this example, you will set fine-grained permissions for a role used in a development account. The example assumes that your company uses Organizations and maintains an organization trail that logs all events for all AWS accounts in the organization. The logs are stored in an S3 bucket in the management account. You can use Access Analyzer to generate a policy based on the actions required by the role. To use Access Analyzer, you must first update the permissions on the S3 bucket where the CloudTrail logs are stored, to grant access to Access Analyzer.

To grant permissions for Access Analyzer to access and review centrally stored logs and generate policies

  1. Sign in to the AWS Management Console using your management account and go to S3 settings.
  2. Select the bucket where the logs from the organization trail are stored.
  3. Change object ownership to bucket owner preferred. To generate a policy, all of the objects in the bucket must be owned by the bucket owner.
  4. Update the bucket policy to grant cross-account access to Access Analyzer by adding the following statement to the bucket policy. This grants Access Analyzer limited access to the CloudTrail data. Replace the <organization-bucket-name>, and <organization-id> with your values and then save the policy.
    {
        "Version": "2012-10-17",
        "Statement": 
        [
        {
            "Sid": "PolicyGenerationPermissions",
            "Effect": "Allow",
            "Principal": {
                "AWS": "*"
            },
            "Action": [
                "s3:GetObject",
                "s3:ListBucket"
            ],
            "Resource": [
                "arn:aws:s3:::<organization-bucket-name>",
                "arn:aws:s3:::my-organization-bucket/AWSLogs/o-exampleorgid/${aws:PrincipalAccount}/*
    "
            ],
            "Condition": {
    "StringEquals":{
    "aws:PrincipalOrgID":"<organization-id>"
    },
    
                "StringLike": {"aws:PrincipalArn":"arn:aws:iam::${aws:PrincipalAccount}:role/service-role/AccessAnalyzerMonitorServiceRole*"            }
            }
        }
        ]
    }
    

By using the preceding statement, you’re allowing listbucket and getobject for the bucket my-organization-bucket-name if the role accessing it belongs to an account in your Organizations and has a name that starts with AccessAnalyzerMonitorServiceRole. Using aws:PrincipalAccount in the resource section of the statement allows the role to retrieve only the CloudTrail logs belonging to its own account. If you are encrypting your logs, update your AWS Key Management Service (AWS KMS) key policy to grant Access Analyzer access to use your key.

Now that you’ve set the required permissions, you can use the development account and the following steps to generate a policy.

To generate a policy in the AWS Management Console

  1. Use your development account to open the IAM Console, and then in the navigation pane choose Roles.
  2. Select a role to analyze. This example uses AWS_Test_Role.
  3. Under Generate policy based on CloudTrail events, choose Generate policy, as shown in Figure 1.
     
    Figure 1: Generate policy from the role detail page

    Figure 1: Generate policy from the role detail page

  4. In the Generate policy page, select the time window for which IAM Access Analyzer will review the CloudTrail logs to create the policy. In this example, specific dates are chosen, as shown in Figure 2.
     
    Figure 2: Specify the time period

    Figure 2: Specify the time period

  5. Under CloudTrail access, select the organization trail you want to use as shown in Figure 3.

    Note: If you’re using this feature for the first time: select create a new service role, and then choose Generate policy.

    This example uses an existing service role “AccessAnalyzerMonitorServiceRole_MBYF6V8AIK.”
     

    Figure 3: CloudTrail access

    Figure 3: CloudTrail access

  6. After the policy is ready, you’ll see a notification on the role page. To review the permissions, choose View generated policy, as shown in Figure 4.
     
    Figure 4: Policy generation progress

    Figure 4: Policy generation progress

After the policy is generated, you can see a summary of the services and associated actions in the generated policy. You can customize it by reviewing the services used and selecting additional required actions from the drop down. To refine permissions further, you can replace the resource-level placeholders in the policies to restrict permissions to just the required access. You can learn more about granting fine-grained permissions and creating the policy as described in this blog post.

Conclusion

Access Analyzer makes it easier to grant fine-grained permissions to your IAM roles and users by generating IAM policies based on the CloudTrail activity centrally stored in a designated account such as your AWS Organizations management accounts. To learn more about how to generate a policy, see Generate policies based on access activity in the IAM User Guide.

If you have feedback about this blog post, submit comments in the Comments section below. If you have questions about this blog post, start a new thread on the IAM forum or contact AWS Support.

Want more AWS Security how-to content, news, and feature announcements? Follow us on Twitter.

Mathangi Ramesh

Mathangi Ramesh

Mathangi is the product manager for AWS Identity and Access Management. She enjoys talking to customers and working with data to solve problems. Outside of work, Mathangi is a fitness enthusiast and a Bharatanatyam dancer. She holds an MBA degree from Carnegie Mellon University.

Strengthen the security of sensitive data stored in Amazon S3 by using additional AWS services

Post Syndicated from Jerry Mullis original https://aws.amazon.com/blogs/security/strengthen-the-security-of-sensitive-data-stored-in-amazon-s3-by-using-additional-aws-services/

In this post, we describe the AWS services that you can use to both detect and protect your data stored in Amazon Simple Storage Service (Amazon S3). When you analyze security in depth for your Amazon S3 storage, consider doing the following:

Using these additional AWS services along with Amazon S3 can improve your security posture across your accounts.

Audit and restrict Amazon S3 access with IAM Access Analyzer

IAM Access Analyzer allows you to identify unintended access to your resources and data. Users and developers need access to Amazon S3, but it’s important for you to keep users and privileges accurate and up to date.

Amazon S3 can often house sensitive and confidential information. To help secure your data within Amazon S3, you should be using AWS Key Management Service (AWS KMS) with server-side encryption at rest for Amazon S3. It is also important that you secure the S3 buckets so that you only allow access to the developers and users who require that access. Bucket policies and access control lists (ACLs) are the foundation of Amazon S3 security. Your configuration of these policies and lists determines the accessibility of objects within Amazon S3, and it is important to audit them regularly to properly secure and maintain the security of your Amazon S3 bucket.

IAM Access Analyzer can scan all the supported resources within a zone of trust. Access Analyzer then provides you with insight when a bucket policy or ACL allows access to any external entities that are not within your organization or your AWS account’s zone of trust.

To setup and use IAM Access Analyzer, follow the instructions for Enabling Access Analyzer in the AWS IAM User Guide.

The example in Figure 1 shows creating an analyzer with the zone of trust as the current account, but you can also create an analyzer with the organization as the zone of trust.

Figure 1: Creating IAM Access Analyzer and zone of trust

Figure 1: Creating IAM Access Analyzer and zone of trust

After you create your analyzer, IAM Access Analyzer automatically scans the resources in your zone of trust and returns the findings from your Amazon S3 storage environment. The initial scan shown in Figure 2 shows the findings of an unsecured S3 bucket.

Figure 2: Example of unsecured S3 bucket findings

Figure 2: Example of unsecured S3 bucket findings

For each finding, you can decide which action you would like to take. As shown in figure 3, you are given the option to archive (if the finding indicates intended access) or take action to modify bucket permissions (if the finding indicates unintended access).

Figure 3: Displays choice of actions to take

Figure 3: Displays choice of actions to take

After you address the initial findings, Access Analyzer monitors your bucket policies for changes, and notifies you of access issues it finds. Access Analyzer is regional and must be enabled in each AWS Region independently.

Classify and secure sensitive data with Macie

Organizational compliance standards often require the identification and securing of sensitive data. Your organization’s sensitive data might contain personally identifiable information (PII), which includes things such as credit card numbers, birthdates, and addresses.

Macie is a data security and privacy service offered by AWS that uses machine learning and pattern matching to discover the sensitive data stored within Amazon S3. You can define your own custom type of sensitive data category that might be unique to your business or use case. Macie will automatically provide an inventory of S3 buckets and alert you of unprotected sensitive data.

Figure 4 shows a sample result from a Macie scan in which you can see important information regarding Amazon S3 public access, encryption settings, and sharing.

Figure 4: Sample results from a Macie scan

Figure 4: Sample results from a Macie scan

In addition to finding potential sensitive data, Macie also gives you a severity score based on the privacy risk, as shown in the example data in Figure 5.

Figure 5: Example Macie severity scores

Figure 5: Example Macie severity scores

When you use Macie in conjunction with AWS Step Functions, you can also automatically remediate any issues found. You can use this combination to help meet regulations such as General Data Protection Regulation (GDPR) and Health Insurance Portability and Accountability Act (HIPAA). Macie allows you to have constant visibility of sensitive data within your Amazon S3 storage environment.

When you deploy Macie in a multi-account configuration, your usage is rolled up to the master account to provide the total usage for all accounts and a breakdown across the entire organization.

Detect malicious access patterns with GuardDuty

Your customers and users can commit thousands of actions each day on S3 buckets. Discerning access patterns manually can be extremely time consuming as the volume of data increases. GuardDuty uses machine learning, anomaly detection, and integrated threat intelligence to analyze billions of events across multiple accounts and uses data collected in AWS CloudTrail logs for S3 data events as well as S3 access logs, VPC Flow Logs, and DNS logs. GuardDuty can be configured to analyze these logs and notify you of suspicious activity, such as unusual data access patterns, unusual discovery API calls, and more. After you receive a list of findings on these activities, you will be able to make informed decisions to secure your S3 buckets.

Figure 6 shows a sample list of findings returned by GuardDuty which shows the finding type, resource affected, and count of occurrences.

Figure 6: Example GuardDuty list of findings

Figure 6: Example GuardDuty list of findings

You can select one of the results in Figure 6 to see the IP address and details associated from this potential malicious IP caller, as shown in Figure 7.

Figure 7: GuardDuty Malicious IP Caller detailed findings

Figure 7: GuardDuty Malicious IP Caller detailed findings

Monitor and remediate configuration changes with AWS Config

Configuration management is important when securing Amazon S3, to prevent unauthorized users from gaining access. It is important that you monitor the configuration changes of your S3 buckets, whether the changes are intentional or unintentional. AWS Config can track all configuration changes that are made to an S3 bucket. For example, if an S3 bucket had its permissions and configurations unexpectedly changed, using AWS Config allows you to see the changes made, as well as who made them.

With AWS Config, you can set up AWS Config managed rules that serve as a baseline for your S3 bucket. When any bucket has configurations that deviate from this baseline, you can be alerted by Amazon Simple Notification Service (Amazon SNS) of the bucket being noncompliant.

AWS Config can be used in conjunction with a service called AWS Lambda. If an S3 bucket is noncompliant, AWS Config can trigger a preprogrammed Lambda function and then the Lambda function can resolve those issues. This combination can be used to reduce your operational overhead in maintaining compliance within your S3 buckets.

Figure 8 shows a sample of AWS Config managed rules selected for configuration monitoring and gives a brief description of what the rule does.

Figure 8: Sample selections of AWS Managed Rules

Figure 8: Sample selections of AWS Managed Rules

Figure 9 shows a sample result of a non-compliant configuration and resource inventory listing the type of resource affected and the number of occurrences.

Figure 9: Example of AWS Config non-compliant resources

Figure 9: Example of AWS Config non-compliant resources

Conclusion

AWS has many offerings to help you audit and secure your storage environment. In this post, we discussed the particular combination of AWS services that together will help reduce the amount of time and focus your business devotes to security practices. This combination of services will also enable you to automate your responses to any unwanted permission and configuration changes, saving you valuable time and resources to dedicate elsewhere in your organization.

For more information about pricing of the services mentioned in this post, see AWS Free Tier and AWS Pricing. For more information about Amazon S3 security, see Amazon S3 Preventative Security Best Practices in the Amazon S3 User Guide.

If you have feedback about this post, submit comments in the Comments section below.

Want more AWS Security how-to content, news, and feature announcements? Follow us on Twitter.

Author

Jerry Mullis

Jerry is an Associate Solutions Architect at AWS. His interests are in data migration, machine learning, and device automation. Jerry has previous experience in machine learning research and healthcare management. His certifications include AWS Solutions Architect Pro, AWS Developer Associate, AWS Sysops Admin Associate and AWS Certified Cloud Practitioner. In his free time, Jerry enjoys hiking, playing basketball, and spending time with his wife.
Author

Dave Geyer

Dave is an Associate Solutions Architect at AWS. He has a background in data management and organizational design, and is interested in data analytics and infrastructure security. Dave has advised and worked for customers in the commercial and public sectors, providing them with architectural best practices and recommendations. Dave is interested in the aerospace and financial services industries. Outside of work, he is an adrenaline junkie, and is passionate about mountaineering and high altitudes.

Author

Andrew Chen

Andrew is an Associate Solutions Architect with an interest in data analytics, machine learning, and virtualization of infrastructure. Andrew has previous experience in management consulting in which he worked as a technical lead for various cloud migration projects. In his free time, Andrew enjoys fishing, hiking, kayaking, and keeping up with financial markets.