Tag Archives: halloween

The Howff 3D scanning rig| The MagPi 99

Post Syndicated from Rob Zwetsloot original https://www.raspberrypi.org/blog/the-howff-3d-scanning-rig-the-magpi-99/

How do you create a 3D model of a historic graveyard? With eight Raspberry Pi computers, as Rob Zwetsloot discovers in the latest issue of The MagPi magazine, out now.

The software builds up the 3D model of the graveyard

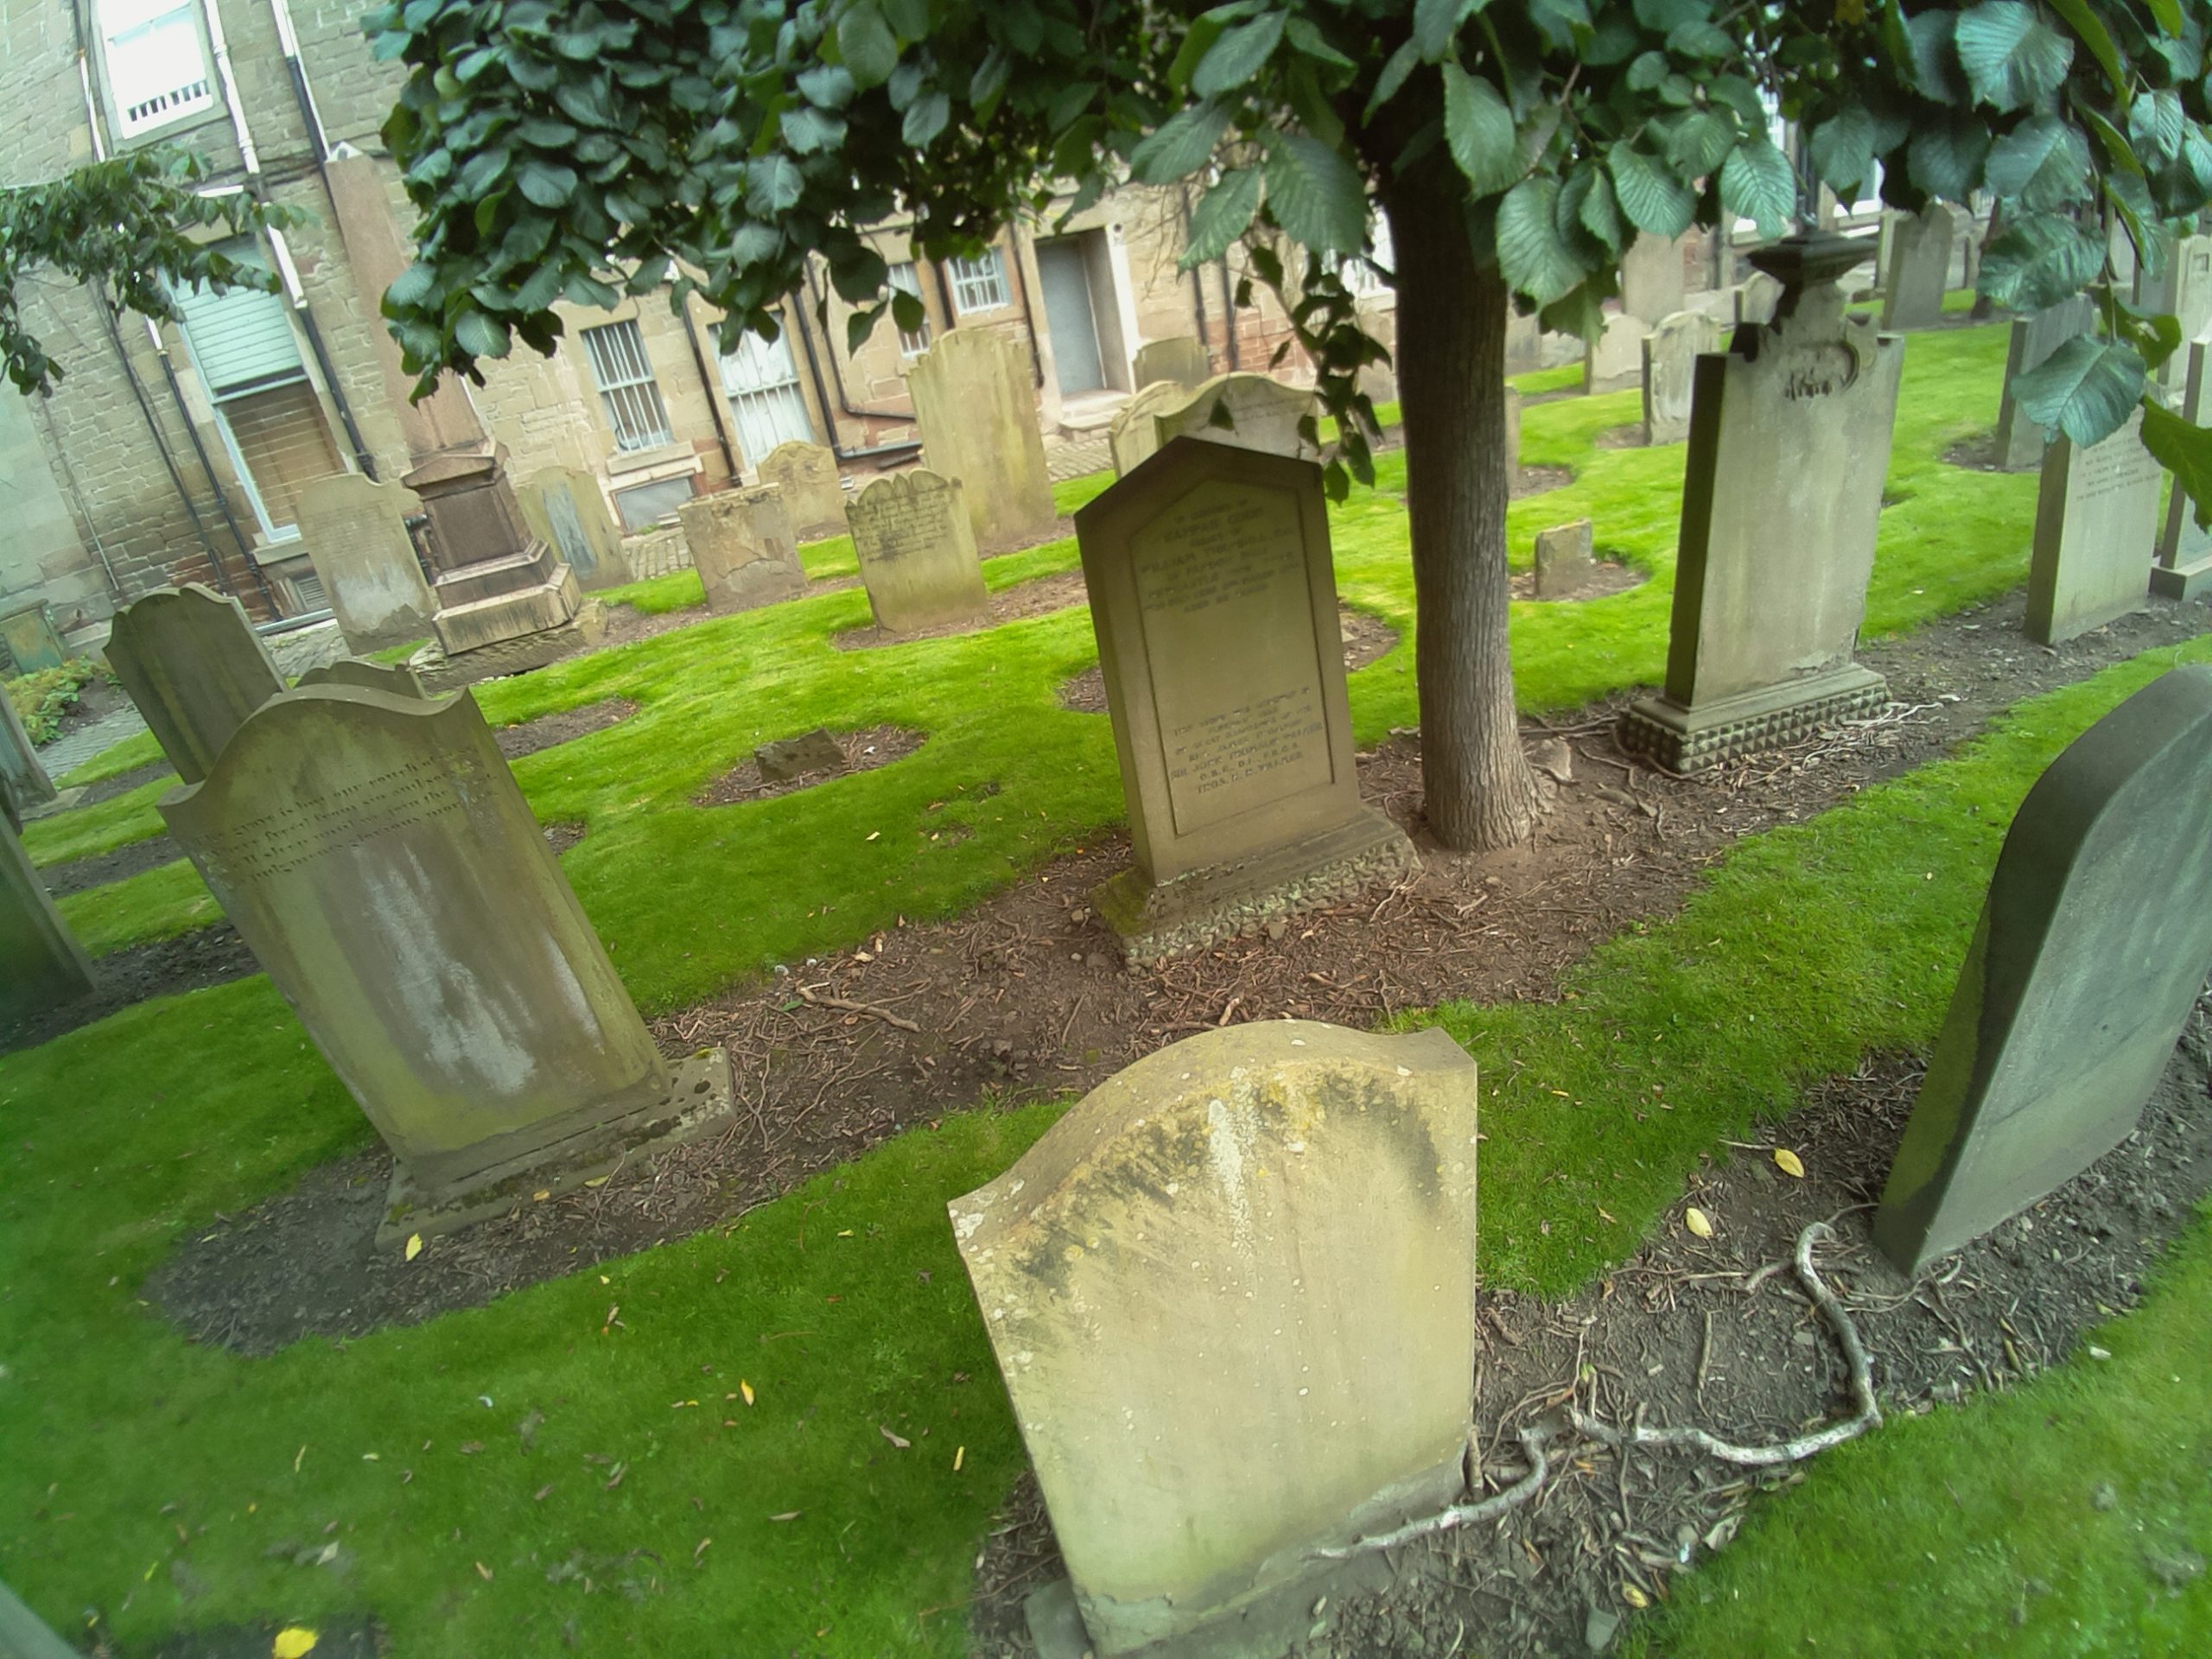
“In the city centre of Dundee is a historical burial ground, The Howff,” says Daniel Muirhead. We should probably clarify that he’s a 3D artist. “This old graveyard is densely packed with around 1500 gravestones and other funerary monuments, which happens to make it an excellent technical challenge for photogrammetry photo capture.”

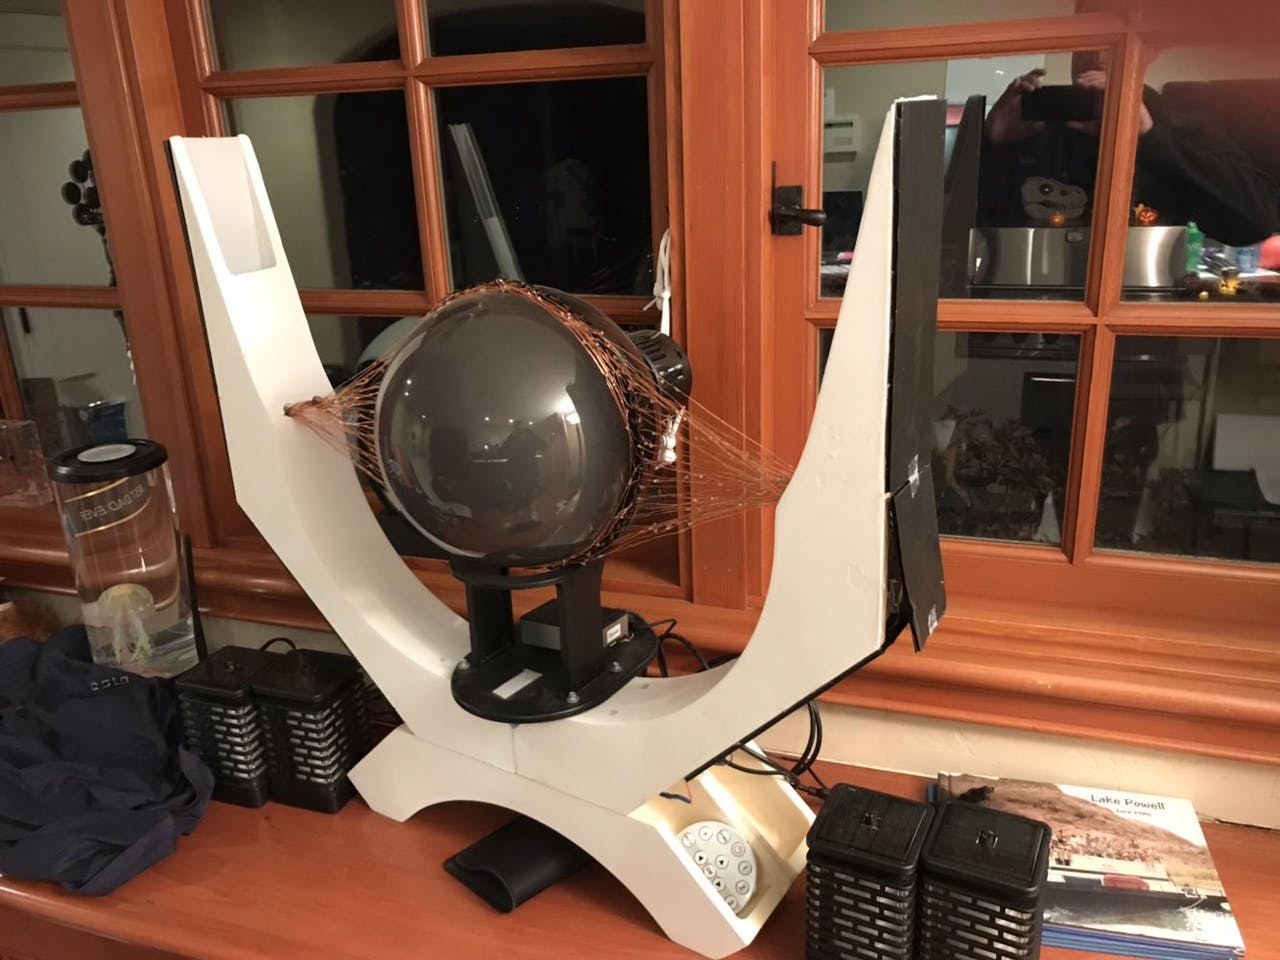
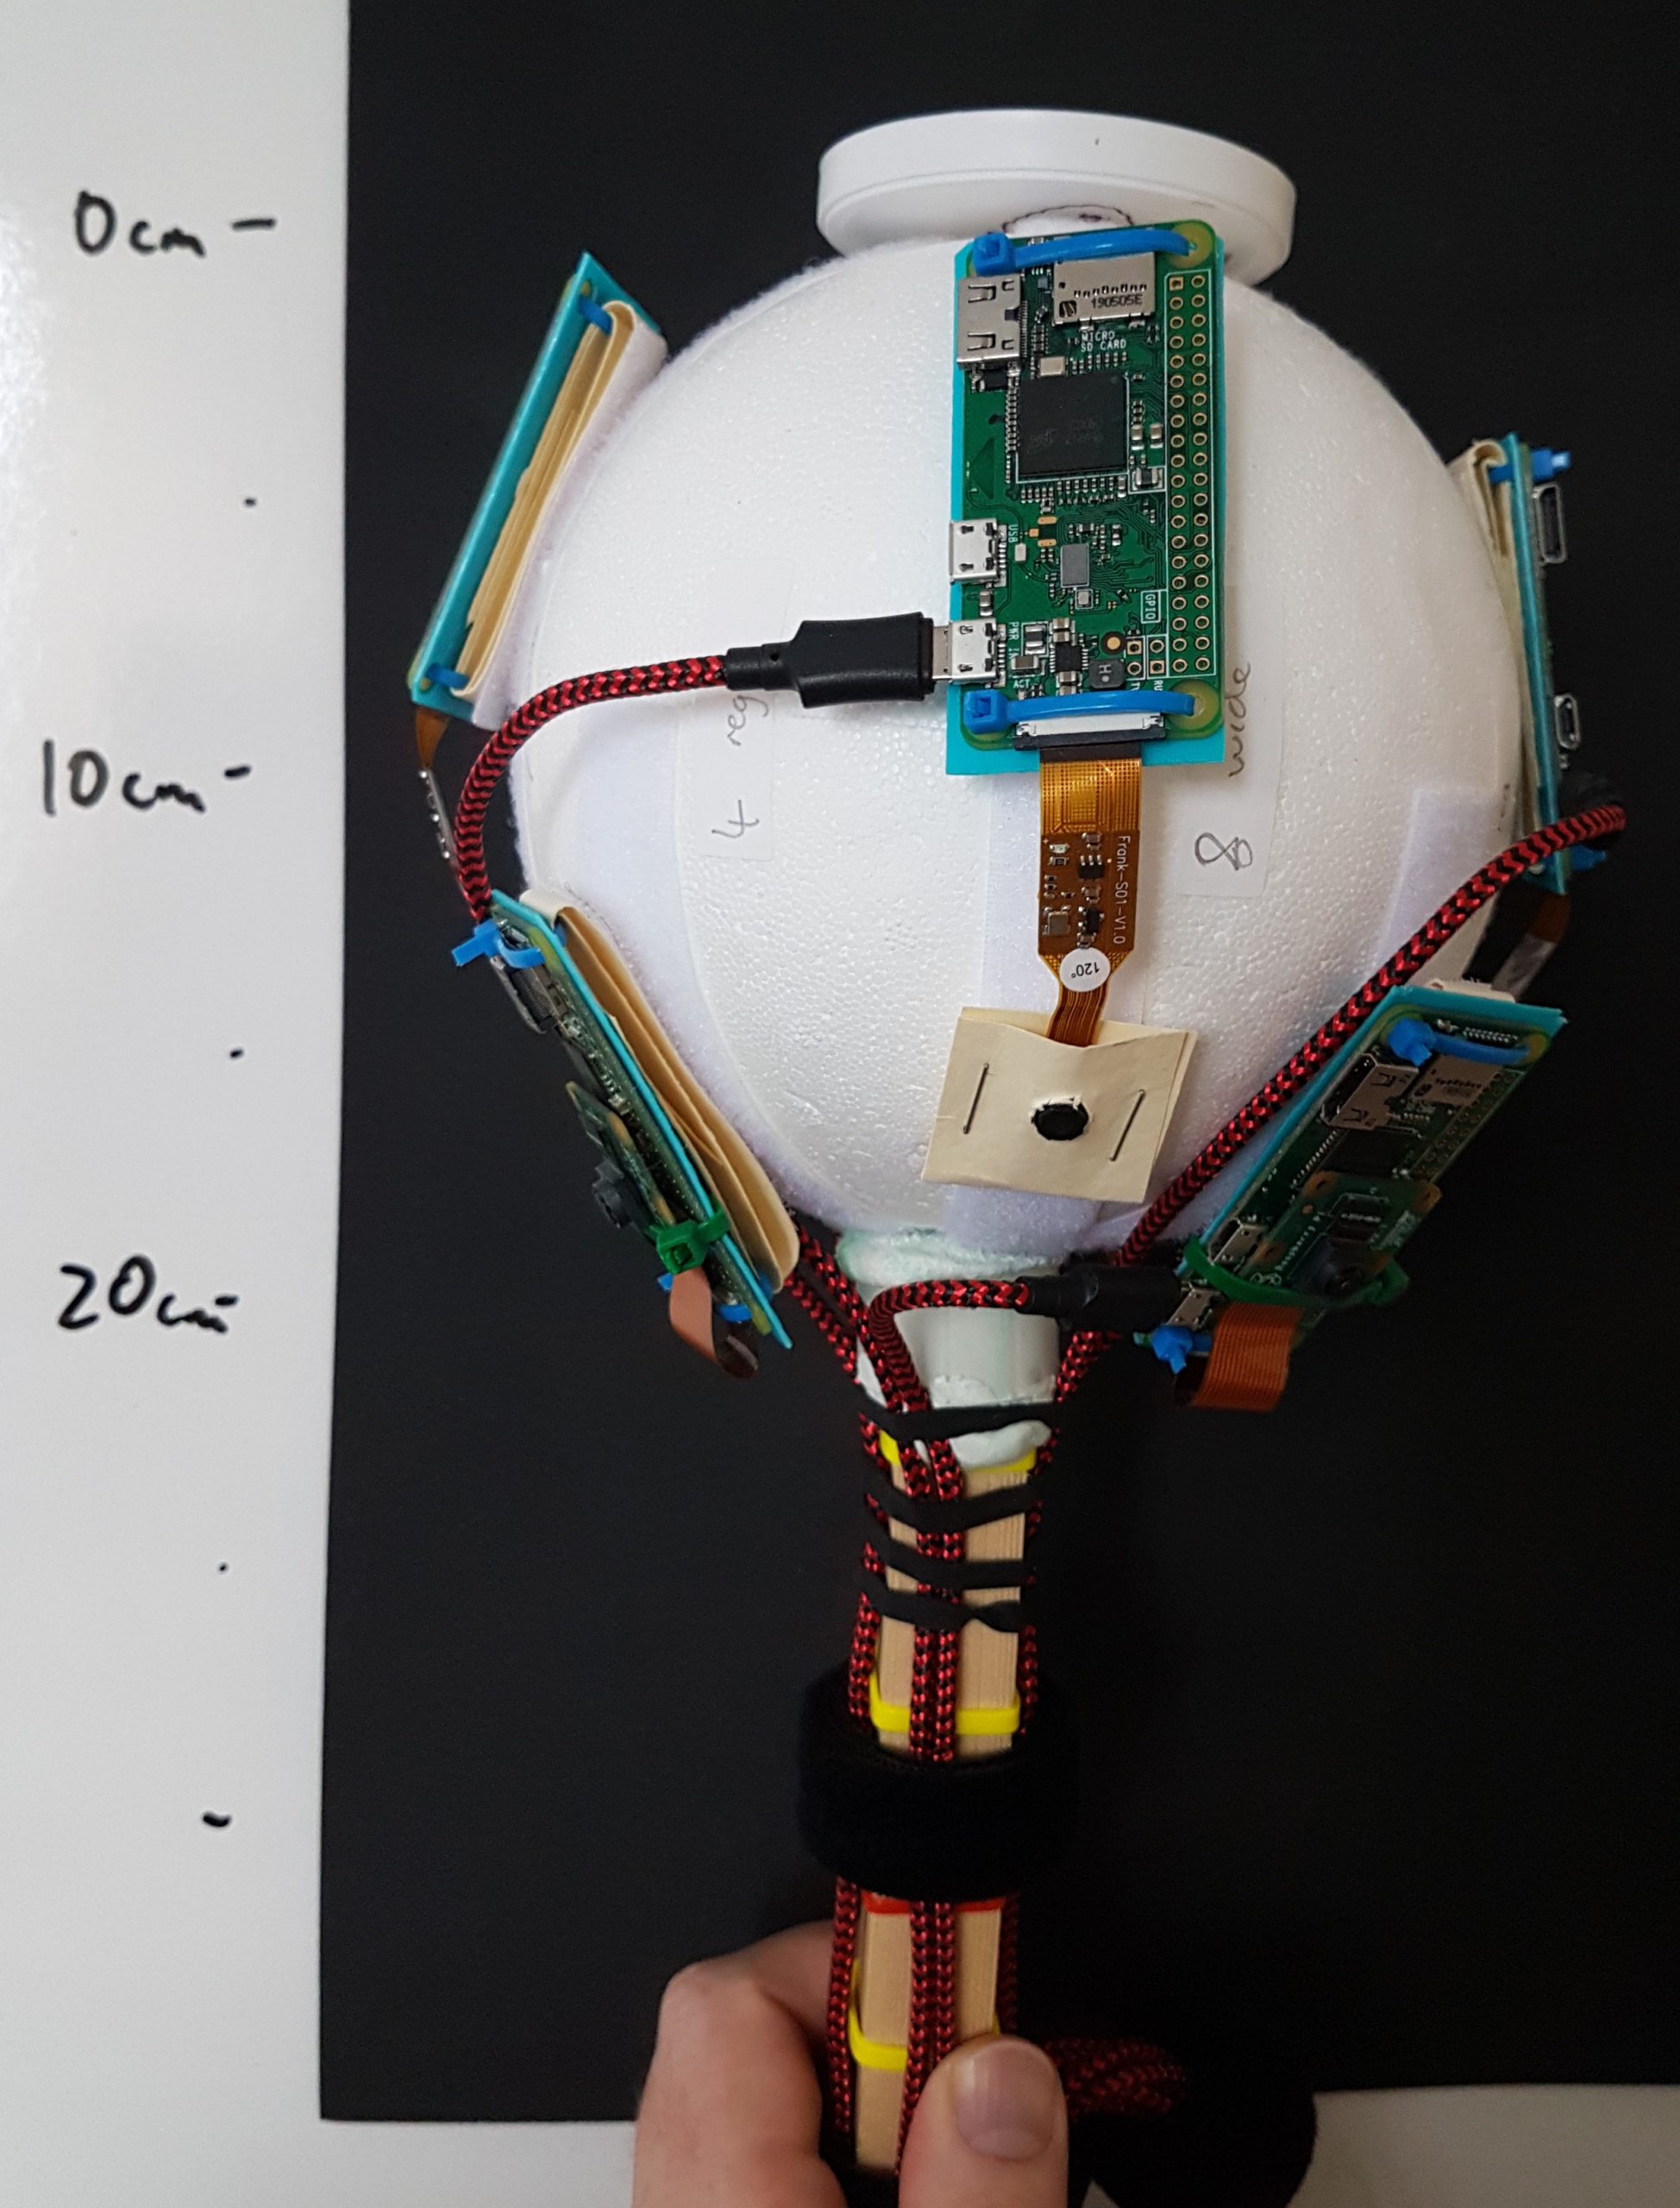
This architecture, stone paths, and vibrant flora is why Daniel ended up creating a 3D-scanning rig out of eight Raspberry Pi computers. And the results are quite stunning.

Eight Raspberry Pi computers are mounted to the ball, with cameras pointing towards the ground

“The goal of this project was to capture photos for use in generating a 3D model of the ground,” he continues. “That model will be used as a base for attaching individual gravestone models and eventually building up a full composite model of this complex subject. The ground model will also be purposed for rendering an ultra-high-resolution map of the graveyard. The historical graveyard has a very active community group that are engaged in its study and digitisation, the Dundee Howff Conservation Group, so I will be sharing my digital outputs with them.”

Google graveyard

There are thousands of pictures, like this one, being used to create the model

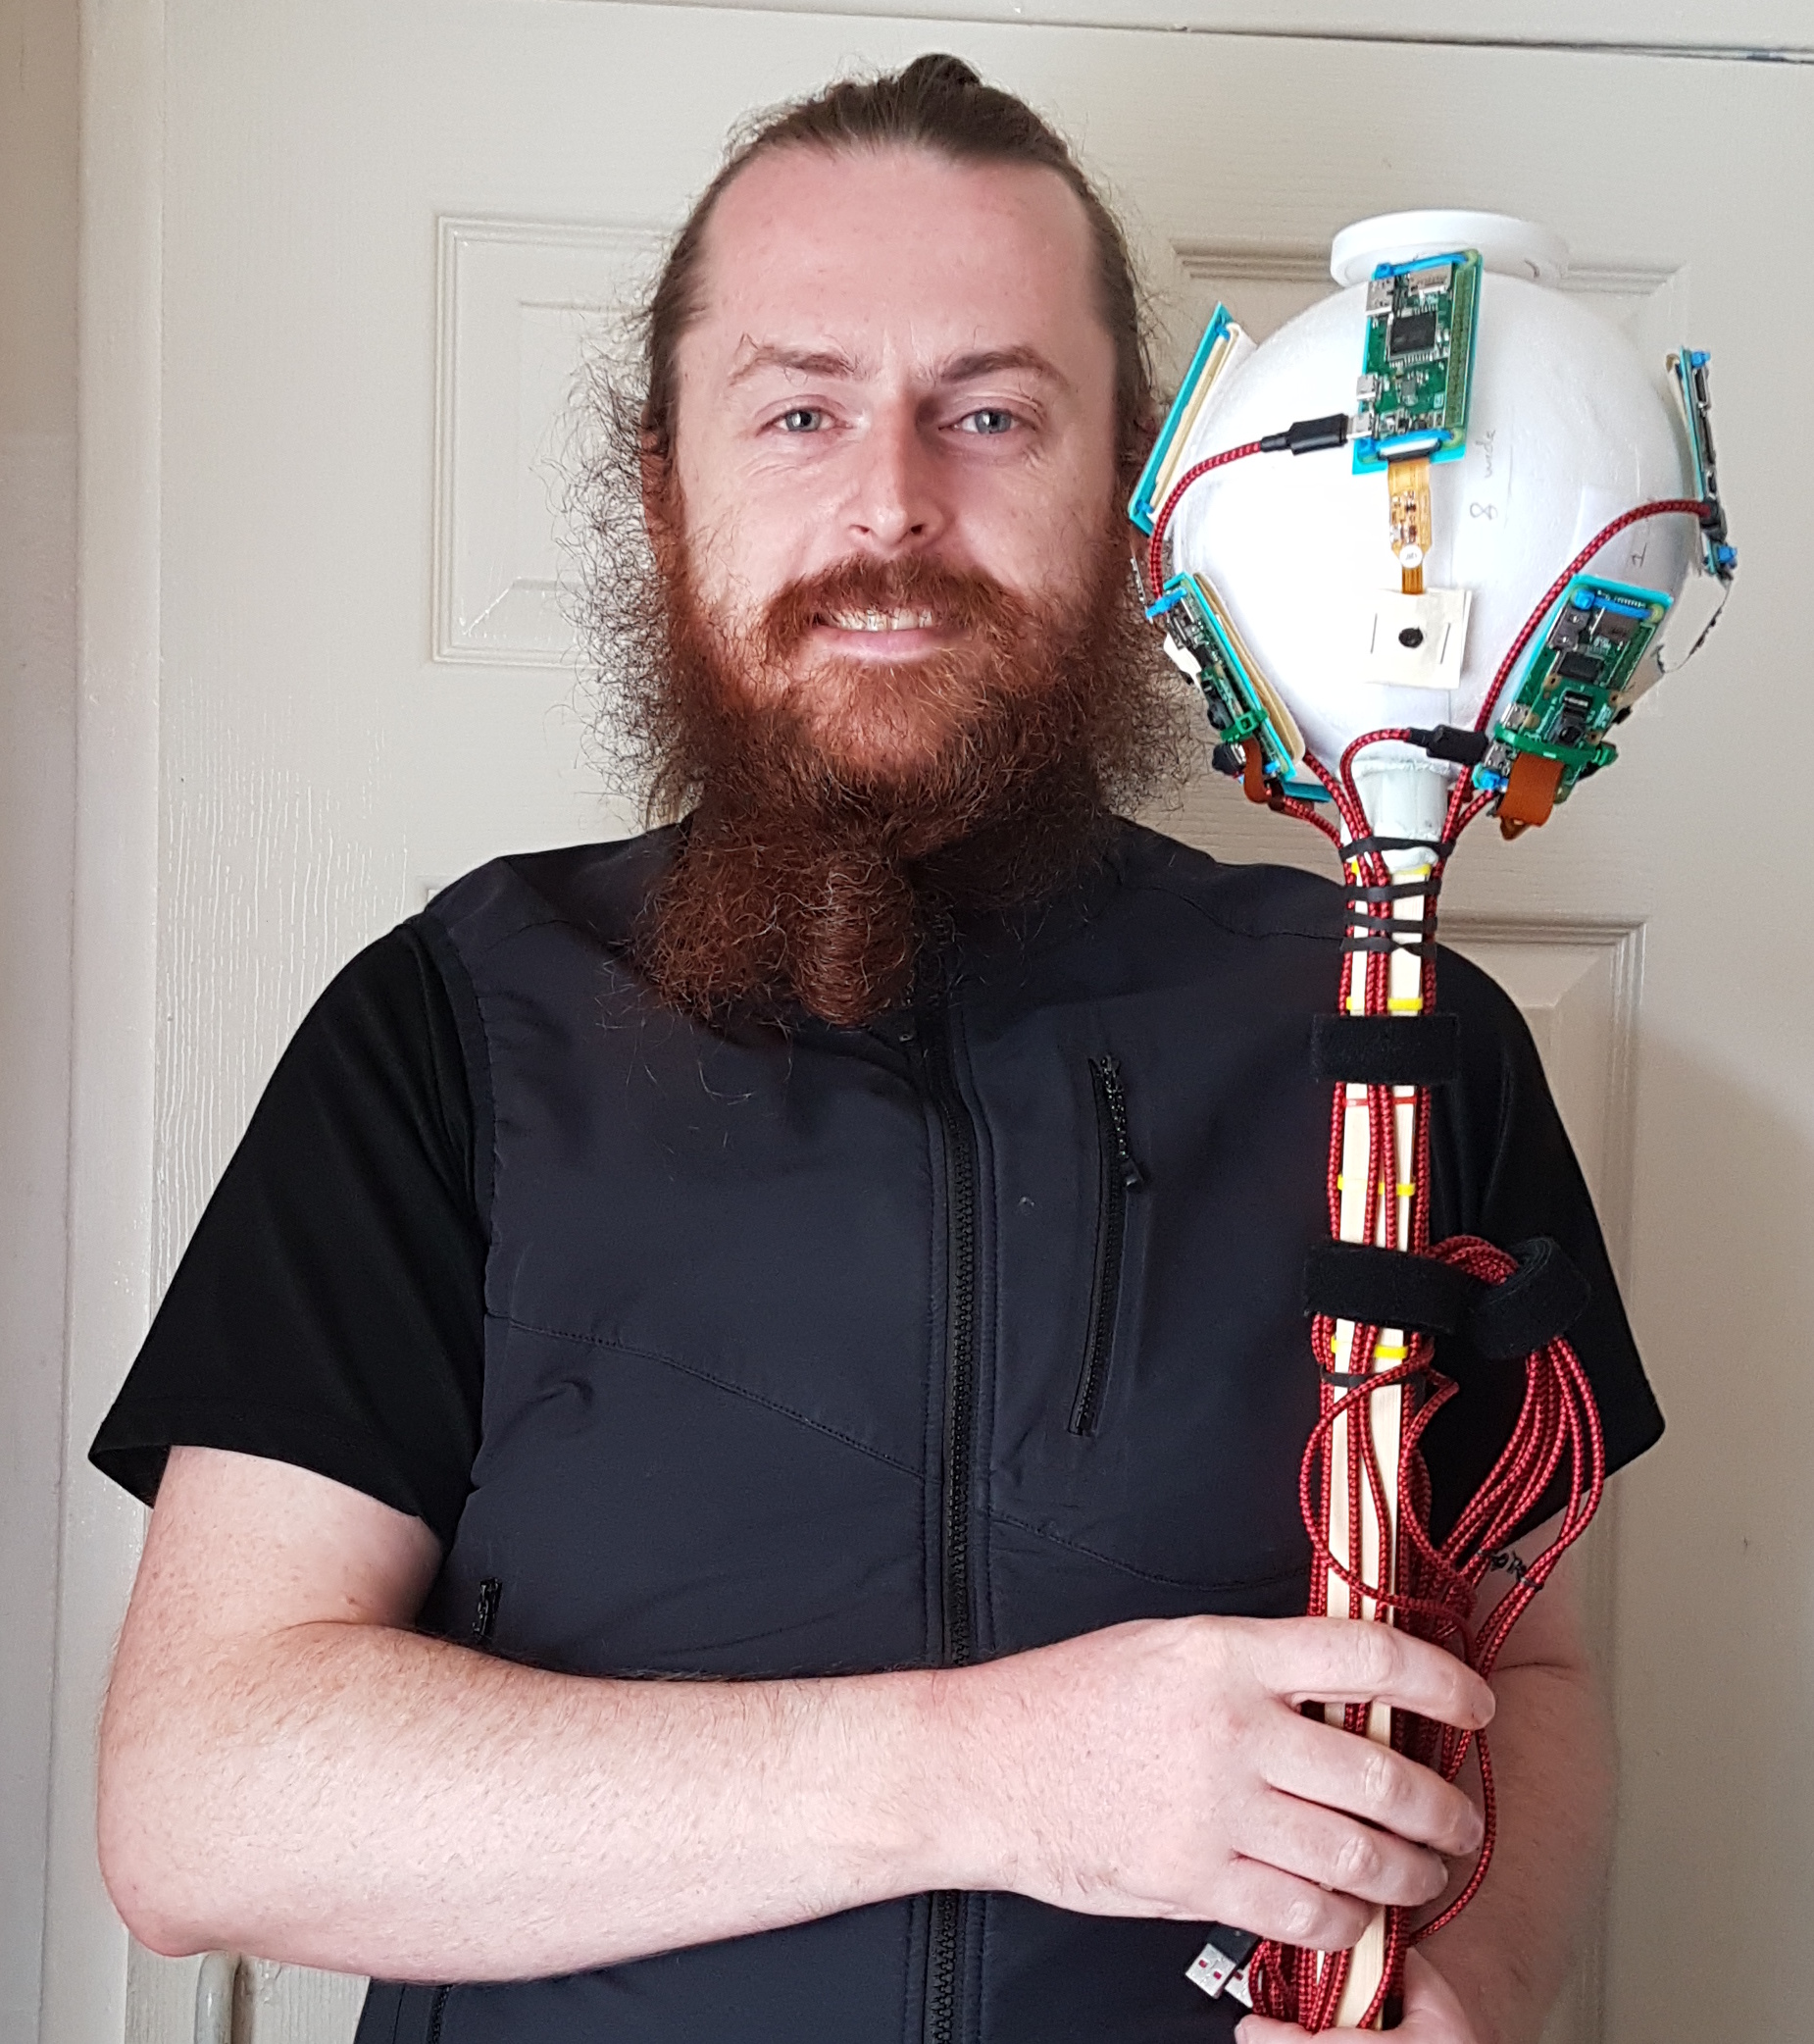
To move the rig throughout the graveyard, Daniel used himself as the major moving part. With the eight Raspberry Pi cameras taking a photo every two seconds, he was able to capture over 180,000 photos over 13 hours of capture sessions.

“The rig was held above my head and the cameras were angled in such a way as to occlude me from view, so I was not captured in the photographs which instead were focused on the ground,” he explains. “Of the eight cameras, four were the regular model with 53.5 ° horizontal field of view (FoV), and the other four were a wide-angle model with 120 ° FoV. These were arranged on the rig pointing outwards in eight different directions, alternating regular and wide-angle, all angled at a similar pitch down towards the ground. During capture, the rig was rotated by +45 ° for every second position, so that the wide-angles were facing where the regulars had been facing on the previous capture, and vice versa.”
Daniel worked according to a very specific grid pattern, staying in one spot for five seconds at a time, with the hopes that at the end he’d have every patch of ground photographed from 16 different positions and angles.

Maker Daniel Muirhead is a 3D artist with an interest in historical architecture

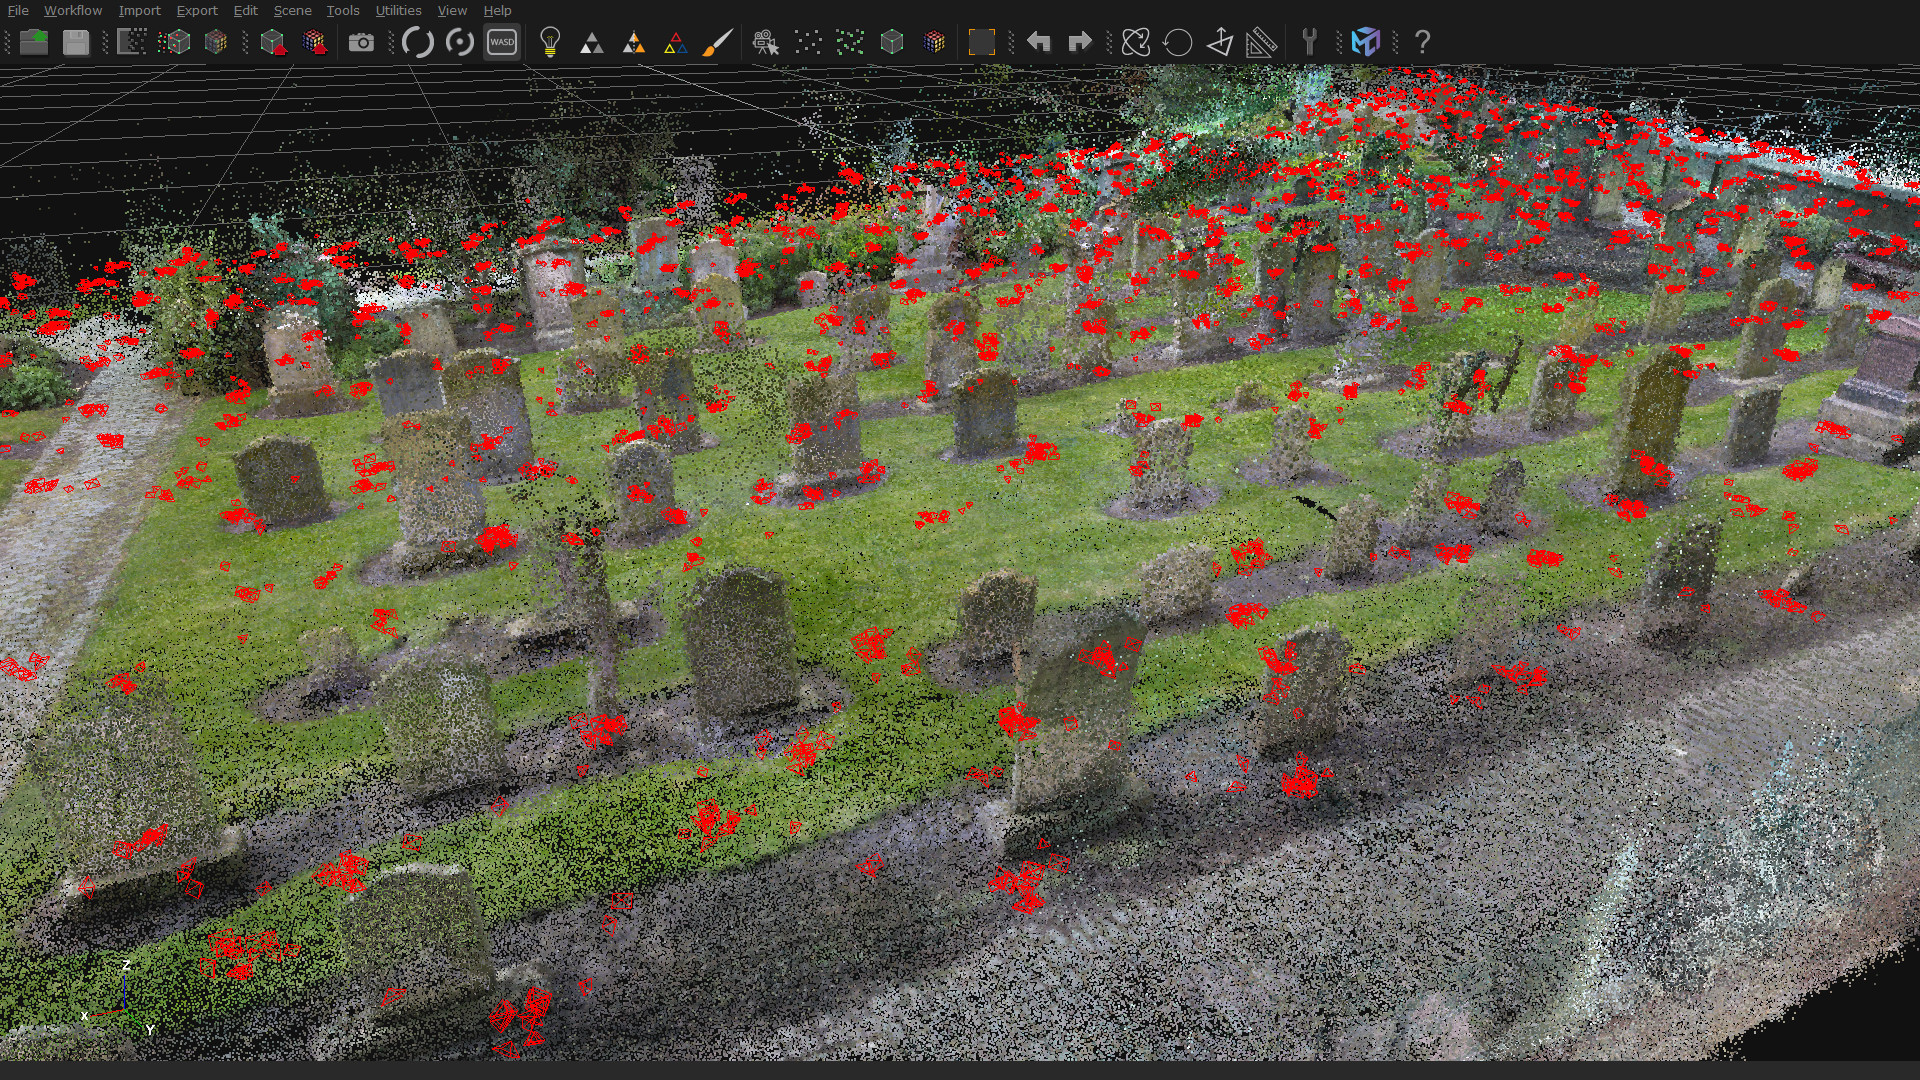
“With a lot of photo data to scan through for something fairly complex, we wondered how well the system had worked. Daniel tells us the only problems he had were with some bug fixing on his code: “The images were separated into batches of around 10,000 (1250 photos from each of the eight cameras), plugged into the photogrammetry software, and the software had no problem in reconstructing the ground as a 3D model.”

Accessible 3D surveying

He’s now working towards making it accessible and low-cost to others that might want it. “Low-cost in the triple sense of financial, labour, and time,” he clarifies. “I have logged around 8000 hours in a variety of photogrammetry softwares, in the process capturing over 300,000 photos with a regular camera for use in such files, so I have some experience in this area.”

“With the current state of technology, it should be possible with around £1000 in equipment to perform a terrestrial photo-survey of a town centre in under an hour, then with a combined total of maybe three hours’ manual processing and 20 hours’ automated computer processing, generate a high-quality 3D model, the total production time being under 24 hours. It should be entirely plausible for a local community group to use such a method to perform weekly (or at least monthly) 3D snapshots of their town centre.”

The MagPi issue 99 – Out now

The MagPi magazine is out now, available in print from the Raspberry Pi Press onlinestore, your local newsagents, and the Raspberry Pi Store, Cambridge.

You can also download the PDF directly from the MagPi magazine website.

The post The Howff 3D scanning rig| The MagPi 99 appeared first on Raspberry Pi.

Pumpkin Pi Build Monitor

Post Syndicated from Ashley Whittaker original https://www.raspberrypi.org/blog/pumpkin-pi-build-monitor/

Following on from Rob Zwetsloot’s Haunted House Hacks in the latest issue of The MagPi magazine, GitHub’s Martin Woodward has created a spooky pumpkin that warns you about the thing programmers find scariest of all — broken builds. Here’s his guest post describing the project:

“When you are browsing code looking for open source projects, seeing a nice green passing build badge in the ReadMe file lets you know everything is working with the latest version of that project. As a programmer you really don’t want to accidentally commit bad code, which is why we often set up continuous integration builds that constantly check the latest code in our project.”

“I decided to create a 3D-printed pumpkin that would hold a Raspberry Pi Zero with an RGB LED pHat on top to show me the status of my build for Halloween. All the code is available on GitHub alongside the 3D printing models which are also available on Thingiverse.”

Components

  • Raspberry Pi Zero (I went for the WH version to save me soldering on the header pins)
  • Unicorn pHat from Pimoroni
  • Panel mount micro-USB extension
  • M2.5 hardware for mounting (screws, male PCB standoffs, and threaded inserts)

“For the 3D prints, I used a glow-in-the-dark PLA filament for the main body and Pi holder, along with a dark green PLA filament for the top plug.”

“I’ve been using M2.5 threaded inserts quite a bit when printing parts to fit a Raspberry Pi, as it allows you to simply design a small hole in your model and then you push the brass thread into the gap with your soldering iron to melt it securely into place ready for screwing in your device.”

Threaded insert

“Once the inserts are in, you can screw the Raspberry Pi Zero into place using some brass PCB stand-offs, place the Unicorn pHAT onto the GPIO ports, and then screw that down.”

pHAT install

“Then you screw in the panel-mounted USB extension into the back of the pumpkin, connect it to the Raspberry Pi, and snap the Raspberry Pi holder into place in the bottom of your pumpkin.”

Inserting the base

Code along with Martin

“Now you are ready to install the software.  You can get the latest version from my PumpkinPi project on GitHub. “

“Format the micro SD Card and install Raspberry Pi OS Lite. Rather than plugging in a keyboard and monitor, you probably want to do a headless install, configuring SSH and WiFi by dropping an ssh file and a wpa_supplicant.conf file onto the root of the SD card after copying over the Raspbian files.”

“You’ll need to install the Unicorn HAT software, but they have a cool one-line installer that takes care of all the dependencies including Python and Git.”

\curl -sS https://get.pimoroni.com/unicornhat | bash

“In addition, we’ll be using the requests module in Python which you can install with the following command:”

sudo pip install requests

“Next you want to clone the git repo.”

git clone https://github.com/martinwoodward/PumpkinPi.git

“You then need to modify the settings to point at your build badge. First of all copy the sample settings provided in the repo:”

cp ~/PumpkinPi/src/local_settings.sample ~/PumpkinPi/src/local_settings.py

“Then edit the BADGE_LINK variable and point at the URL of your build badge.”

# Build Badge for the build you want to monitor

BADGE_LINK = "https://github.com/martinwoodward/calculator/workflows/CI/badge.svg?branch=main"

# How often to check (in seconds). Remember - be nice to the server. Once every 5 minutes is plenty.

REFRESH_INTERVAL = 300

“Finally you can run the script as root:”

sudo python ~/PumpkinPi/src/pumpkinpi.py &

“Once you are happy everything is running how you want, don’t forget you can run the script at boot time. The easiest way to do this is to use crontab. See this cool video from Estefannie to learn more. But basically you do sudo crontab -e then add the following:”

@reboot /bin/sleep 10 ; /usr/bin/python /home/pi/PumpkinPi/src/pumpkinpi.py &

“Note that we are pausing for 10 seconds before running the Python script. This is to allow the WiFi network to connect before we check on the state of our build.”

“The current version of the pumpkinpi script works with all the SVG files produced by the major hosted build providers, including GitHub Actions, which is free for open source projects. But if you want to improve the code in any way, I’m definitely accepting pull requests on it.”

“Using the same hardware you could monitor lots of different things, such as when someone posts on Twitter, what the weather will be tomorrow, or maybe just code your own unique multi-coloured display that you can leave flickering in your window.”

“If you build this project or create your own pumpkin display, I’d love to see pictures. You can find me on Twitter @martinwoodward and on GitHub.”

The post Pumpkin Pi Build Monitor appeared first on Raspberry Pi.

Haunted House hacks

Post Syndicated from Rob Zwetsloot original https://www.raspberrypi.org/blog/haunted-house-hacks/

Spookify your home in time for Halloween with Rob Zwetsloot and these terror-ific projects!

We picked four of our favourites from a much longer feature in the latest issue of The MagPi magazine, so make sure you check it out if you need more Haunted House hacks in your life.

Raspberry Pi Haunted House

This project is a bit of a mixture of indoors and outdoors, with a doorbell on the house activating a series of spooky effects like a creaking door, ‘malfunctioning’ porch lights, and finally a big old monster mash in the garage.

A Halloween themed doorbell

MagPi magazine talked to its creator Stewart Watkiss about it a few years ago and he revealed how he used a PiFace HAT to interface with home automation techniques to create the scary show, although it can be made much easier these days thanks to Energenie. Our favourite part, though, is still the Home Alone-esque monster party that caps it off.

Check it our for yourself here.

Eye of Sauron

It’s a very nice-looking build as well

The dreaded dark lord Sauron from Lord of the Rings watched over Middle-earth in the form of a giant flaming eye atop his black tower, Barad-dûr. Mike Christian’s version sits on top of a shed in Saratoga, CA.

The eye of sauron on top of a barn lit in red lights
Atop the shed with some extra light effects, it looks very scary

It makes use of the Snake Eyes Bonnet from Adafruit, with some code modifications and projecting onto a bigger eye. Throw in some cool lights and copper wires and you get a nice little effect, much like that from the films.

There are loads more cool photos on Mike’s original project page.

Raspberry Pi-powered Jack-o-Lantern

We love the eyes and scary sounds in this version that seem to follow you around

A classic indoor Halloween decoration (and outdoor, according to American movies) is the humble Jack-o’-lantern. While you could carve your own for this kind of project (and we’ve seen many people do so), this version uses a pre-cut, 3D-printed pumpkin.

3D printed pumpkin glowing orange
The original 3D print lit with a single source is still fairly scary

If you want to put one outside as well, we highly recommend you add some waterproofing or put it under a porch of some kind, especially if you live in the UK.

Here’s a video about the project by the maker.

Scary door

You’re unlikely to trick someone already in your house with a random door that has appeared out of nowhere, but while they’re investigating they’ll get the scare of their life. This door was created as a ‘sequel’ to a Scary Porch, and has a big monitor where a window might be in the door. There’s also an array of air-pistons just behind the door to make it sound like someone is trying to get out.

There are various videos that can play on the door screen, and they’re randomised so any viewers won’t know what to expect. This one also uses relays, so be careful.

This project is the brainchild of the element14 community and you can read more about how it was made here.

The MagPi magazine is out now, available in print from the Raspberry Pi Press onlinestore, your local newsagents, and the Raspberry Pi Store, Cambridge.

You can also download the PDF directly from the MagPi magazine website.

The post Haunted House hacks appeared first on Raspberry Pi.