Tag Archives: The MagPi

Machine Learning Prosthetic Arm | The MagPi #110

Post Syndicated from Phil King original https://www.raspberrypi.org/blog/machine-learning-prosthetic-arm-the-magpi-110/

This intelligent arm learns how to move naturally, based on what the wearer is doing, as Phil King discovers in the latest issue of The MagPi, out now.

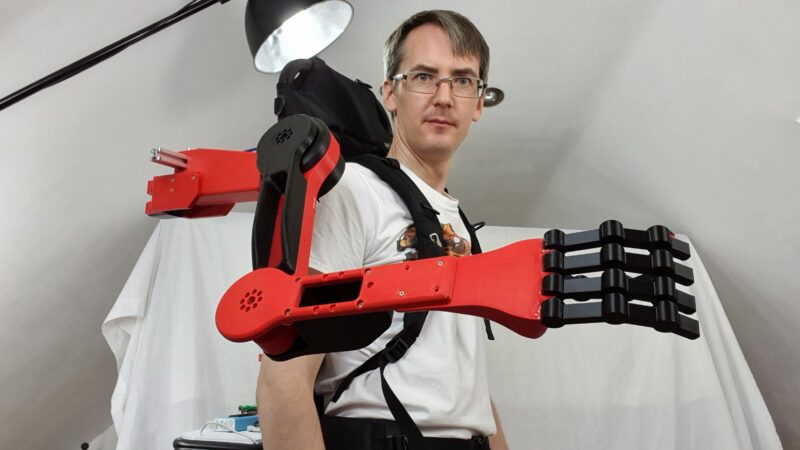
Known for his robotic creations, popular YouTuber James Bruton is also a keen Iron Man cosplayer, and his latest invention would surely impress Tony Stark: an intelligent prosthetic arm that can move naturally and autonomously, depending on the wearer’s body posture and limb movements.

Equipped with three heavy-duty servos, the prosthetic arm moves naturally based on the data from IMU sensors on the wearer’s other limbs

“It’s a project I’ve been thinking about for a while, but I’ve never actually attempted properly,” James tells us. “I thought it would be good to have a work stream of something that could be useful.”

Motion capture suit

To obtain the body movement data on which to base the arm’s movements, James considered using a brain computer, but this would be unreliable without embedding electrodes in his head! So, he instead opted to train it with machine learning.

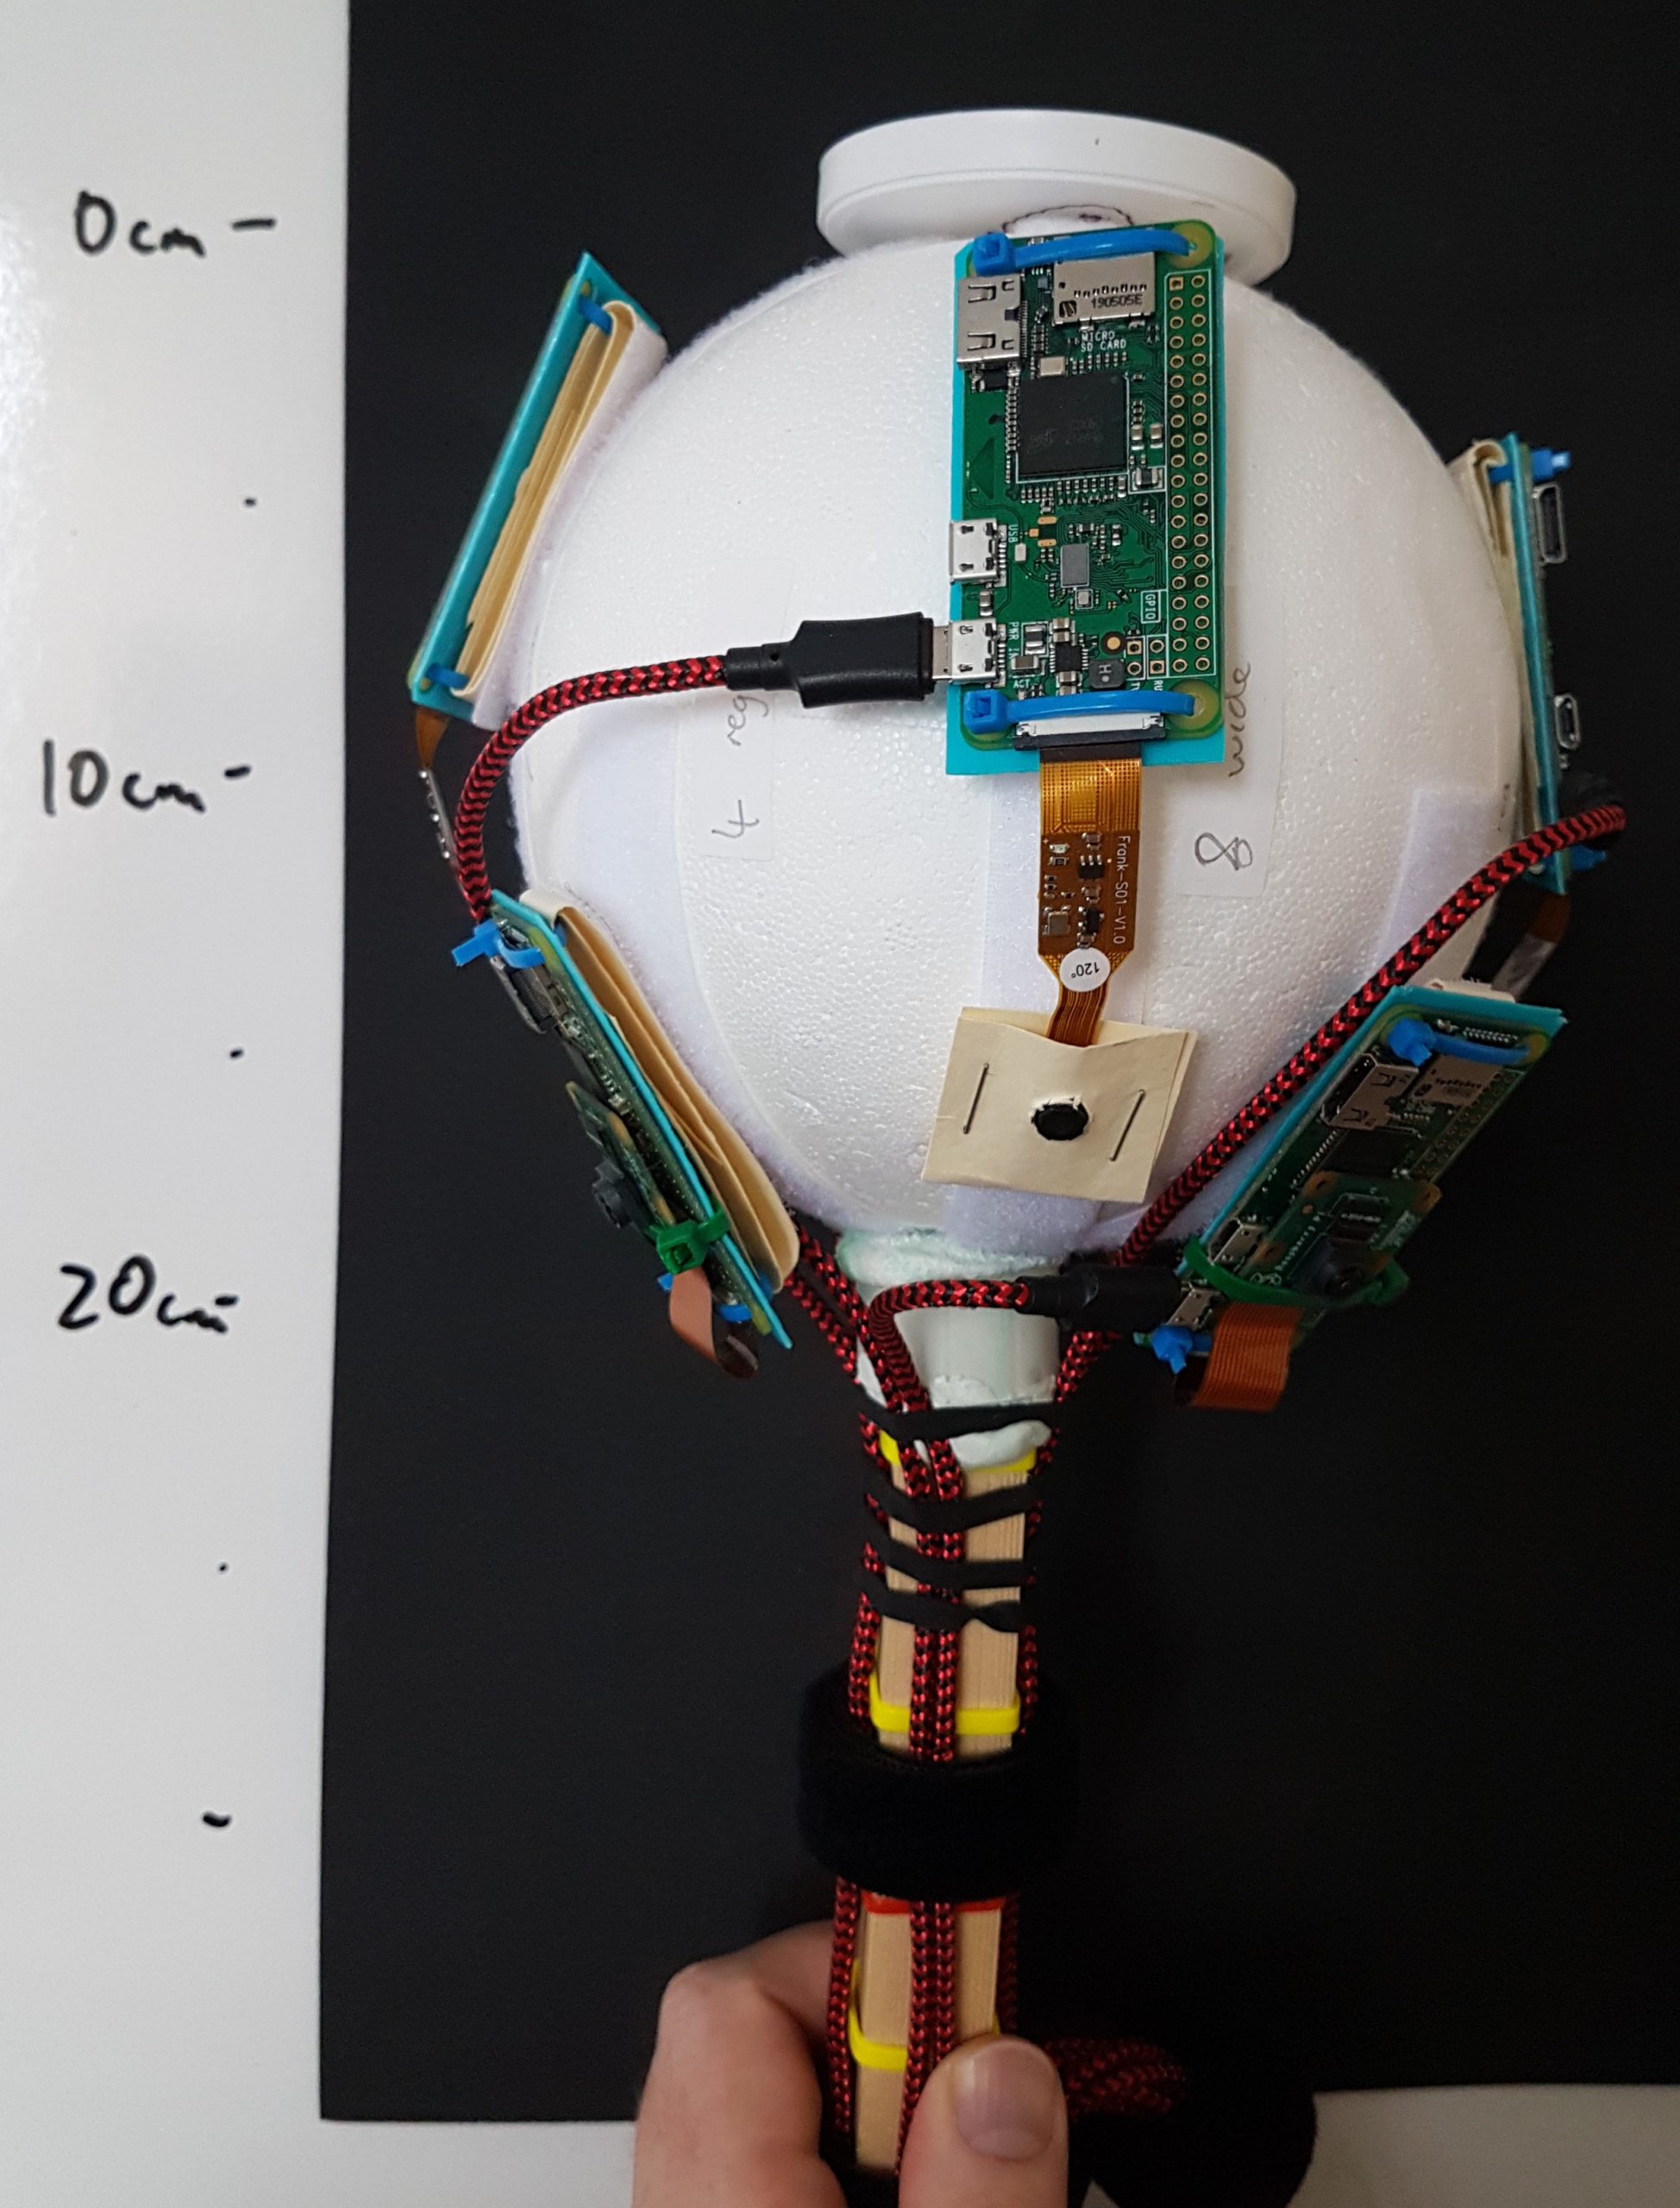
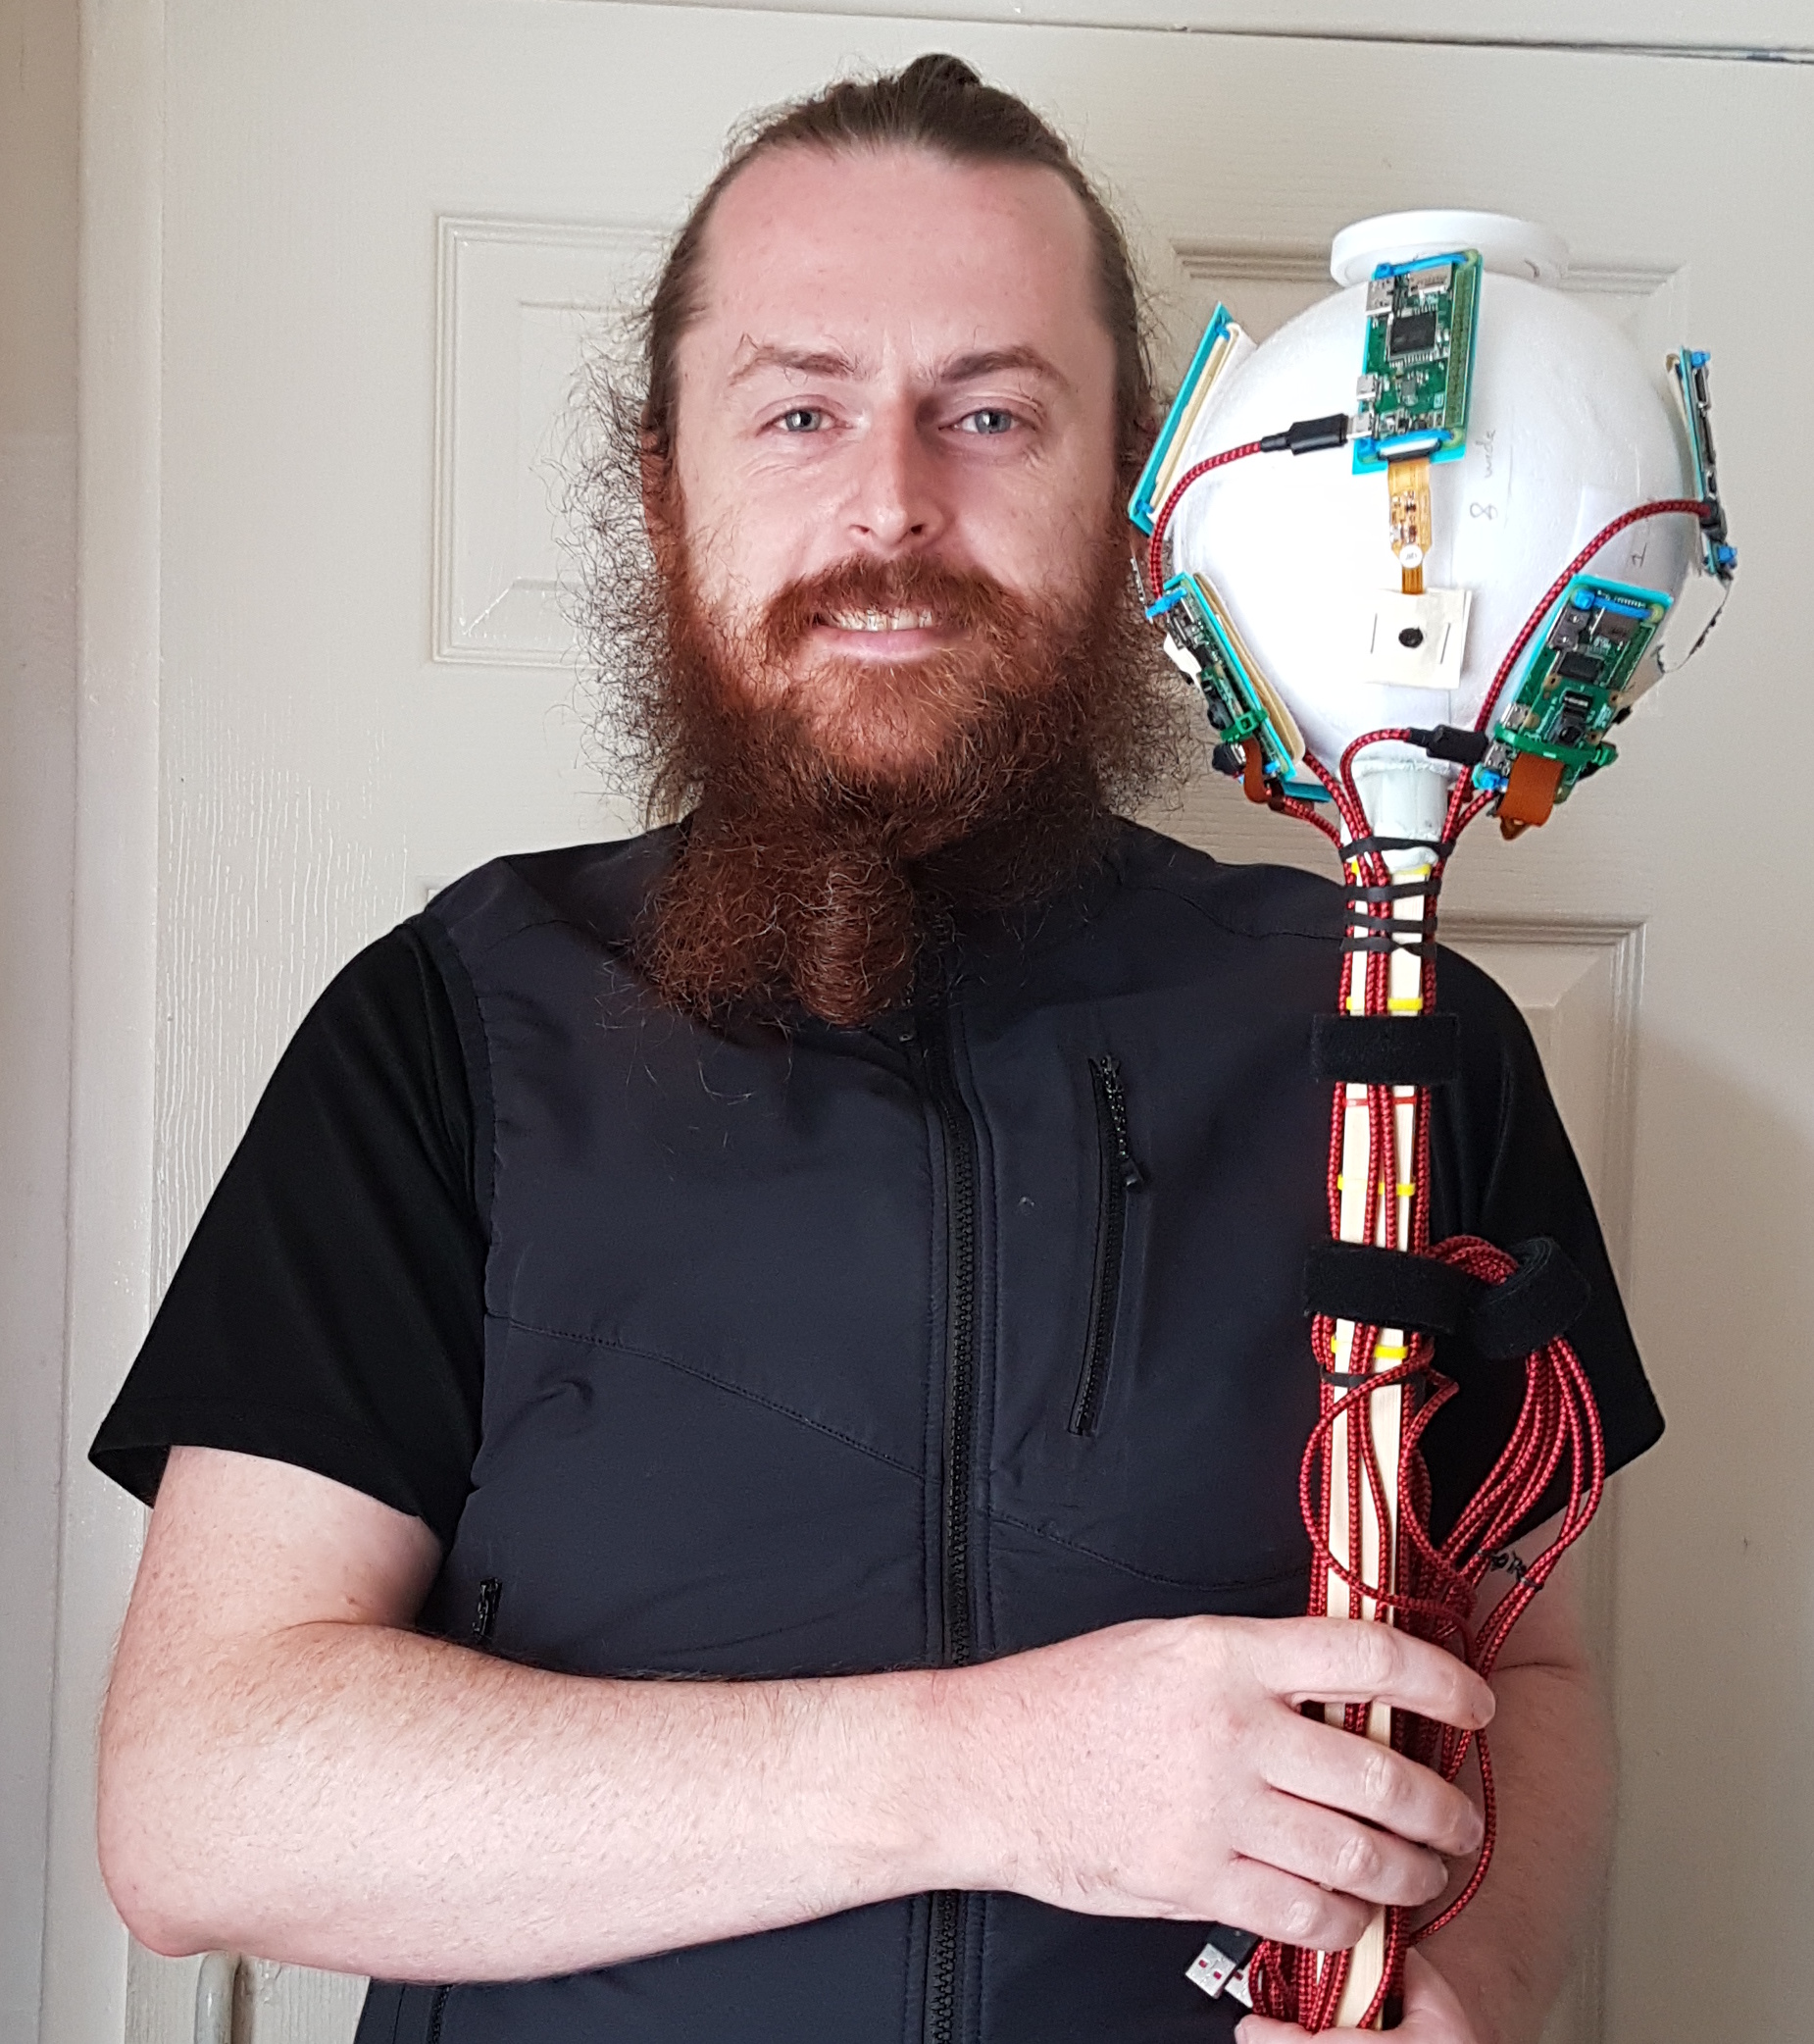
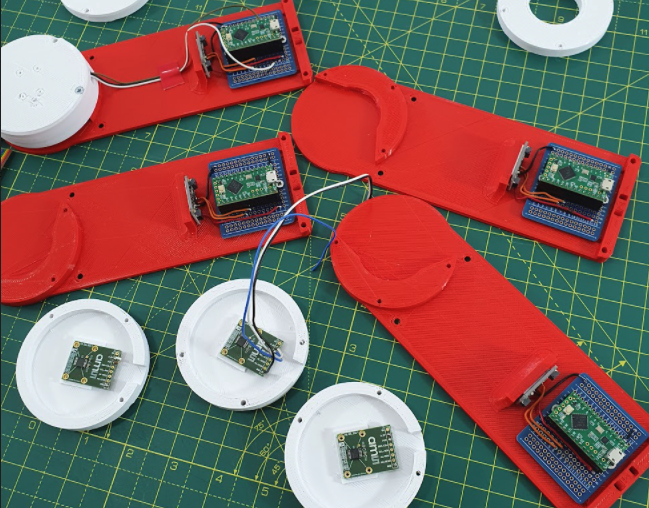
For this he created a motion capture suit from 3D-printed parts to gather all the data from his body motions: arms, legs, and head. The suit measures joint movements using rotating pieces with magnetic encoders, along with limb and head positions – via a special headband – using MPU-6050 inertial measurement units and Teensy LC boards.

Part of the motion capture suit, the headband is equipped with an IMU to gather movement data

Collected by a Teensy 4.1, this data is then fed into a machine learning model running on the suit’s Raspberry Pi Zero using AOgmaNeo, a lightweight C++ software library designed to run on low-power devices such a microcontrollers.

“AOgmaNeo is a reinforcement machine learning system which learns what all of the data is doing in relation to itself,” James explains. “This means that you can remove any piece of data and, after training, the software will do its best to replace the missing piece with a learned output. In my case, I’m removing the right arm and using the learned output to drive the prosthetic arm, but it could be any limb.”

While James notes that AOgmaNeo is actually meant for reinforcement learning,“in this case we know what the output should be rather than it being unknown and learning through binary reinforcement.”

The motion capture suit comprises 3D-printed parts, each equipped with a magnetic rotary encoder, MPU-6050 IMU, and Teensy LC

To train the model, James used distinctive repeated motions, such as walking, so that the prosthetic arm would later be able to predict what it should do from incoming sensor data. He also spent some time standing still so that the arm would know what to do in that situation.

New model arm

With the machine learning model trained, Raspberry Pi Zero can be put into playback mode to control the backpack-mounted arm’s movements intelligently. It can then duplicate what the wearer’s real right arm was doing during training depending on the positions and movements of other body parts.

So, as he demonstrates in his YouTube video, if James starts walking on the spot, the prosthetic arm swings the opposite way to his left arm as he strides along, and moves forward as raises his left leg. If he stands still, the arm will hang down by his side. The 3D-printed hand was added purely for aesthetic reasons and the fingers don’t move.

Subscribe to James’ YouTube channel

James admits that the project is highly experimental and currently an early work in progress. “I’d like to develop this concept further,” he says, “although the current setup is slightly overambitious and impractical. I think the next step will be to have a simpler set of inputs and outputs.”

While he generally publishes his CAD designs and code, the arm “doesn’t work all that well, so I haven’t this time. AOgmaNeo is open-source, though (free for personal use), so you can make something similar if you wished.” What would you do with an extra arm? 

Get The MagPi #110 NOW!

MagPi 110 Halloween cover

You can grab the brand-new issue right now from the Raspberry Pi Press store, or via our app on Android or iOS. You can also pick it up from supermarkets and newsagents. There’s also a free PDF you can download.

The post Machine Learning Prosthetic Arm | The MagPi #110 appeared first on Raspberry Pi.

The Official Raspberry Pi Handbook 2022

Post Syndicated from Rob Zwetsloot original https://www.raspberrypi.org/blog/the-official-raspberry-pi-handbook-2022/

Get the Official Raspberry Pi Handbook 2022 right now! Over 200 pages of Raspberry Pi projects, tutorials, tips, and reviews.

Official Raspberry Pi Handbook 2022

Hey folks, Rob from The MagPi here. It’s been a while! I hope you’re doing well.

We’ve been on double duty this month. As well as making an amazing new issue of The MagPi (out next week), we’ve also put together a brand new book: the Official Raspberry Pi Handbook 2022, which is on sale now!

Official Raspberry Pi Handbook 2022

Packed with projects

The new Handbook is crammed full of incredible community projects, some of our best build guides, an introduction to Raspberry Pi Pico, and reviews of cool Raspberry Pi kits and accessories – all stuffed into 200 pages. Here are some highlights from the book:

Official Raspberry Pi Handbook 2022

Lunchbox Arcade Game – make lunchtime far more exciting by busting out some Street Fighter II and having someone eat your hadoukens. Make sure to eat between rounds for maximum satisfaction.

We Still Fax – one part escape room, one part performance theatre, this relic of office technology has been hacked with a Raspberry Pi to be the centrepiece of a special show in your own living room.

iPod Classic Spotify Player – using a Raspberry Pi Zero W, this old-school iPod has been upgraded with Spotify access. The interface has even been recreated to work the same way as the old iPod, scroll wheel and all.

Official Raspberry Pi Handbook 2022

Play classic console games legally on Raspberry Pi – there are a surprising number of ways to get legal ROMs for Raspberry Pi-powered consoles, as well as a plethora of modern games made for the older hardware.

Build the ultimate media centre – get TV, movies, games, streaming, music, and more on one incredible Raspberry Pi build. It looks good too, thanks to the excellent case.

Stellina – this automated telescope is powered by Raspberry Pi and connects to a tablet to look at planets and other distant celestial objects.

… And much, much more!

Official Raspberry Pi Handbook 2022

Where can I buy it?

You can grab the Official Raspberry Pi Handbook 2022 from our online store, the Raspberry Pi Store in Cambridge, from our Android and iOS app, and in the real world at some newsagents. It will make an excellent stocking stuffer in a few months time. You can also get the PDF free from our website.

Until next time, take care of yourselves!

Official Raspberry Pi Handbook 2022

The post The Official Raspberry Pi Handbook 2022 appeared first on Raspberry Pi.

Meet Geeky Faye: maker, artist, designer, and filmmaker

Post Syndicated from Ashley Whittaker original https://www.raspberrypi.org/blog/meet-geeky-faye-maker-artist-designer-and-filmmaker/

An artist and maker, Geeky Faye describes themself as a one-man band, tackling whole areas of creation. In the latest issue of The MagPi Magazine, Rob Zwetsloot meets the cosplaying polymath.

Having multiple hobbies and interests can be fun, but they can sometimes get on top of you. Allie, also know online as Geeky Faye, seems to have thrived with so many. “As it currently stands, I will happily refer to myself as a maker, artist, designer, and filmmaker because all of those are quite accurate to describe the stuff I do!” Allie tells us.

geeky faye

“I’ve been making almost my whole life. I dove headlong into art as a young teen, to be quickly followed by cosplay and building things that I needed for myself. I would go on to get a degree in fine arts and pursue a professional career as an artist, but that actually ended out resulting in me being on a computer all day more than anything! I’ve always needed to use my hands to create, which is why I’ve always been drawn to picking up as many making skills as possible… These days my making is all very ‘multimedia’ so to speak, involving 3D printing, textiles, electronics, wood working, digital design, and lots of paint!”

geeky faye project
Testing out various functions of BMOctoPrint

When did you learn about Raspberry Pi?

I’d heard about Raspberry Pi years ago, but I didn’t really learn about it until a few years back when I started getting into 3D printing and discovered that you could use one to act as a remote controller for the printer. That felt like an amazing use for a tool I had previously never gotten involved with, but once I started to use them for that, I became more curious and started learning a bit more about them. I’m still quite a Raspberry Pi novice and I am continually blown away by what they are capable of. 

geeky faye project
The PCB for this project was custom-made by Geeky Faye

What have you made with Raspberry Pi?

I am actually working on my first ever proper Raspberry Pi project as we speak! Previously I have only set them up for use with OctoPrint, 3D-printed them a case, and then let them do their thing. Starting from that base need, I decided to take an OctoPrint server [Raspberry] Pi to the next level and started creating BMOctoPrint; an OctoPrint server in the body of a BMO (from Adventure Time). Of course, it would be boring to just slap a Raspberry Pi inside a BMO-shaped case and call it a day.

So, in spite of zero prior experience (I’m even new to electronics in general), I decided to add in functionality like physical buttons that correspond to printer commands, a touchscreen to control OctoPrint (or anything on Raspberry Pi) directly, speakers for sound, and of course user-triggered animations to bring BMO to life… I even ended out designing a custom PCB for the project, which makes the whole thing so clean and straightforward.

Photography, 3D-printing, and making come together in another project

What’s your favourite project that you’ve done?

Most recently I redesigned my teleprompter for the third time and I’m finally really happy with it. It is 3D-printable, prints in just two pieces that assemble with a bit of glue, and is usable with most kinds of lens adapters that you can buy off the internet along with a bit of cheap plastic for the ‘glass’. It is small, easy to use, and will work with any of my six camera lenses; a problem that the previous teleprompter struggled with! That said, I still think my modular picture frame is one of the coolest, hackiest things that I’ve made. I highly recommend anyone who frames more than a single thing over the course of their lives to pick up the files, as you will basically never need to buy a picture frame again, and that’s pretty awesome, I think.

geeky faye in cosplay
Geeky Faye’s amazing Hange Zoë cosplay from the Attack on Titan series

Subscribe to Geeky Faye Art on YouTube, and follow them on Twitter, Instagram, or TikTok.

Get The MagPi #109 NOW!

magpi 109 front cover

You can grab the brand-new issue right now from the Raspberry Pi Press store, or via our app on Android or iOS. You can also pick it up from supermarkets and newsagents. There’s also a free PDF you can download.

The post Meet Geeky Faye: maker, artist, designer, and filmmaker appeared first on Raspberry Pi.

Game Boy + Raspberry Pi insides = ‘DMGPlus’

Post Syndicated from Ashley Whittaker original https://www.raspberrypi.org/blog/game-boy-raspberry-pi-insides-dmgplus/

In the latest issue of The MagPi Magazine, Jeroen Domburg showcases his refurbed Nintendo Game Boy.

The Nintendo Game Boy – the iconic handheld video game console launched in 1989 – is no stranger to the pages of The MagPi. We’ve seen makers either stuff a Raspberry Pi computer into an original case or buy off-the-shelf projects, such as the superb RetroFlag GPi, and create their own from scratch. It’s great to see the device kept alive.

You can’t tell the difference between the finished DMGPlus project and the original Game Boy – all the alterations are inside

But just as we thought we’d seen it all, along came Jeroen Domburg, aka Sprite_tm. Like us, he’d seen a reasonable number of people modifying Game Boy cases to create portable RetroPie machines. “But because they wanted the thing to emulate as many consoles as possible, they usually went all-out with the modifications: high-resolution screen, Li-ion battery, HDMI and USB, multiple front buttons, shoulder buttons, the works,” he says.

“Obviously this would work really well, but it went against the original Game Boy looks. The projects could look like a weird mutation and it made me think, what if I went the other way? What if instead of sacrificing the original looks for playability, I sacrificed playability for the original looks?” Welcome then, DMGPlus: a handheld that looks familiar but has its internals replaced by something more powerful.

Pressing the right buttons

That something includes a Raspberry Pi Zero computer and a replacement motherboard containing a lower power, high performance ICE40 field-programmable gate array (FPGA). These are fixed either side of a new, printed circuit board, replacing the CPU, GPU, and memory.

The original hardware had a direct connection to the cartridge, but Raspberry Pi Zero has to communicate with the FPGA via the SPI port. To speed things up, the emulator reads an entire region from a cart

Jeroen has retained the buttons, cartridge port, speaker, and link port, with everything capable of being run from four AA batteries, just like the original. “I did change the LCD a little bit by driving it in a smart way so that it can display 16 greys instead of the original four,” he enthuses. 

And the upshot of that? “It ends up substantially increasing the number of games the Game Boy can play,” he continues. “Because of emulation, all of a sudden you can have access to games that originally ran on other consoles, some of which have specs way better than the original Game Boy.”

Work hard, play hard

Making the build extra-special is its use of original carts, emulating the Game Boy experience so closely it’s difficult to tell if anything has changed. It uses the emulator Gnuboy and when Jeroen uses his own reproduction carts containing games not originally made for the Game Boy, Raspberry Pi Zero kicks in and runs the title natively.

This is a reproduction cart. Figuring how to program them properly was tricky because they’re used outside of their specified voltage range, even in a standard Game Boy

“Getting Raspberry Pi Zero to boot as fast as possible was tricky because it needed some rethinking of the boot process, as well as a kernel recompile to make it load within the time it took the Game Boy startup screen to finish,” Jeroen explains. “My hardware also takes a longer path: Raspberry Pi has to talk through the SPI port to the FPGA, which then needs to control the cartridge. Doing this for every byte that the game needs would be very slow, so the emulator uses caching.”

Raspberry Pi Zero seemed the perfect choice. Aside from being able to fit in the case, Jeroen said he knew he could get the video interface to do what he wanted. “Raspberry Pi has proper DPI support, outputting video over the GPIO pins so I could make the Game Boy LCD show up as just another frame buffer device,” he says. “That was important because I didn’t want to hack the video output system of every emulator or game I wanted to run it.”

The result is a stunning handheld console, but not one for the faint-hearted. “The big challenge was the need for custom hardware, custom software, custom gateware, and so on and it took a fair bit of time and effort to develop,” he says. “If you’re looking to replicate it, be prepared to put some work into tweaking and fixing things.”

Get The MagPi #109 NOW!

magpi 109 front cover

You can grab the brand-new issue right now from the Raspberry Pi Press store, or via our app on Android or iOS. You can also pick it up from supermarkets and newsagents. There’s also a free PDF you can download.

The post Game Boy + Raspberry Pi insides = ‘DMGPlus’ appeared first on Raspberry Pi.

Humane mouse trap | The MagPi #108

Post Syndicated from Ashley Whittaker original https://www.raspberrypi.org/blog/humane-mouse-trap-the-magpi-108/

Safely catching mice is a better way of fixing a problem, and using Raspberry Pi means it needs less supervision. In the new issue of The MagPi magazine, Rob Zwetsloot takes a look with the maker, Andrew Taylor.

With some IoT projects, it’s the little things that help. For example, take Andrew Taylor, who did the good thing of setting up a humane mousetrap. However, checking it to see if any mice had been caught in it, while necessary, was getting a little boring.

There’s one major component to the setup, which is the PIR sensor

“If a mouse had gone in and I did not check it, the mouse would quickly run out of food and water!” Andrew tells us. “Having been interested in Raspberry Pi for a couple of years and having recently begun learning Python using the Enviro+ environment sensors, I figured a Raspberry Pi with a motion sensor would be an ideal way to check.”

It’s a fairly simple setup, one commonly used in CCTV builds and some fun ‘parent detectors’ on the Raspberry Pi Foundation’s projects site.

An old coffee tub is used as a case for the sensor, a good way to recycle

Mouse motion

“I came across a couple of automated mousetraps that people had made from scratch, but wanting to keep it simple and cheap,” Andrew explains. “I wanted to use off-the-shelf parts where possible and keep costs down. The Pi Hut had a tutorial for a DIY burglar alarm utilising a PIR sensor, IFTTT, and Pushbullet, which seemed like an ideal starting point.”

A Raspberry Pi Zero is used to check the motion sensor and send data if it’s activated

IFTTT – If This Then That – is an online service popular with IoT folks. It’s great for small things like cross-posting images on social media services, or sending a push notification when motion is detected in a mousetrap.

“I have only had one mouse since, but it worked!” Andrew says. “I was averaging about 800 detections a day and suddenly got well over a 1000. Sure enough, there was a mouse in the trap which I released shortly afterwards. I do tend to notice that the values fluctuate a bit, so it is always worth checking over the previous day’s results to see if it is notably higher.”

Wiring up the PIR to Raspberry Pi is quite simple, and means the project is easy to maintain

You might think that 800 push notifications a day is far worse than just occasionally checking your garage, and you’d be right, so Andrew tweaked the code a bit: “The code examples I found sent a notification for each movement detection – which I knew would be rather annoying, considering how randomly PIR sensors sometimes seem to trigger. My script instead logs any hits at a max of 1 per 30 seconds and then triggers a notification once every 24 hours, meaning I just get one notification a day.”

It’s a simple design, and was kept simple to keep to a small budget

Beat a path

There’s always room for improvement, as Andrew explains: “I intend to improve the code so that it can record running averages and give an indication as to whether it believes there has been a significant spike that might necessitate me checking it out.”

The first successful capture was released back outside the garage

Whilst the aim of the project was to keep costs down, Andrew is tempted to experiment by adding a camera, and possibly a light, so he can have a peek remotely when there has been a spike in the readings and to see if it is a false alarm. Which, as he admits, is “a new height in laziness!”

The MagPi #108 out NOW!

You can grab the brand-new issue right now from the Raspberry Pi Press store, or via our app on Android or iOS. You can also pick it up from supermarkets and newsagents. There’s also a free PDF you can download.

The post Humane mouse trap | The MagPi #108 appeared first on Raspberry Pi.

Bluebot Shoal Fish Robot

Post Syndicated from Rosie Hattersley original https://www.raspberrypi.org/blog/bluebot-shoal-fish-robot/

If you loved the film Finding Dory, you might just enjoy the original story of these underwater robots, fresh out of the latest issue of The MagPi Magazine.

It’s no coincidence that the shoal of robot fish in this Raspberry Pi Zero W project look more than a little like Dory from Pixar’s movie. As with the film character, the Bluebot robot fish are based on the blue tang or surgeonfish. Unlike Dory, however, these robot fish are designed to be anything but loners. They behave collectively, which is the focus of the Blueswarm research project that began in 2016 at Harvard University.

Linked cameras attached to Raspberry Pi Zero W monitor what surrounding fish are doing. The Bluebot robot then mimics their behaviour, such as moving its fins
The Blueswarm team designed a PCB and wrote custom Python code for their subterranean Raspberry Pi experiments

Florian Berlinger and his PhD research project colleagues Radhika Nagpal, Melvin Gauci, Jeff Dusek, and Paula Wulko set out to investigate the behaviour of a synchronised group of underwater robots and how groups of such robot fish are co‑ordinated by observing each other’s movements. In the wild, birds, fish, and some animals co-ordinate in this way when migrating, looking for food and as a means of detecting and collectively avoiding predators. Simulations of such swarm behaviour exist, but Blueswarm has the additional challenge of operating underwater. Raspberry Pi Zero W works well here because multiple Bluebot robots can be accessed remotely over a secure wireless connection, and Raspberry Pi Zero W is physically small and light enough to fit inside a palm-sized robot. 

Mimicking movements

The team designed the fish-inspired, 3D-printed robot body as well as the fin-like actuators and the on-board printed circuit board which connects to all the electronics and communicates with Raspberry Pi Zero W. Designing the robot fish took the team four years, from working out how each robot fish would move and adding sensing capabilities, to refining the design and implementing collective behaviours, coded using Python 3. 

The Blueswarm team designed a PCB and wrote custom Python code for their subterranean Raspberry Pi experiments

They used as many off-the-shelf electronics as possible to keep the robots simple, but adapted existing software algorithms for the purposes of their investigations, “with several clever twists on existing algorithms to make them run fast on Raspberry Pi,” adds Florian. 

On-board cameras that offer “an amazing 360-degree field of view” are one of the project’s real triumphs. These cameras are connected to Raspberry Pi via a duplexer board (so two cameras can operate as one) the project team co-designed with Arducam. Each Raspberry Pi Zero W inside follows the camera images and instructs the fins to move accordingly. The team developed custom algorithms for synchronisation, flocking, milling, and search behaviours to simulate how real fish move individually and as a group. As a result, says Florian, “Blueswarm can be used to study inter-robot co-ordination in the laboratory and to learn more about collective intelligence in nature.” He suggests other robot-based projects could make use of a similar setup. 

Imitation of life

Each robot fish cost around $250 and took approximately six hours to make. To make your own, you’d need a 3D printer, Raspberry Pi Zero W, a soldering station – and a suitably large tank for your robot shoal! Although the team hasn’t made the code available, the Blueswarm project paper has recently been published in Science Robotics and by the IEEE Robots and Automation Society. Several biology researchers have also been using the Bluebot shoal as ‘fish surrogates’ in their studies of swimming and schooling.

It may look cute, but Bluebot has a serious purpose

The MagPi #107 out NOW!

MagPi 107 cover

You can grab the brand-new issue right now from the Raspberry Pi Press store, the Raspberry Pi Store, Cambridge, or via our app on Android or iOS. You can also pick it up from supermarkets and newsagents. There’s also a free PDF you can download.

The post Bluebot Shoal Fish Robot appeared first on Raspberry Pi.

#MonthOfMaking is back in The MagPi 103!

Post Syndicated from Rob Zwetsloot original https://www.raspberrypi.org/blog/monthofmaking-is-back-in-the-magpi-103/

Hey folks, Rob from The MagPi here! I hope you’ve been doing well. Despite how it feels, a brand-new March is just around the corner. Here at The MagPi, we like to celebrate March with our annual #MonthOfMaking event, where we want to motivate you to get making.

A MonthOfMaking project: Someone wearing a wearable tech project featuring LEDs, a two-digit LED matrix, and a tablet screen. The person is high-fiving someone who is out of view.
You could make tech you can wear

But what should I make?

Making what? Anything you want. Flex your creative building skills with some programming, or circuity, or woodworking, metalwork, knitting, baking, photography, and whatever else you’ve been wanting to try out. Just make it, and share it with the hashtag #MonthOfMaking.

A MonthOfMaking project: a wildlife camera camouflaged in branches
You could make something to hide in nature while you capture… nature

In The MagPi 103 we have a big feature on alternative ways you can make — at least alternative to what we usually cover in the magazine. From sewing and embroidery to recycling and animation, we hope you’ll be inspired to try something new.

Try something new with Raspberry Pi Pico

I’ve got a few projects lined up myself, including some Raspberry Pi Pico stuff I’ve been mulling over.

A MonthOfMaking project: a homemade chandelier consisting of glass bottles and an LED ring
You could make a chandelier light fitting out of drinks bottles?!

Speaking of: we also show you some easy Raspberry Pi Pico projects to celebrate its recent release! You’ll discover all the ways you can get started with and learn more about Raspberry Pi’s first microcontroller.

All this and our usual selection of articles on weather maps, on-air lights, meme generators, hardware reviews, and much more is packed into issue 103!

A MonthOfMaking project: two Nintendo Game Boys, one of them hacked with two extra buttons and a colour display
Maybe you could tinker with some old tech

Get The MagPi 103 now

You can grab the brand-new issue right now online from the Raspberry Pi Press store, or via our app on Android or iOS. You can also pick it up from supermarkets and newsagents, but make sure you do so safely while following all your local guidelines.

magpi magazine cover issue 103

Finally, there’s also a free PDF you can download. Good luck during the #MonthOfMaking, folks! I’ll see y’all online.

The post #MonthOfMaking is back in The MagPi 103! appeared first on Raspberry Pi.

Raspberry Pi engineers on the making of Raspberry Pi Pico | The MagPi 102

Post Syndicated from Gareth Halfacree original https://www.raspberrypi.org/blog/raspberry-pi-engineers-on-the-making-of-raspberry-pi-pico-the-magpi-102/

In the latest issue of The MagPi Magazine, on sale now, Gareth Halfacree asks what goes into making Raspberry Pi’s first in-house microcontroller and development board.

“It’s a flexible product and platform,” says Nick Francis, Senior Engineering Manager at Raspberry Pi, when discussing the work the Application-Specific Integrated Circuit (ASIC) team put into designing RP2040, the microcontroller at the heart of Raspberry Pi Pico

It would have been easy to have said, well, let’s do a purely educational microcontroller “quite low-level, quite limited performance,” he tells us. “But we’ve done the high-performance thing without forgetting about making it easy to use for beginners. To do that at this price point is really good.”

“I think we’ve done a pretty good job,” agrees James Adams, Chief Operating Officer at Raspberry Pi. “We’ve obviously tossed around a lot of different ideas about what we could include along the way, and we’ve iterated quite a lot and got down to a good set of features.”

A board and chip

“The idea is it’s [Pico] a component in itself,” says James. “The intent was to expose as many of the I/O (input/output) pins for users as possible, and expose them in the DIP-like (Dual Inline Package) form factor, so you can use Raspberry Pi Pico as you might use an old 40-pin DIP chip. Now, Pico is 2.54 millimetres or 0.1 inch pitch wider than a ‘standard’ 40-pin DIP, so not exactly the same, but still very similar.

“After the first prototype, I changed the pins to be castellated so you can solder it down as a module, without needing to put any headers in. Which is, yes, another nod to using it as a component.”

Getting the price right

“One of the things that we’re very excited about is the price,” says James. “We’re able to make these available cheap as chips – for less than the price of a cup of coffee.”

“It’s extremely low-cost,” Nick agrees. “One of the driving requirements right at the start was to build a very low-cost chip, but which also had good performance. Typically, you’d expect a microcontroller with this specification to be more expensive, or one at this price to have a lower specification. We tried to push the performance and keep the cost down.”

“We’re able to make these available cheap as chips.”

James Adams

Raspberry Pi Pico also fits nicely into the Raspberry Pi ecosystem: “Most people are doing a lot of the software development for this, the SDK (software development kit) and all the rest of it, on Raspberry Pi 4 or Raspberry Pi 400,” James explains. “That’s our primary platform of choice. Of course, we’ll make it work on everything else as well. I would hope that it will be as easy to use as any other microcontroller platform out there.”

Eben Upton on RP2040

“RP2040 is an exciting development for Raspberry Pi because it’s Raspberry Pi people making silicon,” says Eben Upton, CEO and co-founder of Raspberry Pi. “I don’t think other people bring their A-game to making microcontrollers; this team really brought its A-game. I think it’s just beautiful.

Is Pico really that small, or is Eben a giant?

“What does Raspberry Pi do? Well, we make products which are high performance, which are cost-effective, and which are implemented with insanely high levels of engineering attention to detail – and this is that. This is that ethos, in the microcontroller space. And that couldn’t have been done with anyone else’s silicon.”

Issue #102 of The MagPi Magazine is out NOW

MagPi 102 cover

Never want to miss an issue? Subscribe to The MagPi and we’ll deliver every issue straight to your door. Also, if you’re a new subscriber and get the 12-month subscription, you’ll get a completely free Raspberry Pi Zero bundle with a Raspberry Pi Zero W and accessories.

The post Raspberry Pi engineers on the making of Raspberry Pi Pico | The MagPi 102 appeared first on Raspberry Pi.

The Stargate | The MagPi 101

Post Syndicated from Rob Zwetsloot original https://www.raspberrypi.org/blog/the-stargate-the-magpi-101/

Fans of the Stargate SG-1 series, prepare to be inspired: a fellow aficionado has fashioned his own model of the show’s iconic portal. Nicola King takes an interstellar trip in the latest issue of The MagPi Magazine.

A mini version of the Stargate from TV sat on a table. Blue glowing light emits from the fake tunnel

When Kristian Tysse began making some projects on his new 3D printer, he soon became aware that the possibility of printing his own ‘working’ Stargate SG-1 model was within his grasp at last. “I suddenly realised I might now have enough knowledge about 3D printing, Raspberry Pi, motors, and programming to actually make a Stargate model of my own,” he tells us. “I wanted people who are familiar with the show to immediately know what it was, and tried to make it work as best I could, while staying as true as possible to the feeling and essence of the TV show.”

Raspberry Pi buried in the wires powering the mini stargate

Kristian also wanted to use a Raspberry Pi within this fully interactive, light-up, moving-parts project as “it is a powerful device with lots of flexibility. I do like that it functions as a full computer with an operating system with all the possibility that brings.”

Model minutiae

The back of the stargate controller with no lights on

You only have to look at the model to see just how much 3D printing was needed to get all of the parts ready to piece together, and Kristian created it in segments. But one of the key parts of his model is the DHD or Dial Home Device which viewers of the series will be familiar with. “The DHD functions as a USB keyboard and, when the keys are used, it sends signals to the (Python) program on Raspberry Pi that engages the different motors and lights in a proper Stargate way,” he enthuses. “If a correct set of keys/symbols are pressed on the DHD, the wormhole is established – illustrated on my Stargate with an infinity mirror effect.” 

“I wanted people who are familiar with the show to immediately know what it was”

Kristian Tysse

However, the DHD was a challenge, and Kristian is still tweaking it to improve how it works. He admits that writing the software for the project was also tricky, “but when I think back, the most challenging part was actually making it ‘functional’, and fitting all the wires and motors on it without destroying the look and shape of the Stargate itself.”

Dazzling detail

A close up of the stargate control panel with glowing orange touch buttons

Kristian admits to using a little artistic licence along the way, but he is keen to ensure the model replicates the original as far as possible. “I have taken a few liberties here and there. People on the social media channels are quick to point out differences between my Stargate and the one in the series. I have listened to most of those and done some changes. I will implement some more of those changes as the project continues,” he says. He also had to redesign the project several times, and had a number of challenges to overcome, especially in creating the seven lit, moving chevrons: “I tried many different approaches before I landed on the right one.”

The results of Kristian’s time-intensive labours are truly impressive, and show what you can achieve when you are willing to put in the hours and the attention to detail. Take a look at Kristian’s extremely detailed project page to see more on this super-stellar make.

Issue #101 of The MagPi Magazine out NOW

The front cover of the magazine featuring Raspberry Pi 400

Never want to miss an issue? Subscribe to The MagPi and we’ll deliver every issue straight to your door. Also, if you’re a new subscriber and get the 12-month subscription, you’ll get a completely free Raspberry Pi Zero bundle with a Raspberry Pi Zero W and accessories.

The post The Stargate | The MagPi 101 appeared first on Raspberry Pi.

100 Raspberry Pi moments

Post Syndicated from Ashley Whittaker original https://www.raspberrypi.org/blog/100-raspberry-pi-moments/

The official Raspberry Pi magazine turned 100 this month! To celebrate, the greatest Raspberry Pi moments, achievements, and events that The MagPi magazine has ever featured came back for a special 100th issue.

100 Raspberry Pi Moments is a cracking bumper feature (starting on page 32 of issue 100, if you’d like to read the whole thing) highlighting some influential projects and educational achievements, as well as how our tiny computers have influenced pop culture. And since ’tis the season, we thought we’d share the How Raspberry Pi made a difference section to bring some extra cheer to your festive season.

Projects for good

The Raspberry Pi Foundation was originally launched to get more UK students into computing. Not only did it succeed at that, but the hardware and the Foundation have also managed to help people in other ways and all over the world. Here are just a few examples!

Computers for good

The Raspberry Pi Foundation provides free learning resources for everyone; however, not everyone has access to a computer to learn at home. Thanks to funding from the Bloomfield Trust and in collaboration with UK Youth and local charities, the Foundation has been able to supply hundreds of Raspberry Pi Desktop Kits to young people most in need. The computers have allowed these children, who wouldn’t have been able to otherwise, to learn from home and stay connected to their schools during lockdown. The Foundation’s work to distribute Raspberry Pi computers to young people in need is ongoing.

Elsewhere, a need for more medical equipment around the world resulted in many proposals and projects being considered for cheap, easy-to produce machines. Some included Raspberry Pi Zero, with 40,000 of these sold for ventilator designs.

The Foundation’s Digital Making at Home live streams bring coding fun to young people at home every week

Offline learning

While there’s no global project or standard to say what an offline internet should contain, some educational projects have tried to condense down enough online content for specific people and load it all onto a Raspberry Pi. RACHEL-Pi is one such solution. The RACHEL-PI kit acts as a server, hosting a variety of different educational materials for all kinds of subjects, as well as an offline version of Wikipedia with 6000 articles. There’s even medical info for helping others, math lessons from Khan Acadamy, and much more.

The RACHEL sites are available in English, French, and Spanish

17,000 ft is another great project, which brings computing to schools high up in the Himalayas through a similar method in an attempt to help children stay in their local communities.

Young learners in red jackets and baseball caps using tablets to learn in a Himalayan school
Ladakh is a desert-like region up a mountain that can easily shut down during the winter

Education in other countries

The free coding resources available on our projects site are great, and the Raspberry Pi Foundation works to make them accessible to people whose first language isn’t English: we have a dedicated translation team and, thanks to volunteers around the world, provide our free resources translated into up to 32 other languages. From French and Welsh to Korean and Arabic, there’s a ton of projects that learners from all over the world can access in their first language.

And through the Code Club and CoderDojo programmes, the Foundation supports volunteers around the world to run free coding clubs for young people.

A Raspberry Pi lab in Kuma Adamé, Togo that Dominique Laloux helped create and update
A Raspberry Pi lab in Kuma Adamé, Togo, that Dominique Laloux helped create and update

That’s not all: several charitable groups have set up Raspberry Pi classrooms to bring computing education to poorer parts of the world. People in African countries and parts of rural India have benefited from these programmes, and work is being done to widen access to ever more people and places.

Pocket FM

The Pocket FM is far smaller than traditional transmitters, and therefore easy to move into the country and set up

The HAM radio community loves Raspberry Pi for amateur radio projects; however, sometimes people need radio for more urgent purposes. In 2016, German group Media in Cooperation and Transition created the Pocket FM 96 , micro radio transmitters with 4–6km range. These radios allowed Syrians in the middle of a civil war to connect to free media on Syrnet for more reliable news.

There are a number of independent radio stations that transmit through Pocket FM

Raspberry Pi powered these transmitters, chosen because of how easy it is to upgrade and add components to. Each transmitter is powered by solar power, and Syrnet is still transmitting through them as the war continues into its tenth year.

The post 100 Raspberry Pi moments appeared first on Raspberry Pi.

The MagPi #100: celebrate 100 amazing moments from Raspberry Pi history

Post Syndicated from Rob Zwetsloot original https://www.raspberrypi.org/blog/the-magpi-100-celebrate-100-amazing-moments-from-raspberry-pi-history/

Hey there, folks, Rob from The MagPi here! I hope you’ve all been doing OK.

Today we celebrate the 100th issue of The MagPi, the official Raspberry Pi magazine!

Flat view of the special front cover of the magazine featuring a big red number 100

Most of you probably know that The MagPi didn’t start off official, though: eight and a half years ago, intrepid community members came together to create The MagPi as a fanzine, and it ran as one for 30 issues (plus one special) until early 2015, when it became part of Raspberry Pi and went official.

Officially official

An orange rover robot which looks a bit like a dog with wheels and a cute smiling face

For 70 issues now, the rest of the team and I have worked hard to bring Raspberry Pi fans a monthly magazine packed full of amazing content from the global Raspberry Pi (and wider maker) community. In the last six-ish years, I’ve built robots with you, stuffed Raspberry Pi Zeros into games controllers, lit up my Christmas tree, written far too many spooky puns, gone stargazing, recorded videos for numerous Raspberry Pi launches, and tried to help everyone who wanted to get their hands on the (in)famous issue 40.

Celebrating a milestone

Hand held gaming devices which look like traditional Game Boys

I could go on, but I already have: for issue 100 we’re celebrating 100 incredible moments in Raspberry Pi history, from its humble beginnings to becoming the third best-selling computer ever, and one of the few to be on the International Space Station.

One of those moments was the release of Raspberry Pi 400, an incredibly cool model of Raspberry Pi that elicited a few ‘oohs’ and ‘aahs’ from me when mine arrived in the post. We give it the full MagPi breakdown with benchmarks and interviews, courtesy of our good friend Gareth Halfacree.

How to get issue 100

Photos of ten Christmas themed projects and short blurbs linking to longer articles about them

But wait, there’s more! We’ve managed to squeeze in our usual array of projects, tutorials, reviews, and community reports as well. Expect cool robots, funky guitars, handheld console building guides, and case reviews.

You can buy The MagPi 100 right this very moment from the online Raspberry Pi Press store, get it on our app for Android or iOS, or even just download the PDF.

Subscription offers!

Never want to miss an issue? Subscribe to The MagPi and we’ll deliver every issue straight to your door. Also, if you’re a new subscriber and get the 12-month subscription, you’ll get a completely free Raspberry Pi Zero bundle with a Raspberry Pi Zero W and accessories.

I really think you’ll like this issue. Here’s to another 100.

A gif of Patrick Stewart saying But the future is left for us to write

The post The MagPi #100: celebrate 100 amazing moments from Raspberry Pi history appeared first on Raspberry Pi.

Mars Clock

Post Syndicated from Ashley Whittaker original https://www.raspberrypi.org/blog/mars-clock/

A sci-fi writer wanted to add some realism to his fiction. The result: a Raspberry Pi-based Martian timepiece. Rosie Hattersley clocks in from the latest issue of The MagPi Magazine.

The Mars Clock project is adapted from code Phil wrote in JavaScript and a Windows environment for Raspberry Pi

Ever since he first clapped eyes on Mars through the eyepiece of a telescope, Philip Ide has been obsessed with the Red Planet. He’s written several books based there and, many moons ago, set up a webpage showing the weather on Mars. This summer, Phil adapted his weather monitor and created a Raspberry Pi-powered Mars Clock.

Mission: Mars

After writing several clocks for his Mars Weather page, Phil wanted to make a physical clock: “something that could sit on my desk or such like, and tell the time on Mars.” It was to tell the time at any location on Mars, with presets for interesting locations “plus the sites of all the missions that made it to the surface – whether they pancaked or not.”

The projects runs on a 2GB Raspberry Pi 4 with official 7-inch touchscreen

Another prerequisite was that the clock had to check for new mission file updates and IERS bulletins to see if a new leap second had been factored into Universal Coordinated Time.

“Martian seconds are longer,” explains Phil, “so everything was pointing at software rather than a mechanical device. Raspberry Pi was a shoo-in for the job”. However, he’d never used one.

“I’d written some software for calculating orbits and one of the target platforms was Raspberry Pi. I’d never actually seen it run on a Raspberry Pi but I knew it worked, so the door was already open.” He was able to check his data against a benchmark NASA provided. Knowing that the clocks on his Mars Weather page were accurate meant that Phil could focus on getting to grips with his new single-board computer.

Phil’s Mars Weather page shows seasonal trends since March 2019.

He chose a 2GB Raspberry Pi 4 and official-inch touchscreen with a SmartiPi Touch 2 case. “Angles are everything,” he reasons. He also added a fan to lower the CPU temperature and extend the hardware’s life. Along with a power lead, the whole setup cost £130 from The Pi Hut.

Since his Mars Clock generates a lot of data, he made it skinnable so the user can choose which pieces of information to view at any one time. It can display two types of map – Viking or MOLA – depending on the co-ordinates for the clock. NASA provides a web map-tile service with many different data sets for Mars, so it should be possible to make the background an interactive map, allowing you to zoom in/out and scroll around. Getting these to work proved rather a headache as he hit incompatibilities with the libraries.

Learn through experience

Phil wrote most of the software himself, with the exception of libraries for the keyboard and FTP which he pulled from GitHub. Here’s all the code.

The Mars Clock’s various skins show details of missions to Mars, as well as the location’s time and date

He used JavaScript running on the Node.js/Electron framework. “This made for rapid development and is cross-platform, so I could write and test it on Windows and then move it to the Raspberry Pi,” he says. With the basic code written, Phil set about paring it back, reducing the number and duration of CPU time-slices the clock needed when running. “I like optimised software,” he explains.

His decades as a computer programmer meant other aspects were straightforward. The hardware is more than capable, he says of his first ever experience of Raspberry Pi, and the SmartiPi case makers had done a brilliant job. Everything fit together and in just a few minutes his Raspberry Pi was working.

The SmartiPi Touch 2 case houses Raspberry Pi 4 and a fan to cool its CPU

Since completing his Mars Clock Phil has added a pi-hole and a NAS to his Raspberry Pi setup and says his confidence using them is such that he’s now contemplating challenging himself to build an orrery (a mechanical model of the solar system). “I have decades of programming experience, but I was still learning new things as the project progressed,” he says. “The nerd factor of any given object increases exponentially if you make it yourself.”

The MagPi Magazine | Issue 99

Check out page 26 in the latest issue of The MagPi Magazine for a step-by-step and to learn more about the maker, Phillip. You can read a PDF copy for free on The MagPi Magazine website if you’re not already a subscriber.

The post Mars Clock appeared first on Raspberry Pi.

The Howff 3D scanning rig| The MagPi 99

Post Syndicated from Rob Zwetsloot original https://www.raspberrypi.org/blog/the-howff-3d-scanning-rig-the-magpi-99/

How do you create a 3D model of a historic graveyard? With eight Raspberry Pi computers, as Rob Zwetsloot discovers in the latest issue of The MagPi magazine, out now.

The software builds up the 3D model of the graveyard

“In the city centre of Dundee is a historical burial ground, The Howff,” says Daniel Muirhead. We should probably clarify that he’s a 3D artist. “This old graveyard is densely packed with around 1500 gravestones and other funerary monuments, which happens to make it an excellent technical challenge for photogrammetry photo capture.”

This architecture, stone paths, and vibrant flora is why Daniel ended up creating a 3D-scanning rig out of eight Raspberry Pi computers. And the results are quite stunning.

Eight Raspberry Pi computers are mounted to the ball, with cameras pointing towards the ground

“The goal of this project was to capture photos for use in generating a 3D model of the ground,” he continues. “That model will be used as a base for attaching individual gravestone models and eventually building up a full composite model of this complex subject. The ground model will also be purposed for rendering an ultra-high-resolution map of the graveyard. The historical graveyard has a very active community group that are engaged in its study and digitisation, the Dundee Howff Conservation Group, so I will be sharing my digital outputs with them.”

Google graveyard

There are thousands of pictures, like this one, being used to create the model

To move the rig throughout the graveyard, Daniel used himself as the major moving part. With the eight Raspberry Pi cameras taking a photo every two seconds, he was able to capture over 180,000 photos over 13 hours of capture sessions.

“The rig was held above my head and the cameras were angled in such a way as to occlude me from view, so I was not captured in the photographs which instead were focused on the ground,” he explains. “Of the eight cameras, four were the regular model with 53.5 ° horizontal field of view (FoV), and the other four were a wide-angle model with 120 ° FoV. These were arranged on the rig pointing outwards in eight different directions, alternating regular and wide-angle, all angled at a similar pitch down towards the ground. During capture, the rig was rotated by +45 ° for every second position, so that the wide-angles were facing where the regulars had been facing on the previous capture, and vice versa.”
Daniel worked according to a very specific grid pattern, staying in one spot for five seconds at a time, with the hopes that at the end he’d have every patch of ground photographed from 16 different positions and angles.

Maker Daniel Muirhead is a 3D artist with an interest in historical architecture

“With a lot of photo data to scan through for something fairly complex, we wondered how well the system had worked. Daniel tells us the only problems he had were with some bug fixing on his code: “The images were separated into batches of around 10,000 (1250 photos from each of the eight cameras), plugged into the photogrammetry software, and the software had no problem in reconstructing the ground as a 3D model.”

Accessible 3D surveying

He’s now working towards making it accessible and low-cost to others that might want it. “Low-cost in the triple sense of financial, labour, and time,” he clarifies. “I have logged around 8000 hours in a variety of photogrammetry softwares, in the process capturing over 300,000 photos with a regular camera for use in such files, so I have some experience in this area.”

“With the current state of technology, it should be possible with around £1000 in equipment to perform a terrestrial photo-survey of a town centre in under an hour, then with a combined total of maybe three hours’ manual processing and 20 hours’ automated computer processing, generate a high-quality 3D model, the total production time being under 24 hours. It should be entirely plausible for a local community group to use such a method to perform weekly (or at least monthly) 3D snapshots of their town centre.”

The MagPi issue 99 – Out now

The MagPi magazine is out now, available in print from the Raspberry Pi Press onlinestore, your local newsagents, and the Raspberry Pi Store, Cambridge.

You can also download the PDF directly from the MagPi magazine website.

The post The Howff 3D scanning rig| The MagPi 99 appeared first on Raspberry Pi.