Post Syndicated from Kevin Hakanson original https://aws.amazon.com/blogs/security/authorize-api-gateway-apis-using-amazon-verified-permissions-and-amazon-cognito/
Externalizing authorization logic for application APIs can yield multiple benefits for Amazon Web Services (AWS) customers. These benefits can include freeing up development teams to focus on application logic, simplifying application and resource access audits, and improving application security by using continual authorization. Amazon Verified Permissions is a scalable permissions management and fine-grained authorization service that you can use for externalizing application authorization. Along with controlling access to application resources, you can use Verified Permissions to restrict API access to authorized users by using Cedar policies. However, a key challenge in adopting an external authorization system like Verified Permissions is the effort involved in defining the policy logic and integrating with your API. This blog post shows how Verified Permissions accelerates the process of securing REST APIs that are hosted on Amazon API Gateway for Amazon Cognito customers.
Setting up API authorization using Amazon Verified Permissions
As a developer, there are several tasks you need to do in order to use Verified Permissions to store and evaluate policies that define which APIs a user is permitted to access. Although Verified Permissions enables you to decouple authorization logic from your application code, you may need to spend time up front integrating Verified Permissions with your applications. You may also need to spend time learning the Cedar policy language, defining a policy schema, and authoring policies that enforce access control on APIs. Lastly, you may need to spend additional time developing and testing the AWS Lambda authorizer function logic that builds the authorization request for Verified Permissions and enforces the authorization decision.
Getting started with the simplified wizard
Amazon Verified Permissions now includes a console-based wizard that you can use to quickly create building blocks to set up your application’s API Gateway to use Verified Permissions for authorization. Verified Permissions generates an authorization model based on your APIs and policies that allows only authorized Cognito groups access to your APIs. Additionally, it deploys a Lambda authorizer, which you attach to the APIs you want to secure. After the authorizer is attached, API requests are authorized by Verified Permissions. The generated Cedar policies and schema flatten the learning curve, yet allow you full control to modify and help you adhere to your security requirements.
Overview of sample application
In this blog post, we demonstrate how you can simplify the task of securing permissions to a sample application API by using the Verified Permissions console-based wizard. We use a sample pet store application which has two resources:
- PetStorePool – An Amazon Cognito user pool with users in one of three groups: customers, employees, and owners.
- PetStore – An Amazon API Gateway REST API derived from importing the PetStore example API and extended with a mock integration for administration. This mock integration returns a message with a URI path that uses {“statusCode”: 200} as the integration request and {“Message”: “User authorized for $context.path”} as the integration response.
The PetStore has the following four authorization requirements that allow access to the related resources. All other behaviors should be denied.
- Both authenticated and unauthenticated users are allowed to access the root URL.
- GET /
- All authenticated users are allowed to get the list of pets, or get a pet by its identifier.
- GET /pets
- GET /pets/{petid}
- The employees and owners group are allowed to add new pets.
- POST /pets
- Only the owners group is allowed to perform administration functions. These are defined using an API Gateway proxy resource that enables a single integration to implement a set of API resources.
- ANY /admin/{proxy+}
Walkthrough
Verified Permissions includes a setup wizard that connects a Cognito user pool to an API Gateway REST API and secures resources based on Cognito group membership. In this section, we provide a walkthrough of the wizard that generates authorization building blocks for our sample application.
To set up API authorization based on Cognito groups
- On the Amazon Verified Permissions page in the AWS Management Console, choose Create a new policy store.
- On the Specify policy store details page under Starting options, select Set up with Cognito and API Gateway, and then choose Next.

Figure 1: Starting options
- On the Import resources and actions page under API Gateway details, select the API and Deployment stage from the dropdown lists. (A REST API stage is a named reference to a deployment.) For this example, we selected the PetStore API and the demo stage.
Figure 2: API Gateway and deployment stage
- Choose Import API to generate a Map of imported resources and actions. For our example, this list includes Action::”get /pets” for getting the list of pets, Action::”get /pets/{petId}” for getting a single pet, and Action::”post /pets” for adding a new pet. Choose Next.
Figure 3: Map of imported resources and actions
- On the Choose identity source page, select an Amazon Cognito user pool (PetStorePool in our example). For Token type to pass to API, select a token type. For our example, we chose the default value, Access token, because Cognito recommends using the access token to authorize API operations. The additional claims available in an id token may support more fine-grained access control. For Client application validation, we also specified the default, to not validate that tokens match a configured app client ID. Consider validation when you have multiple user pool app clients configured with different permissions.
Figure 4: Choose Cognito user pool as identity source
- Choose Next.
- On the Assign actions to groups page under Group selection, choose the Cognito user pool groups that can take actions in the application. This solution uses native Cognito group membership to control permissions. In Figure 5, the customers group is not used for access control, we deselected it and it isn’t included in the generated policies. Instead, access to get /pets and get/pets/{petId} is granted to all authenticated users using a different authorizer that we define later in this post.
Figure 5: Assign actions to groups
- For each of the groups, choose which actions are allowed. In our example, post /pets is the only action selected for the employees group. For the owners group, all of the /admin/{proxy+} actions are additionally selected. Choose Next.
Figure 6: Groups employees and owners
- On the Deploy app integration page, review the API Gateway Integration details. Choose Create policy store.
Figure 7: API Gateway integration
- On the Create policy store summary page, review the progress of the setup. Choose Check deployment to check the progress of Lambda authorizer.
Figure 8: Create policy store


The setup wizard deployed a CloudFormation stack with a Lambda authorizer. This authorizes access to the API Gateway resources for the employees and owners groups. For the resources that should be authorized for all authenticated users, a separate Cognito User Pool authorizer is required. You can use the following AWS CLI apigateway create-authorizer command to create the authorizer.
After the CloudFormation stack deployment completes and the second Cognito authorizer is created, there are two authorizers that can be attached to PetStore API resources, as shown in Figure 9.
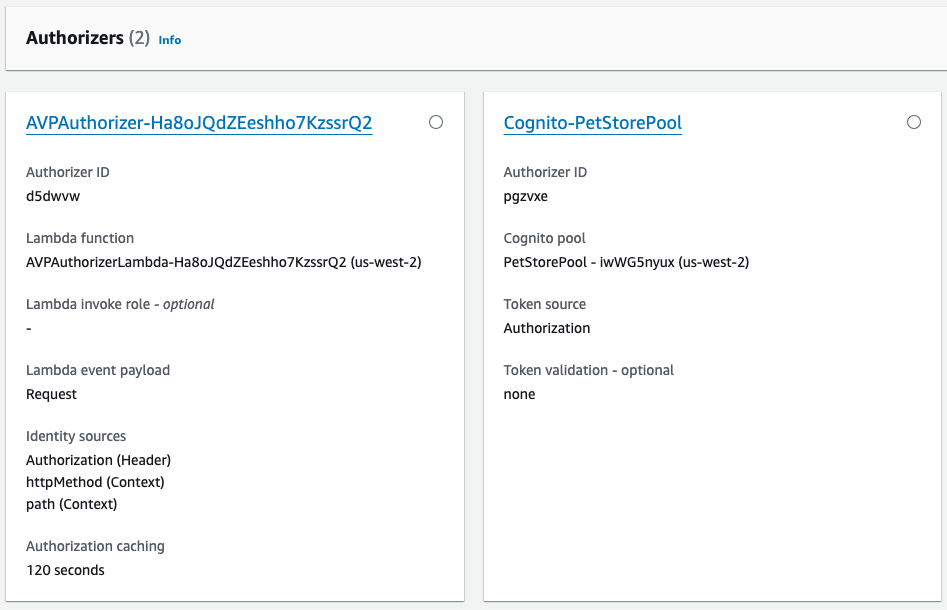
Figure 9: PetStore API Authorizers
In Figure 9, Cognito-PetStorePool is a Cognito user pool authorizer. Because this example uses an access token, an authorization scope (for example, a custom scope like petstore/api) is specified when attached to the GET /pets and GET /pets/{petId} resources.
AVPAuthorizer-XXX is a request parameter-based Lambda authorizer, which determines the caller’s identity from the configured identity sources. In Figure 9, these sources are Authorization (Header), httpMethod (Context), and path (Context). This authorizer is attached to the POST /pets and ANY /admin/{proxy+} resources. Authorization caching is initially set at 120 seconds and can be configured using the API Gateway console.
This combination of multiple authorizers and caching reduces the number of authorization requests to Verified Permissions. For API calls that are available to all authenticated users, using the Cognito-PetStorePool authorizer instead of a policy permitting the customers group helps avoid chargeable authorization requests to Verified Permissions. Applications where the users initiate the same action multiple times or have a predictable sequence of actions will experience high cache hit rates. For repeated API calls that use the same token, AVPAuthorizer-XXX caching results in lower latency, fewer requests per second, and reduced costs from chargeable requests. The use of caching can delay the time between policy updates and policy enforcement, meaning that the policy updates to Verified Permissions are not realized until the timeout or the FlushStageAuthorizersCache API is called.
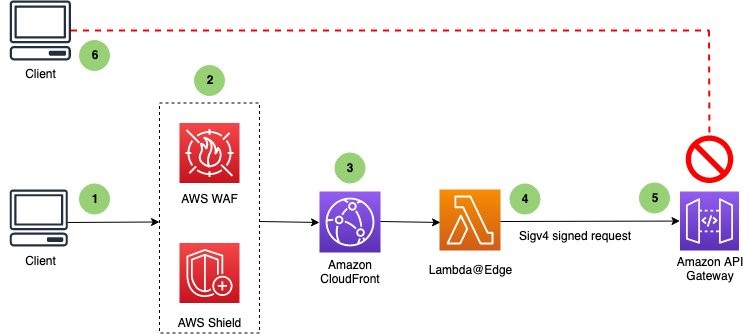
Deployment architecture
Figure 10 illustrates the runtime architecture after you have used the Verified Permissions setup wizard to perform the deployment and configuration steps. After the users are authenticated with the Cognito PetStorePool, API calls to the PetStore API are authorized with the Cognito access token. Fine-grained authorization is performed by Verified Permissions using a Lambda authorizer. The wizard automatically created the following four items for you, which are labelled in Figure 10:
- A Verified Permissions policy store that is connected to a Cognito identity source.
- A Cedar schema that defines the User and UserGroup entities, and an action for each API Gateway resource.
- Cedar policies that assign permissions for the employees and owners groups to related actions.
- A Lambda authorizer that is configured on the API Gateway.
Figure 10: Architecture diagram after deployment
Verified Permissions uses the Cedar policy language to define fine-grained permissions. The default decision for an authorization response is “deny.” The Cedar policies that are generated by the setup wizard can determine an “allow” decision. The principal for each policy is a UserGroup entity with an entity ID format of {user pool id}|{group name}. The action IDs for each policy represent the set of selected API Gateway HTTP methods and resource paths. Note that post /pets is permitted for both employees and owners. The resource in the policy scope is unspecified, because the resource is implicitly the application.
permit (
    principal in PetStore::UserGroup::"us-west-2_iwWG5nyux|employees",
    action in [PetStore::Action::"post /pets"],
    resource
);

permit (
    principal in PetStore::UserGroup::"us-west-2_iwWG5nyux|owners",
    action in
        [PetStore::Action::"delete /admin/{proxy+}",
         PetStore::Action::"post /admin/{proxy+}",
         PetStore::Action::"get /admin/{proxy+}",
         PetStore::Action::"patch /admin/{proxy+}",
         PetStore::Action::"put /admin/{proxy+}",
         PetStore::Action::"post /pets"],
    resource
);
Validating API security
A set of terminal-based curl commands validate API security for both authorized and unauthorized users, by using different access tokens. For readability, a set of environment variables is used to represent the actual values. TOKEN_C, TOKEN_E, and TOKEN_O contain valid access tokens for respective users in the customers, employees, and owners groups. API_STAGE is the base URL for the PetStore API and demo stage that we selected earlier.
To test that an unauthenticated user is allowed for the GET / root path (Requirement 1 as described in the Overview section of this post), but not allowed to call the GET /pets API (Requirement 2), run the following curl commands. The Cognito-PetStorePool authorizer should return {“message”:”Unauthorized”}.
To test that an authenticated user is allowed to call the GET /pets API (Requirement 2) by using an access token (due to the Cognito-PetStorePool authorizer), run the following curl commands. The user should receive an error message when they try to call the POST /pets API (Requirement 3), because of the AVPAuthorizer. There are no Cedar polices defined for the customers group with the action post /pets.
The following commands will verify that a user in the employees group is allowed the post /pets action (Requirement 3).
The following commands will verify that a user in the employees group is not authorized for the admin APIs, but a user in the owners group is allowed (Requirement 4).
Try it yourself
How could this work with your user pool and REST API? Before you try out the solution, make sure that you have the following prerequisites in place, which are required by the Verified Permissions setup wizard:
- A Cognito user pool, along with Cognito groups that control authorization to the API endpoints.
- An API Gateway REST API in the same Region as the Cognito user pool.
As you review the resources generated by the solution, consider these authorization modeling topics:
- Are access tokens or id tokens preferable for your API? Are there custom claims on your tokens that you would use in future Cedar policies for fine-grained authorization?
- Do multiple authorizers fit your model, or do you have an “all users” group for use in Cedar policies?
- How might you extend the Cedar schema, allowing for new Cedar policies that include URL path parameters, such as {petId} from the example?
Conclusion
This post demonstrated how the Amazon Verified Permissions setup wizard provides you with a step-by-step process to build authorization logic for API Gateway REST APIs using Cognito user groups. The wizard generates a policy store, schema, and Cedar policies to manage access to API endpoints based on the specification of the APIs deployed. In addition, the wizard creates a Lambda authorizer that authorizes access to the API Gateway resources based on the configured Cognito groups. This removes the modeling effort required for initial configuration of API authorization logic and setup of Verified Permissions to receive permission requests. You can use the wizard to set up and test access controls to your APIs based on Cognito groups in non-production accounts. You can further extend the policy schema and policies to accommodate fine-grained or attribute-based access controls, based on specific requirements of the application, without making code changes.
If you have feedback about this post, submit comments in the Comments section below. If you have questions about this post, start a new thread on the Amazon Verified Permissions re:Post or contact AWS Support.