Polyfill.io is a popular JavaScript library that nullifies differences across old browser versions. These differences often take up substantial development time.
It does this by adding support for modern functions (via polyfilling), ultimately letting developers work against a uniform environment simplifying development. The tool is historically loaded by linking to the endpoint provided under the domain polyfill.io.
In the interest of providing developers with additional options to use polyfill, today we are launching an alternative endpoint under cdnjs. You can replace links to polyfill.io “as is” with our new endpoint. You will then rely on the same service and reputation that cdnjs has built over the years for your polyfill needs.
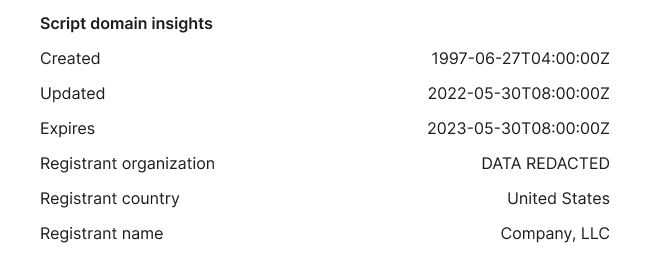
Our interest in creating an alternative endpoint was also sparked by some concerns raised by the community, and main contributors, following the transition of the domain polyfill.io to a new provider (Funnull).
The concerns are that any website embedding a link to the original polyfill.io domain, will now be relying on Funnull to maintain and secure the underlying project to avoid the risk of a supply chain attack. Such an attack would occur if the underlying third party is compromised or alters the code being served to end users in nefarious ways, causing, by consequence, all websites using the tool to be compromised.
Supply chain attacks, in the context of web applications, are a growing concern for security teams, and also led us to build a client side security product to detect and mitigate these attack vectors: Page Shield.
Irrespective of the scenario described above, this is a timely reminder of the complexities and risks tied to modern web applications. As maintainers and contributors of cdnjs, currently used by more than 12% of all sites, this reinforces our commitment to help keep the Internet safe.
polyfill.io on cdnjs
The full polyfill.io implementation has been deployed at the following URL:
Usage and deployment is intended to be identical to the original polyfill.io site. As a developer, you should be able to simply “replace” the old link with the new cdnjs-hosted link without observing any side effects, besides a possible improvement in performance and reliability.
If you don’t have access to the underlying website code, but your website is behind Cloudflare, replacing the links is even easier, as you can deploy a Cloudflare Worker to update the links for you:
You can also test the Worker on your website without deploying the worker. You can find instructions on how to do this in another blog post we wrote in the past.
The polyfill.io service was hosted on Fastly and used their Rust library. We forked the project to add the compatibility for Cloudflare Workers, and plan to make the fork publicly accessible in the near future.
Worker
The https://cdnjs.cloudflare.com/polyfill/[...].js endpoints are also implemented in a Cloudflare Worker that wraps our Polyfill.io fork. The wrapper uses Cloudflare’s Rust API and looks like the following:
#[event(fetch)]
async fn main(req: Request, env: Env, ctx: Context) -> Result<Response> {
    let metrics = {...};

    let polyfill_store = get_d1(&req, &env)?;
    let polyfill_env = Arc::new(service::Env { polyfill_store, metrics });

    // Run the polyfill.io entrypoint
    let res = service::handle_request(req2, polyfill_env).await;

    let status_code = if let Ok(res) = &res {
        res.status_code()
    } else {
        500
    };
    metrics
        .requests
        .with_label_values(&[&status_code.to_string()])
        .inc();

    ctx.wait_until(async move {
        if let Err(err) = metrics.report_metrics().await {
            console_error!("failed to report metrics: {err}");
        }
    });

    res
}
The wrapper only sets up our internal metrics and logging tools, so we can monitor uptime and performance of the underlying logic while calling the Polyfill.io entrypoint.
Storage for the Polyfill files
All the polyfill files are stored in a key-value store powered by Cloudflare D1. This allows us to fetch as many polyfill files as we need with a single SQL query, as opposed to the original implementation doing one KV get() per file.
For performance, we have one Cloudflare D1 instance per region and the SQL queries are routed to the nearest database.
cdnjs for your JavaScript libraries
cdnjs is hosting over 6k JavaScript libraries as of today. We are looking for ways to improve the service and provide new content. We listen to community feedback and welcome suggestions on our community forum, or cdnjs on GitHub.
Page Shield is also available to all paid plans. Log in to turn it on with a single click to increase visibility and security for your third party assets.
In this post, we’re excited to introduce SafeTest, a revolutionary library that offers a fresh perspective on End-To-End (E2E) tests for web-based User Interface (UI) applications.
The Challenges of Traditional UI Testing
Traditionally, UI tests have been conducted through either unit testing or integration testing (also referred to as End-To-End (E2E) testing). However, each of these methods presents a unique trade-off: you have to choose between controlling the test fixture and setup, or controlling the test driver.
For instance, when using react-testing-library, a unit testing solution, you maintain complete control over what to render and how the underlying services and imports should behave. However, you lose the ability to interact with an actual page, which can lead to a myriad of pain points:
Difficulty in interacting with complex UI elements like <Dropdown /> components.
Inability to test CORS setup or GraphQL calls.
Lack of visibility into z-index issues affecting click-ability of buttons.
Complex and unintuitive authoring and debugging of tests.
Conversely, using integration testing tools like Cypress or Playwright provides control over the page, but sacrifices the ability to instrument the bootstrapping code for the app. These tools operate by remotely controlling a browser to visit a URL and interact with the page. This approach has its own set of challenges:
Difficulty in making calls to an alternative API endpoint without implementing custom network layer API rewrite rules.
Inability to make assertions on spies/mocks or execute code within the app.
Testing something like dark mode entails clicking the theme switcher or knowing the localStorage mechanism to override.
Inability to test segments of the app, for example if a component is only visible after clicking a button and waiting for a 60 second timer to countdown, the test will need to run those actions and will be at least a minute long.
Recognizing these challenges, solutions like E2E Component Testing have emerged, with offerings from Cypress and Playwright. While these tools attempt to rectify the shortcomings of traditional integration testing methods, they have other limitations due to their architecture. They start a dev server with bootstrapping code to load the component and/or setup code you want, which limits their ability to handle complex enterprise applications that might have OAuth or a complex build pipeline. Moreover, updating TypeScript usage could break your tests until the Cypress/Playwright team updates their runner.
Welcome to SafeTest
SafeTest aims to address these issues with a novel approach to UI testing. The main idea is to have a snippet of code in our application bootstrapping stage that injects hooks to run our tests (see the How Safetest Works sections for more info on what this is doing). Note that how this works has no measurable impact on the regular usage of your app since SafeTest leverages lazy loading to dynamically load the tests only when running the tests (in the README example, the tests aren’t in the production bundle at all). Once that’s in place, we can use Playwright to run regular tests, thereby achieving the ideal browser control we want for our tests.
This approach also unlocks some exciting features:
Deep linking to a specific test without needing to run a node test server.
Two-way communication between the browser and test (node) context.
Access to all the DX features that come with Playwright (excluding the ones that come with @playwright/test).
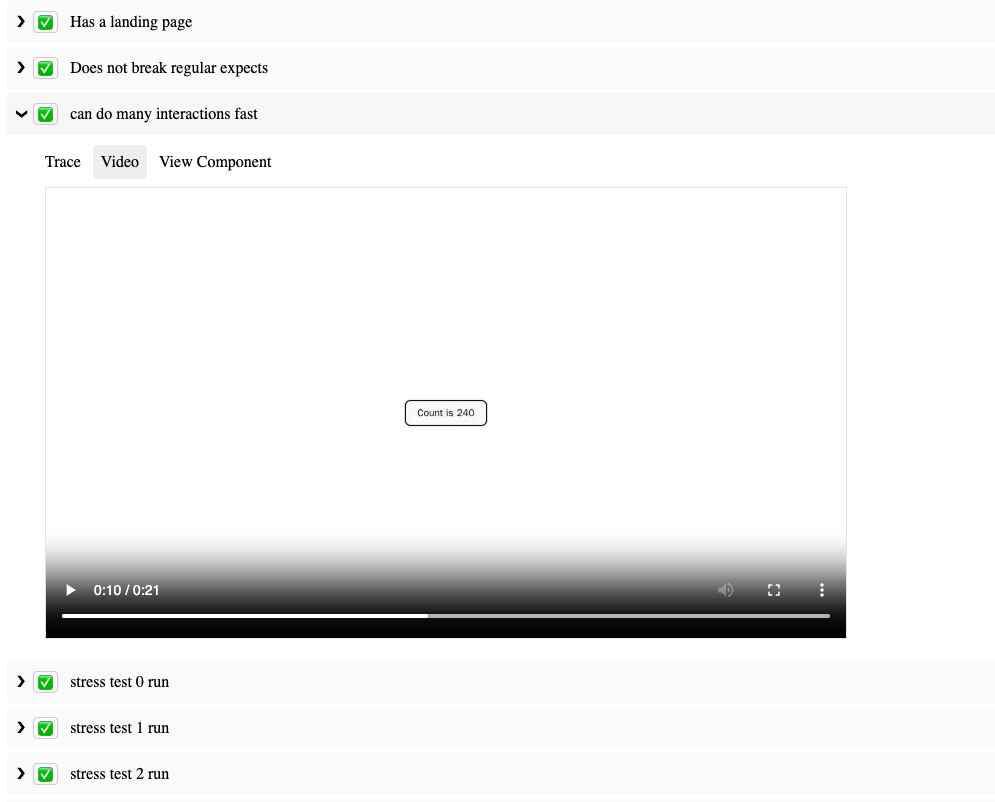
Video recording of tests, trace viewing, and pause page functionality for trying out different page selectors/actions.
Ability to make assertions on spies in the browser in node, matching snapshot of the call within the browser.
Test Examples with SafeTest
SafeTest is designed to feel familiar to anyone who has conducted UI tests before, as it leverages the best parts of existing solutions. Here’s an example of how to test an entire application:
import { describe, it, expect } from 'safetest/jest';
import { render } from 'safetest/react';

describe('my app', () => {
  it('loads the main page', async () => {
    const { page } = await render();

    await expect(page.getByText('Welcome to the app')).toBeVisible();
    expect(await page.screenshot()).toMatchImageSnapshot();
  });
});
We can just as easily test a specific component
import { describe, it, expect, browserMock } from 'safetest/jest'; import { render } from 'safetest/react';
SafeTest utilizes React Context to allow for value overrides during tests. For an example of how this works, let’s assume we have a fetchPeople function used in a component:
import { useAsync } from 'react-use'; import { fetchPerson } from './api/person';
The render function also accepts a function that will be passed the initial app component, allowing for the injection of any desired elements anywhere in the app:
With overrides, we can write complex test cases such as ensuring a service method which combines API requests from /foo, /bar, and /baz, has the correct retry mechanism for just the failed API requests and still maps the return value correctly. So if /bar takes 3 attempts to resolve the method will make a total of 5 API calls.
Overrides aren’t limited to just API calls (since we can use also use page.route), we can also override specific app level values like feature flags or changing some static value:
+const Language = createOverride(navigator.language); export const LanguageChanger = () => { - const language = navigator.language; + const language = Language.useValue(); return <div>Current language is { language } </div>; }
await expect(page.getByText('Current language is abc')).toBeVisible(); }); });
Overrides are a powerful feature of SafeTest and the examples here only scratch the surface. For more information and examples, refer to the Overrides section on the README.
Many large corporations need a form of authentication to use the app. Typically, navigating to localhost:3000 just results in a perpetually loading page. You need to go to a different port, like localhost:8000, which has a proxy server to check and/or inject auth credentials into underlying service calls. This limitation is one of the main reasons that Cypress/Playwright Component Tests aren’t suitable for use at Netflix.
However, there’s usually a service that can generate test users whose credentials we can use to log in and interact with the application. This facilitates creating a light wrapper around SafeTest to automatically generate and assume that test user. For instance, here’s basically how we do it at Netflix:
import { setup } from 'safetest/setup'; import { createTestUser, addCookies } from 'netflix-test-helper';
type Setup = Parameters<typeof setup>[0] & { extraUserOptions?: UserOptions; };
After setting this up, we simply import the above package in place of where we would have used safetest/setup.
Beyond React
While this post focused on how SafeTest works with React, it’s not limited to just React. SafeTest also works with Vue, Svelte, Angular, and even can run on NextJS or Gatsby. It also runs using either Jest or Vitest based on which test runner your scaffolding started you off with. The examples folder demonstrates how to use SafeTest with different tooling combinations, and we encourage contributions to add more cases.
At its core, SafeTest is an intelligent glue for a test runner, a UI library, and a browser runner. Though the most common usage at Netflix employs Jest/React/Playwright, it’s easy to add more adapters for other options.
Conclusion
SafeTest is a powerful testing framework that’s being adopted within Netflix. It allows for easy authoring of tests and provides comprehensive reports when and how any failures occurred, complete with links to view a playback video or manually run the test steps to see what broke. We’re excited to see how it will revolutionize UI testing and look forward to your feedback and contributions.
Last year, we announced the Browser Rendering API – letting users running Puppeteer, a browser automation library, directly in Workers. Puppeteer is one of the most popular libraries used to interact with a headless browser instance to accomplish tasks like taking screenshots, generating PDFs, crawling web pages, and testing web applications. We’ve heard from developers that configuring and maintaining their own serverless browser automation systems can be quite painful.
The Workers Browser Rendering API solves this. It makes the Puppeteer library available directly in your Worker, connected to a real web browser, without the need to configure and manage infrastructure or keep browser sessions warm yourself. You can use @cloudflare/puppeteer to run the full Puppeteer API directly on Workers!
We’ve seen so much interest from the developer community since launching last year. While the Browser Rendering API is still in beta (sign up to our waitlist to get access), we wanted to share a way to get more out of our current limits by using the Browser Rendering API with Durable Objects. We’ll also be sharing pricing for the Rendering API, so you can build knowing exactly what you’ll pay for.
Building a responsive web design testing tool with the Browser Rendering API
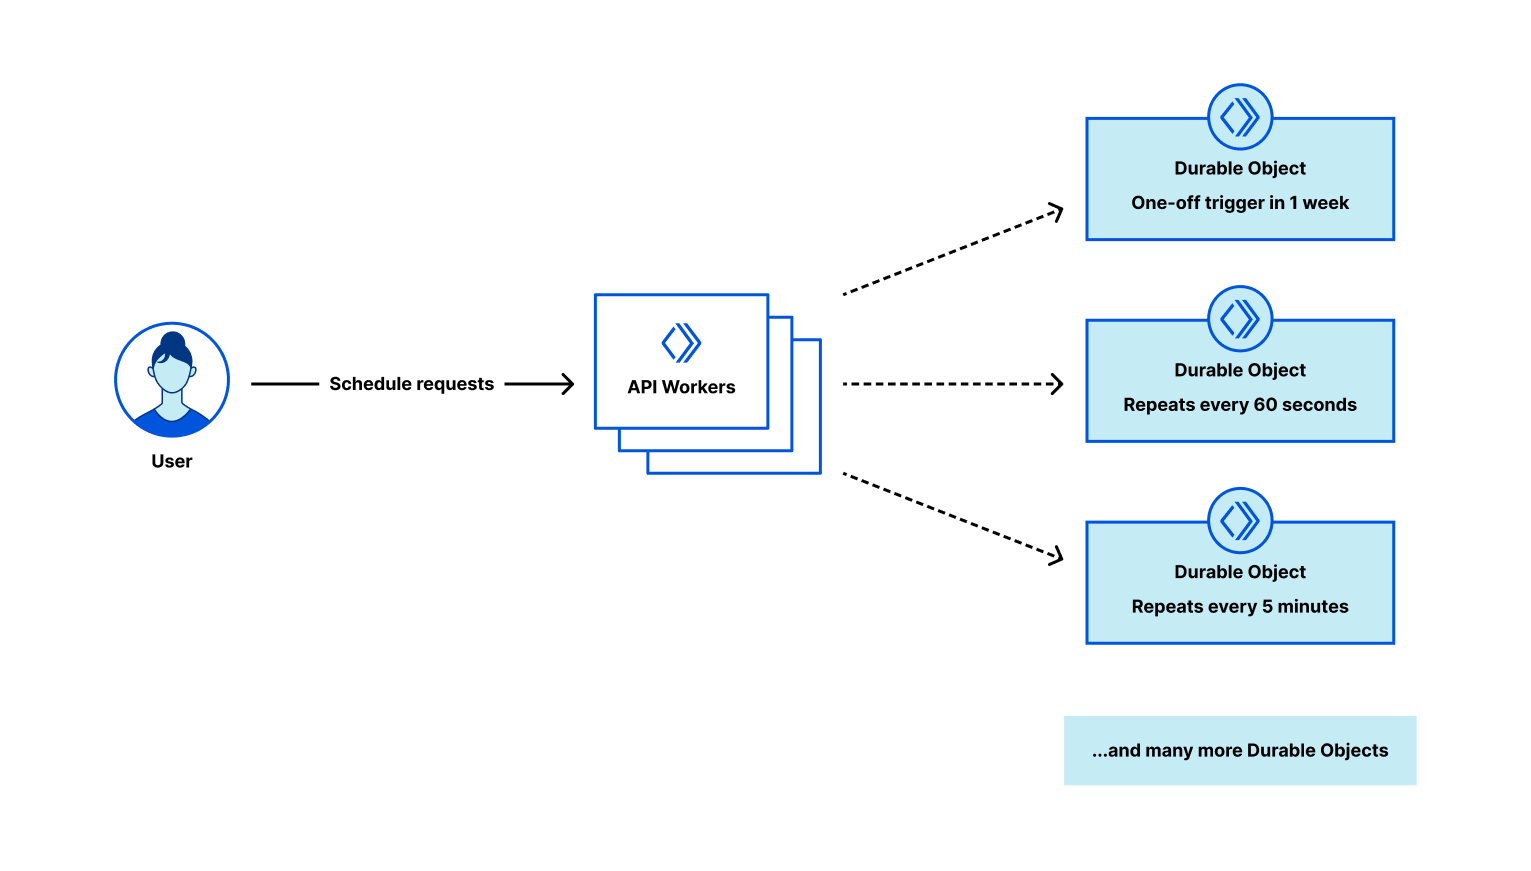
As a designer or frontend developer, you want to make sure that content is well-designed for visitors browsing on different screen sizes. With the number of possible devices that users are browsing on are growing, it becomes difficult to test all the possibilities manually. While there are many testing tools on the market, we want to show how easy it is to create your own Chromium based tool with the Workers Browser Rendering API and Durable Objects.
We’ll be using the Worker to handle any incoming requests, pass them to the Durable Object to take screenshots and store them in an R2 bucket. The Durable Object is used to create a browser session that’s persistent. By using Durable Object Alarms we can keep browsers open for longer and reuse browser sessions across requests.
Let’s dive into how we can build this application:
Create a Worker with a Durable Object, Browser Rendering API binding and R2 bucket. This is the resulting wrangler.toml:
name = "rendering-api-demo"
main = "src/index.js"
compatibility_date = "2023-09-04"
compatibility_flags = [ "nodejs_compat"]
account_id = "c05e6a39aa4ccdd53ad17032f8a4dc10"


# Browser Rendering API binding
browser = { binding = "MYBROWSER" }

# Bind an R2 Bucket
[[r2_buckets]]
binding = "BUCKET"
bucket_name = "screenshots"

# Binding to a Durable Object
[[durable_objects.bindings]]
name = "BROWSER"
class_name = "Browser"

[[migrations]]
tag = "v1" # Should be unique for each entry
new_classes = ["Browser"] # Array of new classes
2. Define the Worker
This Worker simply passes the request onto the Durable Object.
export default {
	async fetch(request, env) {

		let id = env.BROWSER.idFromName("browser");
		let obj = env.BROWSER.get(id);

		// Send a request to the Durable Object, then await its response.
		let resp = await obj.fetch(request.url);
		let count = await resp.text();

		return new Response("success");
	}
};
3. Define the Durable Object class
const KEEP_BROWSER_ALIVE_IN_SECONDS = 60;

export class Browser {
	constructor(state, env) {
		this.state = state;
		this.env = env;
		this.keptAliveInSeconds = 0;
		this.storage = this.state.storage;
	}

	async fetch(request) {
		// screen resolutions to test out
		const width = [1920, 1366, 1536, 360, 414]
		const height = [1080, 768, 864, 640, 896]

		// use the current date and time to create a folder structure for R2
		const nowDate = new Date()
		var coeff = 1000 * 60 * 5
		var roundedDate = (new Date(Math.round(nowDate.getTime() / coeff) * coeff)).toString();
		var folder = roundedDate.split(" GMT")[0]

		//if there's a browser session open, re-use it
		if (!this.browser) {
			console.log(`Browser DO: Starting new instance`);
			try {
			  this.browser = await puppeteer.launch(this.env.MYBROWSER);
			} catch (e) {
			  console.log(`Browser DO: Could not start browser instance. Error: ${e}`);
			}
		  }

		// Reset keptAlive after each call to the DO
		this.keptAliveInSeconds = 0;

		const page = await this.browser.newPage();

		// take screenshots of each screen size
		for (let i = 0; i < width.length; i++) {
			await page.setViewport({ width: width[i], height: height[i] });
			await page.goto("https://workers.cloudflare.com/");
			const fileName = "screenshot_" + width[i] + "x" + height[i]
			const sc = await page.screenshot({
				path: fileName + ".jpg"
			}
			);

			this.env.BUCKET.put(folder + "/"+ fileName + ".jpg", sc);
		  }

		// Reset keptAlive after performing tasks to the DO.
		this.keptAliveInSeconds = 0;

		// set the first alarm to keep DO alive
		let currentAlarm = await this.storage.getAlarm();
		if (currentAlarm == null) {
		console.log(`Browser DO: setting alarm`);
		const TEN_SECONDS = 10 * 1000;
		this.storage.setAlarm(Date.now() + TEN_SECONDS);
		}

		await this.browser.close();
		return new Response("success");
	}

	async alarm() {
		this.keptAliveInSeconds += 10;

		// Extend browser DO life
		if (this.keptAliveInSeconds < KEEP_BROWSER_ALIVE_IN_SECONDS) {
		  console.log(`Browser DO: has been kept alive for ${this.keptAliveInSeconds} seconds. Extending lifespan.`);
		  this.storage.setAlarm(Date.now() + 10 * 1000);
		} else console.log(`Browser DO: cxceeded life of ${KEEP_BROWSER_ALIVE_IN_SECONDS}. Browser DO will be shut down in 10 seconds.`);
	  }

  }
That’s it! With less than a hundred lines of code, you can fully customize a powerful tool to automate responsive web design testing. You can even incorporate it into your CI pipeline to automatically test different window sizes with each build and verify the result is as expected by using an automated library like pixelmatch.
How much will this cost?
We’ve spoken to many customers deploying a Puppeteer service on their own infrastructure, on public cloud containers or functions or using managed services. The common theme that we’ve heard is that these services are costly – costly to maintain and expensive to run.
While you won’t be billed for the Browser Rendering API yet, we want to be transparent with you about costs you start building. We know it’s important to understand the pricing structure so that you don’t get a surprise bill and so that you can design your application efficiently.
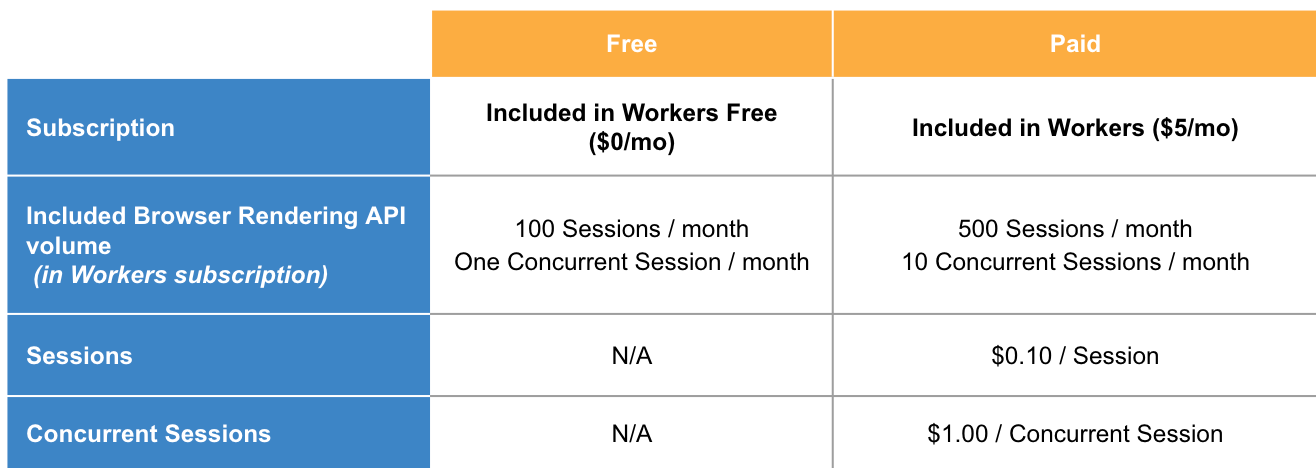
You pay based on two usage metrics:
Number of sessions: A Browser Session is a new instance of a browser being launched
Number of concurrent sessions: Concurrent Sessions is the number of browser instances open at once
Using Durable Objects to persist browser sessions improves performance by eliminating the time that it takes to spin up a new browser session. Since it re-uses sessions, it cuts down on the number of concurrent sessions needed. We highly encourage this model of session re-use if you expect to see consistent traffic for applications that you build on the Browser Rendering API.
If you have feedback about this pricing, we’re all ears. Feel free to reach out through Discord (channel name: browser-rendering-api-beta) and share your thoughts.
Get Started
Sign up to our waitlist to get access to the Workers Browser Rendering API. We’re so excited to see what you build! Share your creations with us on Twitter/X @CloudflareDev or on our Discord community.
This post is written by Alexander Schüren, Sr Specialist SA, Powertools.
One of the design principles of AWS Lambda is to “develop for retries and failures”. If your function fails, the Lambda service will retry and invoke your function again with the same event payload. Therefore, when your function performs tasks such as processing orders or making reservations, it is necessary for your Lambda function to handle requests idempotently to avoid duplicate payment or order processing, which can result in a poor customer experience.
This article explains what idempotency is and how to make your Lambda functions idempotent using the idempotency utility for Powertools for AWS Lambda (TypeScript). The Powertools idempotency utility for TypeScript was co-developed with Vanguard and is now generally available.
Understanding idempotency
Idempotency is the property of an operation that can be applied multiple times without changing the result beyond the initial execution. You can safely run an idempotent operation multiple times without side effects, such as duplicate records or data inconsistencies. This is especially relevant for payment and order processing or third-party API integrations.
There are key concepts to consider when implementing idempotency in AWS Lambda. For each invocation, you specify which subset of the event payload you want to use to identify an idempotent request. This is called the idempotency key. This key can be a single field such as transactionId, a combination of multiple fields such as customerId and requestId, or the entire event payload.
Because timestamps, dates, and other generated values within the payload affect the idempotency key, we recommend that you define specific fields rather than using the entire event payload.
By evaluating the idempotency key, you can then decide if the function needs to run again or send an existing response to the client. To do this, you need to store the following information for each request in a persistence layer (i.e., Amazon DynamoDB):
Status: IN_PROGRESS, EXPIRED, COMPLETE
Response data: the response to send back to the client instead of executing the function again
Expiration timestamp: when the idempotency record becomes invalid for reuse
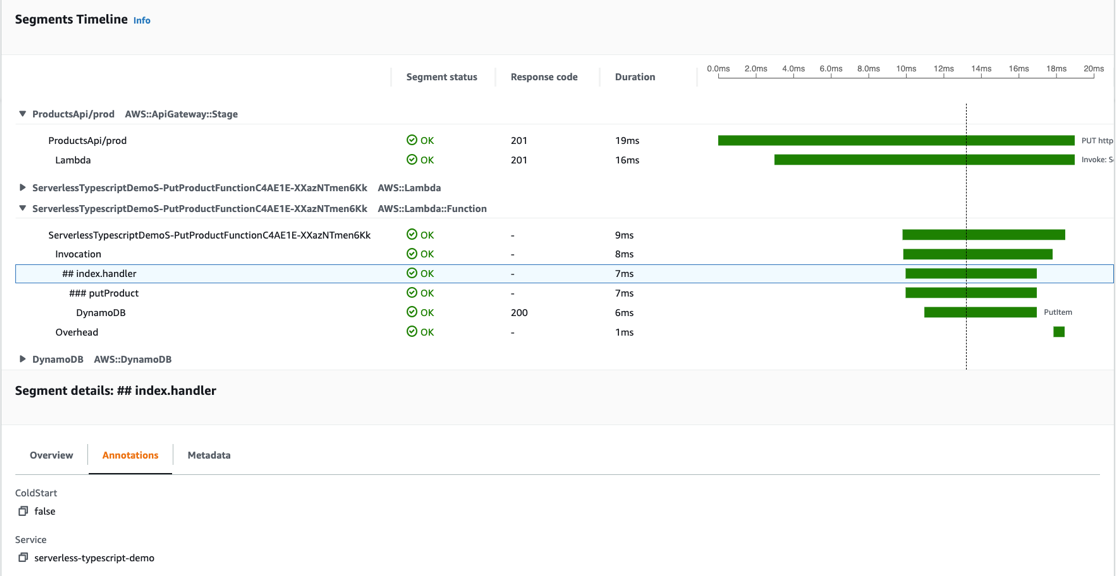
The following diagram shows a successful request flow for this idempotency scenario:
When you invoke a Lambda function with a particular event for the first time, it stores a record with a unique idempotency key tied to an event payload in the persistence layer.
The function then executes its code and updates the record in the persistence layer with the function response. For subsequent invocations with the same payload, you must check if the idempotency key exists in the persistence layer. If it exists, the function returns the same response to the client. This prevents multiple invocations of the function, making it idempotent.
There are more edge cases to be mindful of, such as when the idempotency record has expired, or handling of failures between the client, the Lambda function, and the persistence layer. The Powertools for AWS Lambda (TypeScript) documentation covers all request flows in detail.
Idempotency with Powertools for AWS Lambda (TypeScript)
Powertools for AWS Lambda, available in Python, Java, .NET, and TypeScript, provides utilities for Lambda functions to ease the adoption of best practices and to reduce the amount of code needed to perform recurring tasks. In particular, it provides a module to handle idempotency.
This post shows examples using the TypeScript version of Powertools. To get started with the Powertools idempotency module, you must install the library and configure it within your build process. For more details, follow the Powertools for AWS Lambda documentation.
Getting started
Powertools for AWS Lambda (TypeScript) is modular, meaning you can install the idempotency utility independently from the Logger, Tracing, Metrics, or other packages. Install the idempotency utility library and the AWS SDK v3 client for DynamoDB in your project using npm:
npm i @aws-lambda-powertools/idempotency @aws-sdk/client-dynamodb @aws-sdk/lib-dynamodb
Before getting started, you need to create a persistent storage layer where the idempotency utility can store its state. Your Lambda function AWS Identity and Access Management (IAM) role must have dynamodb:GetItem, dynamodb:PutItem, dynamodb:UpdateItem and dynamodb:DeleteItem permissions.
The following sections illustrate how to instrument your Lambda function code to make it idempotent using a wrapper function or using middy middleware.
Using the function wrapper
Assuming you have created a DynamoDB table with the name IdempotencyTable, create a persistence layer in your Lambda function code:
import { makeIdempotent } from "@aws-lambda-powertools/idempotency";
import { DynamoDBPersistenceLayer } from "@aws-lambda-powertools/idempotency/dynamodb";

const persistenceStore = new DynamoDBPersistenceLayer({
  tableName: "IdempotencyTable",
});
Now, apply the makeIdempotent function wrapper to your Lambda function handler to make it idempotent and use the previously configured persistence store.
The function processes the incoming event to create a payment and return the paymentId, message, and status back to the client. Making the Lambda function handler idempotent ensures that payments are only processed once, despite multiple Lambda invocations with the same event payload. You can also apply the makeIdempotent function wrapper to any other function outside of your handler.
Use the following type definitions for this example by adding a types.ts file to your source folder:
type Request = {
  user: string;
  productId: string;
};

type Response = {
  [key: string]: unknown;
};

type SubscriptionResult = {
  id: string;
  productId: string;
};
Using middy middleware
If you are using middy middleware, Powertools provides makeHandlerIdempotent middleware to make your Lambda function handler idempotent:
import { makeHandlerIdempotent } from '@aws-lambda-powertools/idempotency/middleware';
import { DynamoDBPersistenceLayer } from '@aws-lambda-powertools/idempotency/dynamodb';
import middy from '@middy/core';
import type { Context } from 'aws-lambda';
import type { Request, Response, SubscriptionResult } from './types';

const persistenceStore = new DynamoDBPersistenceLayer({
  tableName: 'IdempotencyTable',
});

export const handler = middy(
  async (event: Request, _context: Context): Promise<Response> => {
    try {
      const payment = … // create payment object

      return {
        paymentId: payment.id,
        message: 'success',
        statusCode: 200,
      };
    } catch (error) {
      throw new Error('Error creating payment');
    }
  }
).use(
    makeHandlerIdempotent({
      persistenceStore,
  })
);
Configuration options
The Powertools idempotency utility comes with several configuration options to change the idempotency behavior that will fit your use case scenario. This section highlights the most common configurations. You can find all available customization options in the AWS Powertools for Lambda (TypeScript) documentation.
Persistence layer options
When you create a DynamoDBPersistenceLayer object, only the tableName attribute is required. Powertools will expect the table with a partition key id and will create other attributes with default values.
You can change these default values if needed by passing the options parameter:
import { DynamoDBPersistenceLayer } from '@aws-lambda-powertools/idempotency/dynamodb';

const persistenceStore = new DynamoDBPersistenceLayer({
  tableName: 'idempotencyTableName',
  keyAttr: 'idempotencyKey', // default: id
  expiryAttr: 'expiresAt', // default: expiration
  inProgressExpiryAttr: 'inProgressExpiresAt', // default: in_progress_expiration
  statusAttr: 'currentStatus', // default: status
  dataAttr: 'resultData', // default: data
  validationKeyAttr: 'validationKey', .// default validation
});
Using a subset of the event payload
When you configure idempotency for your Lambda function handler, Powertools will use the entire event payload for idempotency handling by hashing the object.
To prevent that, create an IdempotencyConfig and configure which part of the payload should be hashed for the idempotency logic.
Create the IdempotencyConfig and set eventKeyJmespath to a key within your event payload:
import { IdempotencyConfig } from '@aws-lambda-powertools/idempotency';

// Extract the idempotency key from the request headers
const config = new IdempotencyConfig({
  eventKeyJmesPath: 'headers."X-Idempotency-Key"',
});
Use the X-Idempotency-Key header for your idempotency key. Subsequent invocations with the same header value will be idempotent.
You can then add the configuration to the makeIdempotent function wrapper from the previous example:
There are other configuration options you can apply, such as payload validation, expiration duration, local caching, and others. See the Powertools for AWS Lambda (TypeScript) documentation for more information.
Customizing the AWS SDK configuration
The DynamoDBPersistenceLayer is built-in and allows you to store the idempotency data for all your requests. Under the hood, Powertools uses the AWS SDK for JavaScript v3. Change the SDK configuration by passing a clientConfig object.
The following sample sets the region to eu-west-1:
import { DynamoDBPersistenceLayer } from '@aws-lambda-powertools/idempotency/dynamodb';

const persistenceStore = new DynamoDBPersistenceLayer({
  tableName: 'IdempotencyTable',
  clientConfig: {
    region: 'eu-west-1',
  },
});
If you are using your own client, you can pass it the persistence layer:
import { DynamoDBPersistenceLayer } from '@aws-lambda-powertools/idempotency/dynamodb';
import { DynamoDBClient } from '@aws-sdk/client-dynamodb';

const ddbClient = new DynamoDBClient({ region: 'eu-west-1' });

const dynamoDBPersistenceLayer = new DynamoDBPersistenceLayer({
  tableName: 'IdempotencyTable',
  awsSdkV3Client: ddbClient,
});
Conclusion
Making your Lambda functions idempotent can be a challenge and, if not done correctly, can lead to duplicate data, inconsistencies, and a bad customer experience. This post shows how to use Powertools for AWS Lambda (TypeScript) to process your critical transactions only once when using AWS Lambda.
For more details on the Powertools idempotency feature and its configuration options, see the full documentation.
For more serverless learning resources, visit Serverless Land.
Today we are announcing support for three additional APIs from Node.js in Cloudflare Workers. This increases compatibility with the existing ecosystem of open source npm packages, allowing you to use your preferred libraries in Workers, even if they depend on APIs from Node.js.
We recently added support for AsyncLocalStorage, EventEmitter, Buffer, assert and parts of util. Today, we are adding support for:
We are also sharing a preview of a new module type, available in the open-source Workers runtime, that mirrors a Node.js environment more closely by making some APIs available as globals, and allowing imports without the node: specifier prefix.
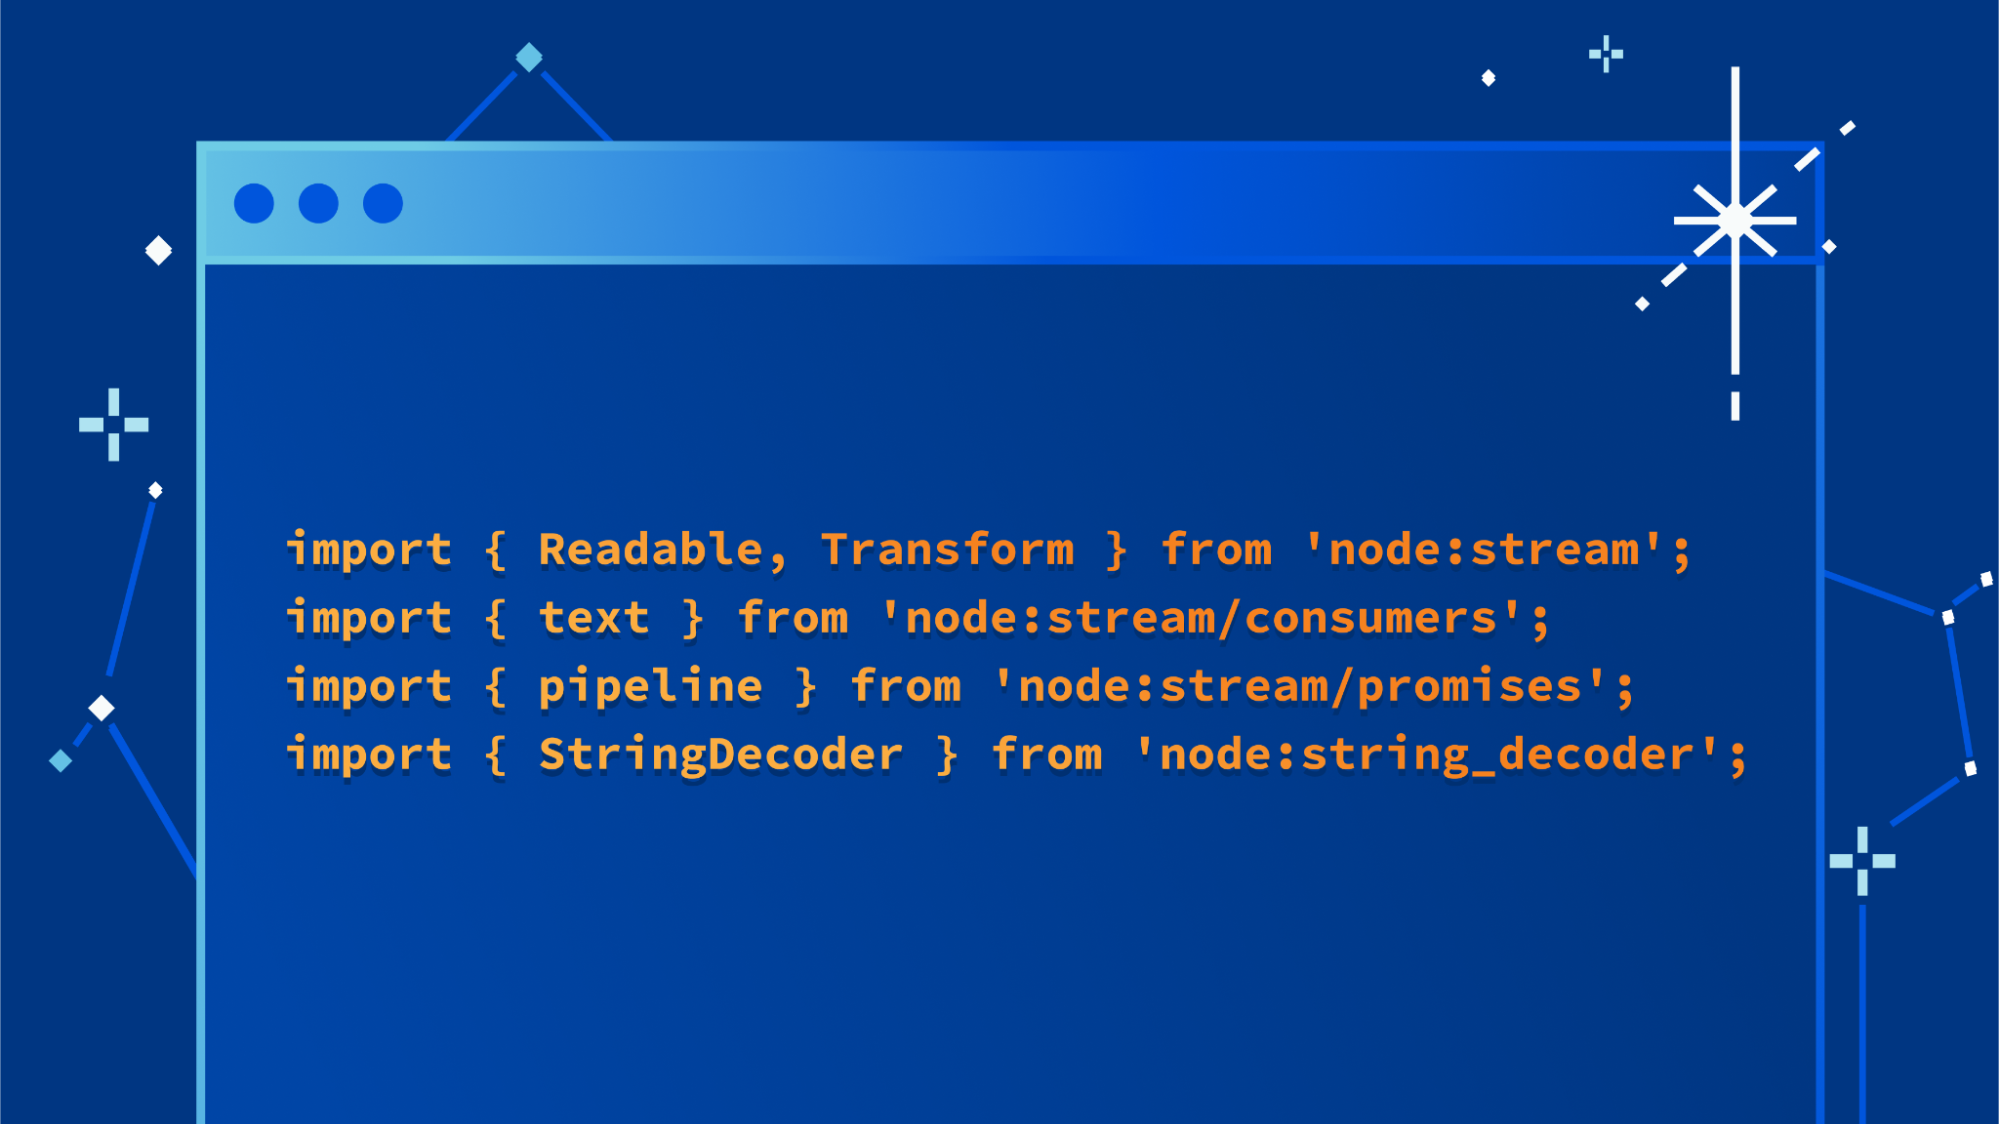
The Node.js streams API is the original API for working with streaming data in JavaScript that predates the WHATWG ReadableStream standard. Now, a full implementation of Node.js streams (based directly on the official implementation provided by the Node.js project) is available within the Workers runtime.
Let's start with a quick example:
import {
  Readable,
  Transform,
} from 'node:stream';

import {
  text,
} from 'node:stream/consumers';

import {
  pipeline,
} from 'node:stream/promises';

// A Node.js-style Transform that converts data to uppercase
// and appends a newline to the end of the output.
class MyTransform extends Transform {
  constructor() {
    super({ encoding: 'utf8' });
  }
  _transform(chunk, _, cb) {
    this.push(chunk.toString().toUpperCase());
    cb();
  }
  _flush(cb) {
    this.push('\n');
    cb();
  }
}

export default {
  async fetch() {
    const chunks = [
      "hello ",
      "from ",
      "the ",
      "wonderful ",
      "world ",
      "of ",
      "node.js ",
      "streams!"
    ];

    function nextChunk(readable) {
      readable.push(chunks.shift());
      if (chunks.length === 0) readable.push(null);
      else queueMicrotask(() => nextChunk(readable));
    }

    // A Node.js-style Readable that emits chunks from the
    // array...
    const readable = new Readable({
      encoding: 'utf8',
      read() { nextChunk(readable); }
    });

    const transform = new MyTransform();
    await pipeline(readable, transform);
    return new Response(await text(transform));
  }
};
In this example we create two Node.js stream objects: one stream.Readable and one stream.Transform. The stream.Readable simply emits a sequence of individual strings, piped through the stream.Transform which converts those to uppercase and appends a new-line as a final chunk.
The example is straightforward and illustrates the basic operation of the Node.js API. For anyone already familiar with using standard WHATWG streams in Workers the pattern here should be recognizable.
The Node.js streams API is used by countless numbers of modules published on npm. Now that the Node.js streams API is available in Workers, many packages that depend on it can be used in your Workers. For example, the split2 module is a simple utility that can break a stream of data up and reassemble it so that every line is a distinct chunk. While simple, the module is downloaded over 13 million times each week and has over a thousand direct dependents on npm (and many more indirect dependents). Previously it was not possible to use split2 within Workers without also pulling in a large and complicated polyfill implementation of streams along with it. Now split2 can be used directly within Workers with no modifications and no additional polyfills. This reduces the size and complexity of your Worker by thousands of lines.
import {
  PassThrough,
} from 'node:stream';

import { default as split2 } from 'split2';

const enc = new TextEncoder();

export default {
  async fetch() {
    const pt = new PassThrough();
    const readable = pt.pipe(split2());

    pt.end('hello\nfrom\nthe\nwonderful\nworld\nof\nnode.js\nstreams!');
    for await (const chunk of readable) {
      console.log(chunk);
    }

    return new Response("ok");
  }
};
Path
The Node.js Path API provides utilities for working with file and directory paths. For example:
Note that in the Workers implementation of path, the path.win32 variants of the path API are not implemented, and will throw an exception.
StringDecoder
The Node.js StringDecoder API is a simple legacy utility that predates the WHATWG standard TextEncoder/TextDecoder API and serves roughly the same purpose. It is used by Node.js' stream API implementation as well as a number of popular npm modules for the purpose of decoding UTF-8, UTF-16, Latin1, Base64, and Hex encoded data.
import { StringDecoder } from 'node:string_decoder';
const decoder = new StringDecoder('utf8');

const cent = Buffer.from([0xC2, 0xA2]);
console.log(decoder.write(cent));

const euro = Buffer.from([0xE2, 0x82, 0xAC]);
console.log(decoder.write(euro));
In the vast majority of cases, your Worker should just keep on using the standard TextEncoder/TextDecoder APIs, but the StringDecoder is available directly for workers to use now without relying on polyfills.
Node.js Compat Modules
One Worker can already be a bundle of multiple assets. This allows a single Worker to be made up of multiple individual ESM modules, CommonJS modules, JSON, text, and binary data files.
Soon there will be a new type of module that can be included in a Worker bundles: the NodeJsCompatModule.
A NodeJsCompatModule is designed to emulate the Node.js environment as much as possible. Within these modules, common Node.js global variables such as process, Buffer, and even __filename will be available. More importantly, it is possible to require() our Node.js core API implementations without using the node: specifier prefix. This maximizes compatibility with existing NPM packages that depend on globals from Node.js being present, or don’t import Node.js APIs using the node: specifier prefix.
Support for this new module type has landed in the open source workerd runtime, with deeper integration with Wrangler coming soon.
What’s next
We’re adding support for more Node.js APIs each month, and as we introduce new APIs, they will be added under the nodejs_compat compatibility flag — no need to take any action or update your compatibility date.
Have an NPM package that you wish worked on Workers, or an API you’d like to be able to use? Join the Cloudflare Developers Discord and tell us what you’re building, and what you’d like to see next.
Programming is becoming an increasingly useful skill in today’s society. As we continue to rely more and more on software and digital technology, knowing how to code is also more and more valuable. That’s why many parents are looking for ways to introduce their children to programming. You might find it difficult to know where to begin, with so many different kids’ coding languages and platforms available. In this blog post, we explore how children can progress through different programming languages to realise their potential as proficient coders and creators of digital technology.
ScratchJr
Everyone needs to start somewhere, and one great option for children aged 5–7 is ScratchJr (Scratch Junior), a visual programming language with drag-and-drop blocks for creating simple programs. ScratchJr is available for free on Android and iOS mobile devices. It’s great for introducing young children to the basics of programming, and they can use it to create interactive stories and games.
Scratch
Moving on from ScratchJr, there’s its web-based sibling Scratch. Scratch offers drag-and-drop blocks for creating programs and comes with an assortment of graphics, sounds, and music for your child to bring their programs to life. This visual programming language is designed specifically for children to learn programming fundamentals. Scratch is available in multiple spoken languages and is perfect for beginners. It allows kids to create interactive stories, animations, and games with ease.
The Raspberry Pi Foundation has a wealth of free Scratch resources we have created specifically for young people who are beginners, such as the ‘Introduction to Scratch’ project path. And if your child is interested in physical computing to interact with the real world using code, they can also learn how to use electronic components, such as buzzers and LEDs, with Scratch and a Raspberry Pi computer.
MakeCode
Another fun option for children who want to explore coding and physical computing is the micro:bit. This is a small programmable device with an LED display, buttons, and sensors, and it can be used to create games, animations, interactive projects, and lots more. To control a micro:bit, a visual programming language called MakeCode can be used. The micro:bit can also be programmed using Scratch or text-based languages such as Python, offering an easy transition for children as their coding skills progress. Have a look at our free collection of micro:bit resources to learn more.
HTML
Everyone is familiar with websites, but fewer people know how they are coded. HTML is a markup language that is used to create the webpages we use every day. It’s a great language for children to learn because they can see the results of their code in real time, in their web browser. They can use HTML and CSS to create simple webpages that include links, videos, pictures, and interactive elements, all the while learning how websites are structured and designed. We have many free web design resources for your child, including a basic ‘Introduction to web development’ project path.
Python
If your child is becoming confident with Scratch and HTML, then using Python is the recommended next stage in their learning. Python is a high-level text-based programming language that is easy to read and learn. It is a popular choice for beginners as it has a simple syntax that often reads like plain English. Many free Python projects for young people are available on our website, including the ‘Introduction to Python’ path.
The Python community is also really welcoming and has produced a myriad of online tutorials and videos to help learners explore this language. Python can be used to do some very powerful things with ease, which is why it is so popular. For example, it is relatively simple to create Python programs to engage in machine learning and data analysis. If you wanted to explore large language models such as GPT, on which the ChatGPT chatbot is based, then Python would be the language of choice.
JavaScript
JavaScript is the language of the web, and if your child has become proficient in HTML, then this is the next language for them. JavaScript is used to create interactive websites and web applications. As young people become more comfortable with programming, JavaScript is a useful language to progress to, given how ubiquitous the web is today. It can be tricky to learn, but like Python, it has a vast number of libraries of functions that people have already created for it to achieve things more quickly. These libraries make JavaScript a very powerful language to use.
Try out kids’ coding languages
There are many different programming languages, and each one has its own strengths and weaknesses. Some are easy to learn and use, some are really fast, and some are very secure.
Starting with visual languages such as Scratch or MakeCode allows your child to begin to understand the basic concepts of programming without needing any developed reading and keyboard skills. Once their understanding and skills have improved, they can try out text-based languages, find the one that they are comfortable with, and then continue to learn. It’s fairly common for people who are proficient in one programming language to learn other languages quite quickly, so don’t worry about which programming language your child starts with.
Whether your child is interested in working in software development or just wants to learn a valuable — and creative — skill, helping them learn to code and try out different kids’ coding languages is a great way for you to open up new opportunities for them.
Welcome to the 21st edition of the AWS Serverless ICYMI (in case you missed it) quarterly recap. Every quarter, we share all the most recent product launches, feature enhancements, blog posts, webinars, live streams, and other interesting things that you might have missed!
In case you missed our last ICYMI, check out what happened last quarter here.
Example notification of a story hosted with Next.js and App Runner
Serverless Land is a website maintained by the Serverless Developer Advocate team to help you build serverless applications and includes workshops, code examples, blogs, and videos. There is now enhanced search functionality so you can search across resources, patterns, and video content.
ServerlessLand search
AWS Lambda
AWS Lambda has improved how concurrency works with Amazon SQS. You can now control the maximum number of concurrent Lambda functions invoked.
The launch blog post explains the scaling behavior of Lambda using this architectural pattern, challenges this feature helps address, and a demo of maximum concurrency in action.
Maximum concurrency is set to 10 for the SQS queue.
AWS Lambda Powertools is an open-source library to help you discover and incorporate serverless best practices more easily. Lambda Powertools for .NET is now generally available and currently focused on three observability features: distributed tracing (Tracer), structured logging (Logger), and asynchronous business and application metrics (Metrics). Powertools is also available for Python, Java, and Typescript/Node.js programming languages.
Lambda announced a new feature, runtime management controls, which provide more visibility and control over when Lambda applies runtime updates to your functions. The runtime controls are optional capabilities for advanced customers that require more control over their runtime changes. You can now specify a runtime management configuration for each function with three settings, Automatic (default), Function update, or manual.
There are three new Amazon CloudWatch metrics for asynchronous Lambda function invocations: AsyncEventsReceived, AsyncEventAge, and AsyncEventsDropped. You can track the asynchronous invocation requests sent to Lambda functions to monitor any delays in processing and take corrective actions if required. The launch blog post explains the new metrics and how to use them to troubleshoot issues.
Lambda now supports Amazon DocumentDB change streams as an event source. You can use Lambda functions to process new documents, track updates to existing documents, or log deleted documents. You can use any programming language that is supported by Lambda to write your functions.
There is a helpful blog post suggesting best practices for developing portable Lambda functions that allow you to port your code to containers if you later choose to.
AWS Step Functions
AWS Step Functions has expanded its AWS SDK integrations with support for 35 additional AWS services including Amazon EMR Serverless, AWS Clean Rooms, AWS IoT FleetWise, AWS IoT RoboRunner and 31 other AWS services. In addition, Step Functions also added support for 1000+ new API actions from new and existing AWS services such as Amazon DynamoDB and Amazon Athena. For the full list of added services, visit AWS SDK service integrations.
EventBridge event buses now also support enhanced integration with Service Quotas. Your quota increase requests for limits such as PutEvents transactions-per-second, number of rules, and invocations per second among others will be processed within one business day or faster, enabling you to respond quickly to changes in usage.
AWS SAM
The AWS Serverless Application Model (SAM) Command Line Interface (CLI) has added the sam list command. You can now show resources defined in your application, including the endpoints, methods, and stack outputs required to test your deployed application.
AWS SAM has a preview of sam build support for building and packaging serverless applications developed in Rust. You can use cargo-lambda in the AWS SAM CLI build workflow and AWS SAM Accelerate to iterate on your code changes rapidly in the cloud.
You can now use AWS SAM connectors as a source resource parameter. Previously, you could only define AWS SAM connectors as a AWS::Serverless::Connector resource. Now you can add the resource attribute on a connector’s source resource, which makes templates more readable and easier to update over time.
AWS SAM connectors now also support multiple destinations to simplify your permissions. You can now use a single connector between a single source resource and multiple destination resources.
In October 2022, AWS released OpenID Connect (OIDC) support for AWS SAM Pipelines. This improves your security posture by creating integrations that use short-lived credentials from your CI/CD provider. There is a new blog post on how to implement it.
Amazon S3 now automatically applies default encryption to all new objects added to S3, at no additional cost and with no impact on performance.
You can now use an S3 Object Lambda Access Point alias as an origin for your Amazon CloudFront distribution to tailor or customize data to end users. For example, you can resize an image depending on the device that an end user is visiting from.
S3 has introduced Mountpoint for S3, a high performance open source file client that translates local file system API calls to S3 object API calls like GET and LIST.
S3 Multi-Region Access Points now support datasets that are replicated across multiple AWS accounts. They provide a single global endpoint for your multi-region applications, and dynamically route S3 requests based on policies that you define. This helps you to more easily implement multi-Region resilience, latency-based routing, and active-passive failover, even when data is stored in multiple accounts.
Amazon Kinesis
Amazon Kinesis Data Firehose now supports streaming data delivery to Elastic. This is an easier way to ingest streaming data to Elastic and consume the Elastic Stack (ELK Stack) solutions for enterprise search, observability, and security without having to manage applications or write code.
Amazon DynamoDB
Amazon DynamoDB now supports table deletion protection to protect your tables from accidental deletion when performing regular table management operations. You can set the deletion protection property for each table, which is set to disabled by default.
Amazon SNS
Amazon SNS now supports AWS X-Ray active tracing to visualize, analyze, and debug application performance. You can now view traces that flow through Amazon SNS topics to destination services, such as Amazon Simple Queue Service, Lambda, and Kinesis Data Firehose, in addition to traversing the application topology in Amazon CloudWatch ServiceLens.
SNS also now supports setting content-type request headers for HTTPS notifications so applications can receive their notifications in a more predictable format. Topic subscribers can create a DeliveryPolicy that specifies the content-type value that SNS assigns to their HTTPS notifications, such as application/json, application/xml, or text/plain.
EDA Visuals collection added to Serverless Land
The Serverless Developer Advocate team has extended Serverless Land and introduced EDA visuals. These are small bite sized visuals to help you understand concept and patterns about event-driven architectures. Find out about batch processing vs. event streaming, commands vs. events, message queues vs. event brokers, and point-to-point messaging. Discover bounded contexts, migrations, idempotency, claims, enrichment and more!
There is also a new section on Serverless Land containing helpful code repositories. You can search for code repos to use for examples, learning or building serverless applications. You can also filter by use-case, runtime, and level.
Weekly office hours live stream. In each session we talk about a specific topic or technology related to serverless and open it up to helping you with your real serverless challenges and issues. Ask us anything you want about serverless technologies and applications.
Marcia Villalba frequently publishes new videos on her popular serverless YouTube channel. You can view all of Marcia’s videos at https://www.youtube.com/c/FooBar_codes.
Eric Johnson is exploring how developers are building serverless applications. We spend time talking about AWS SAM as well as others like AWS CDK, Terraform, Wing, and AMPT.
The Serverless landing page has more information. The Lambda resources page contains case studies, webinars, whitepapers, customer stories, reference architectures, and even more Getting Started tutorials.
Over the coming months, Cloudflare Workers will start to roll out built-in compatibility with Node.js core APIs as part of an effort to support increased compatibility across JavaScript runtimes.
We are happy to announce today that the first of these Node.js APIs – AsyncLocalStorage, EventEmitter, Buffer, assert, and parts of util – are now available for use. These APIs are provided directly by the open-source Cloudflare Workers runtime, with no need to bundle polyfill implementations into your own code.
These new APIs are available today — start using them by enabling the nodejs_compatcompatibility flag in your Workers.
Async Context Tracking with the AsyncLocalStorage API
The AsyncLocalStorage API provides a way to track context across asynchronous operations. It allows you to pass a value through your program, even across multiple layers of asynchronous code, without having to pass a context value between operations.
Consider an example where we want to add debug logging that works through multiple layers of an application, where each log contains the ID of the current request. Without AsyncLocalStorage, it would be necessary to explicitly pass the request ID down through every function call that might invoke the logging function:
function logWithId(id, state) {
  console.log(`${id} - ${state}`);
}

function doSomething(id) {
  // We don't actually use id for anything in this function!
  // It's only here because logWithId needs it.
  logWithId(id, "doing something");
  setTimeout(() => doSomethingElse(id), 10);
}

function doSomethingElse(id) {
  logWithId(id, "doing something else");
}

let idSeq = 0;

export default {
  async fetch(req) {
    const id = idSeq++;
    doSomething(id);
    logWithId(id, 'complete');
    return new Response("ok");
  }
}
While this approach works, it can be cumbersome to coordinate correctly, especially as the complexity of an application grows. Using AsyncLocalStorage this becomes significantly easier by eliminating the need to explicitly pass the context around. Our application functions (doSomething and doSomethingElse in this case) never need to know about the request ID at all while the logWithId function does exactly what we need it to:
import { AsyncLocalStorage } from 'node:async_hooks';

const requestId = new AsyncLocalStorage();

function logWithId(state) {
  console.log(`${requestId.getStore()} - ${state}`);
}

function doSomething() {
  logWithId("doing something");
  setTimeout(() => doSomethingElse(), 10);
}

function doSomethingElse() {
  logWithId("doing something else");
}

let idSeq = 0;

export default {
  async fetch(req) {
    return requestId.run(idSeq++, () => {
      doSomething();
      logWithId('complete');
      return new Response("ok");
    });
  }
}
With the nodejs_compatcompatibility flag enabled, import statements are used to access specific APIs. The Workers implementation of these APIs requires the use of the node: specifier prefix that was introduced recently in Node.js (e.g. node:async_hooks, node:events, etc)
We implement a subset of the AsyncLocalStorage API in order to keep things as simple as possible. Specifically, we’ve chosen not to support the enterWith() and disable() APIs that are found in Node.js implementation simply because they make async context tracking more brittle and error prone.
Conceptually, at any given moment within a worker, there is a current “Asynchronous Context Frame”, which consists of a map of storage cells, each holding a store value for a specific AsyncLocalStorage instance. Calling asyncLocalStorage.run(...) causes a new frame to be created, inheriting the storage cells of the current frame, but using the newly provided store value for the cell associated with asyncLocalStorage.
const als1 = new AsyncLocalStorage();
const als2 = new AsyncLocalStorage();

// Code here runs in the root frame. There are two storage cells,
// one for als1, and one for als2. The store value for each is
// undefined.

als1.run(123, () => {
  // als1.run(...) creates a new frame (1). The store value for als1
  // is set to 123, the store value for als2 is still undefined.
  // This new frame is set to "current".

  als2.run(321, () => {
    // als2.run(...) creates another new frame (2). The store value
    // for als1 is still 123, the store value for als2 is set to 321.
    // This new frame is set to "current".
    console.log(als1.getStore(), als2.getStore());
  });

  // Frame (1) is restored as the current. The store value for als1
  // is still 123, but the store value for als2 is undefined again.
});

// The root frame is restored as the current. The store values for
// both als1 and als2 are both undefined again.
Whenever an asynchronous operation is initiated in JavaScript, for example, creating a new JavaScript promise, scheduling a timer, etc, the current frame is captured and associated with that operation, allowing the store values at the moment the operation was initialized to be propagated and restored as needed.
const als = new AsyncLocalStorage();
const p1 = als.run(123, () => {
  return promise.resolve(1).then(() => console.log(als.getStore());
});

const p2 = promise.resolve(1);
const p3 = als.run(321, () => {
  return p2.then(() => console.log(als.getStore()); // prints 321
});

als.run('ABC', () => setInterval(() => {
  // prints "ABC" to the console once a second…
  setInterval(() => console.log(als.getStore(), 1000);
});

als.run('XYZ', () => queueMicrotask(() => {
  console.log(als.getStore());  // prints "XYZ"
}));
Note that for unhandled promise rejections, the “unhandledrejection” event will automatically propagate the context that is associated with the promise that was rejected. This behavior is different from other types of events emitted by EventTarget implementations, which will propagate whichever frame is current when the event is emitted.
const asyncLocalStorage = new AsyncLocalStorage();

asyncLocalStorage.run(123, () => Promise.reject('boom'));
asyncLocalStorage.run(321, () => Promise.reject('boom2'));

addEventListener('unhandledrejection', (event) => {
  // prints 123 for the first unhandled rejection ('boom'), and
  // 321 for the second unhandled rejection ('boom2')
  console.log(asyncLocalStorage.getStore());
});
Workers can use the AsyncLocalStorage.snapshot() method to create their own objects that capture and propagate the context:
const asyncLocalStorage = new AsyncLocalStorage();

class MyResource {
  #runInAsyncFrame = AsyncLocalStorage.snapshot();

  doSomething(...args) {
    return this.#runInAsyncFrame((...args) => {
      console.log(asyncLocalStorage.getStore());
    }, ...args);
  }
}

const resource1 = asyncLocalStorage.run(123, () => new MyResource());
const resource2 = asyncLocalStorage.run(321, () => new MyResource());

resource1.doSomething();  // prints 123
resource2.doSomething();  // prints 321
There is currently an effort underway to add a new AsyncContext mechanism (inspired by AsyncLocalStorage) to the JavaScript language itself. While it is still early days for the TC-39 proposal, there is good reason to expect it to progress through the committee. Once it does, we look forward to being able to make it available in the Cloudflare Workers platform. We expect our implementation of AsyncLocalStorage to be compatible with this new API.
The proposal for AsyncContext provides an excellent set of examples and description of the motivation of why async context tracking is useful.
Events with EventEmitter
The EventEmitter API is one of the most fundamental Node.js APIs and is critical to supporting many other higher level APIs, including streams, crypto, net, and more. An EventEmitter is an object that emits named events that cause listeners to be called.
The implementation in the Workers runtime fully supports the entire Node.js EventEmitter API including the captureRejections option that allows improved handling of async functions as event handlers:
const emitter = new EventEmitter({ captureRejections: true });
emitter.on('hello', async (...args) => {
  throw new Error('boom');
});
emitter.on('error', (err) => {
  // the async promise rejection is emitted here!
});
The Buffer API in Node.js predates the introduction of the standard TypedArray and DataView APIs in JavaScript by many years and has persisted as one of the most commonly used Node.js APIs for manipulating binary data. Today, every Buffer instance extends from the standard Uint8Array class but adds a range of unique capabilities such as built-in base64 and hex encoding/decoding, byte-order manipulation, and encoding-aware substring searching.
In the Workers implementation of assert, all assertions run in what Node.js calls the “strict assertion mode“, which means that non-strict methods behave like their corresponding strict methods. For instance, deepEqual() will behave like deepStrictEqual().
The promisify and callbackify APIs in Node.js provide a means of bridging between a Promise-based programming model and a callback-based model.
The promisify method allows taking a Node.js-style callback function and converting it into a Promise-returning async function:
import { promisify } from 'node:util';

function foo(args, callback) {
  try {
    callback(null, 1);
  } catch (err) {
    // Errors are emitted to the callback via the first argument.
    callback(err);
  }
}

const promisifiedFoo = promisify(foo);
await promisifiedFoo(args);
Similarly, callbackify converts a Promise-returning async function into a Node.js-style callback function:
import { callbackify } from 'node:util';

async function foo(args) {
  throw new Error('boom');
}

const callbackifiedFoo = callbackify(foo);

callbackifiedFoo(args, (err, value) => {
  if (err) throw err;
});
Together these utilities make it easy to properly handle all of the generally tricky nuances involved with properly bridging between callbacks and promises.
The util.types API provides a reliable and generally more efficient way of checking that values are instances of various built-in types.
import { types } from 'node:util';

types.isAnyArrayBuffer(new ArrayBuffer());  // Returns true
types.isAnyArrayBuffer(new SharedArrayBuffer());  // Returns true
types.isArrayBufferView(new Int8Array());  // true
types.isArrayBufferView(Buffer.from('hello world')); // true
types.isArrayBufferView(new DataView(new ArrayBuffer(16)));  // true
types.isArrayBufferView(new ArrayBuffer());  // false
function foo() {
  types.isArgumentsObject(arguments);  // Returns true
}
types.isAsyncFunction(function foo() {});  // Returns false
types.isAsyncFunction(async function foo() {});  // Returns true
// .. and so on
Please refer to the Node.js documentation for more information on how to use the type check APIs: https://nodejs.org/dist/latest-v19.x/docs/api/util.html#utiltypes. The workers implementation currently does not provide implementations of the util.types.isExternal(), util.types.isProxy(), util.types.isKeyObject(), or util.type.isWebAssemblyCompiledModule() APIs.
What’s next
Keep your eyes open for more Node.js core APIs coming to Cloudflare Workers soon! We currently have implementations of the string decoder, streams and crypto APIs in active development. These will be introduced into the workers runtime incrementally over time and any worker using the nodejs_compat compatibility flag will automatically pick up the new modules as they are added.
Web development teams are tasked with delivering feature-rich applications at lightning speeds. To help them, there are thousands of pre-built JavaScript libraries that they can integrate with little effort.
Not always, however, are these libraries backed with hardened security measures to ensure the code they provide is not tampered with by malicious actors. This ultimately leads to an increased risk of an application being compromised.
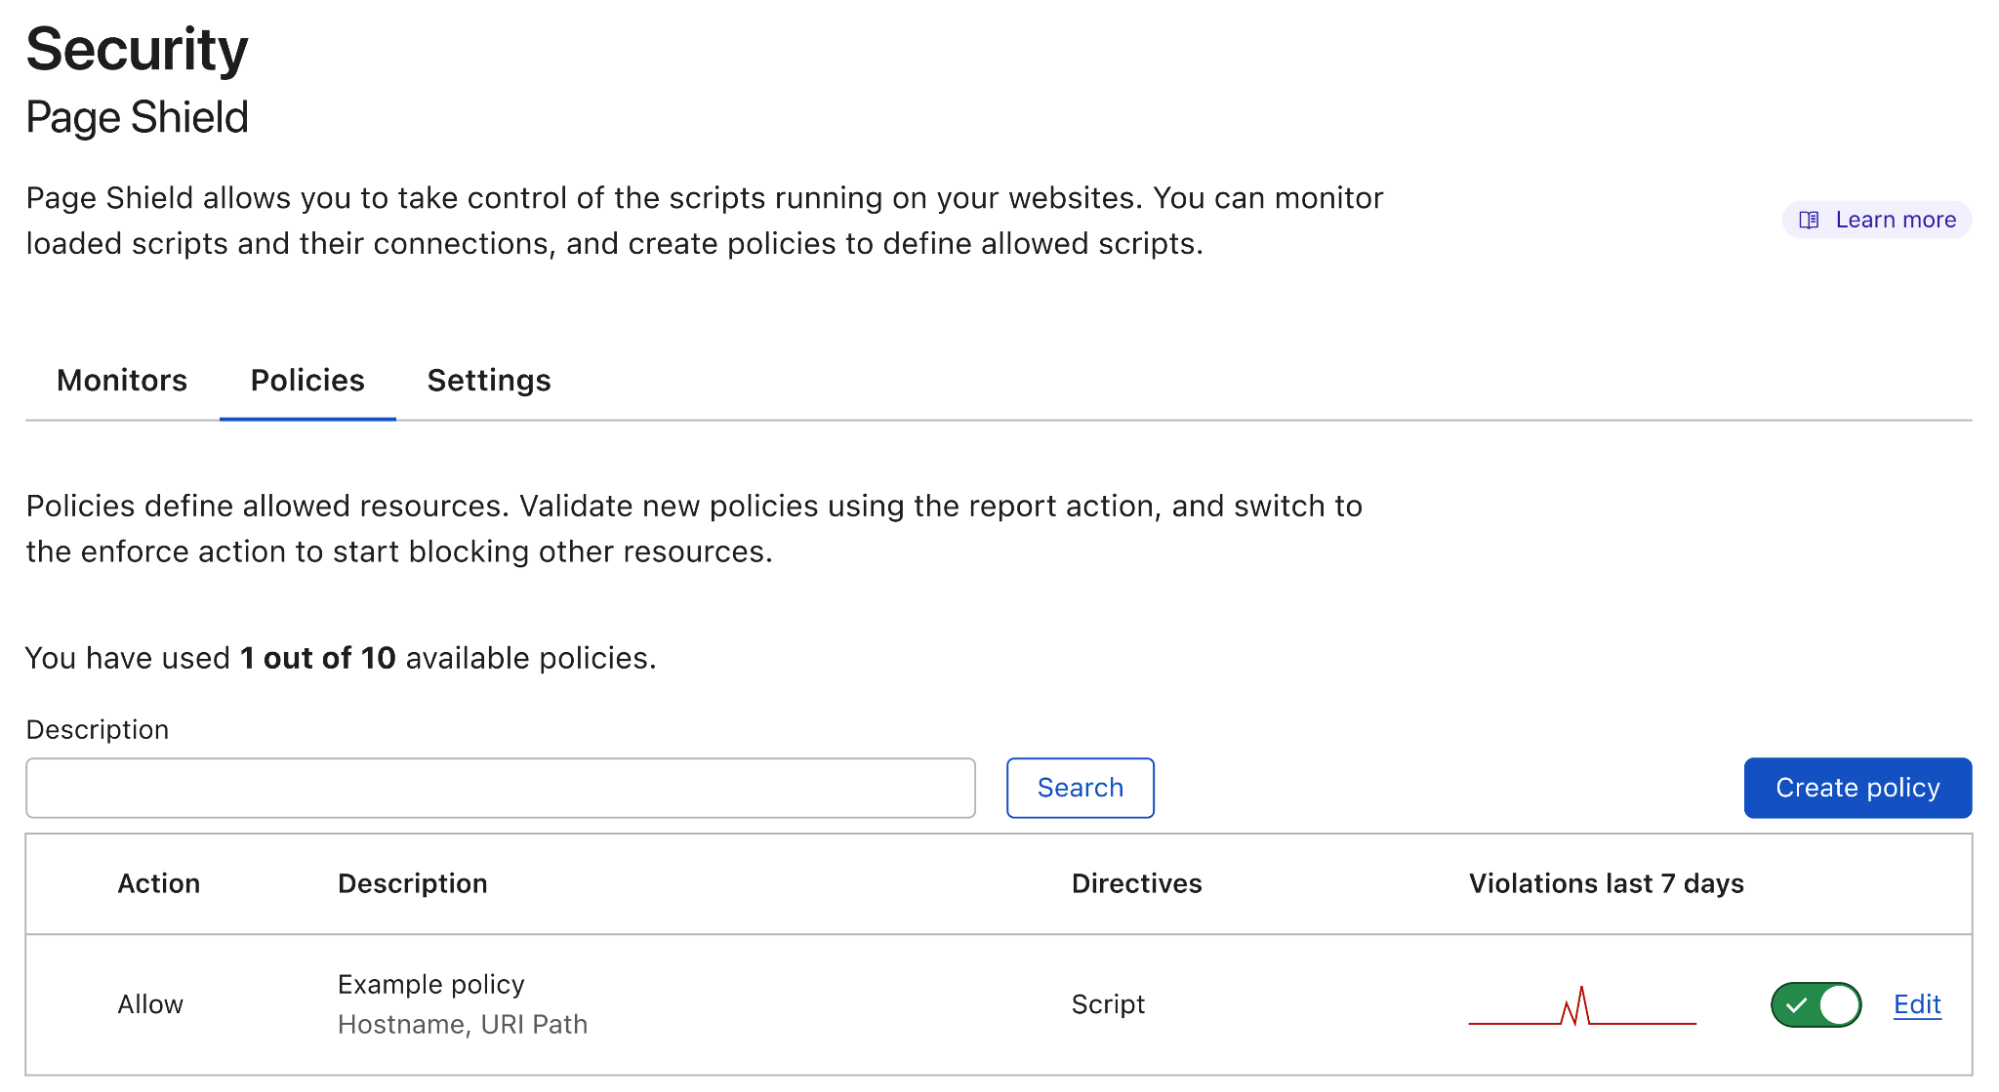
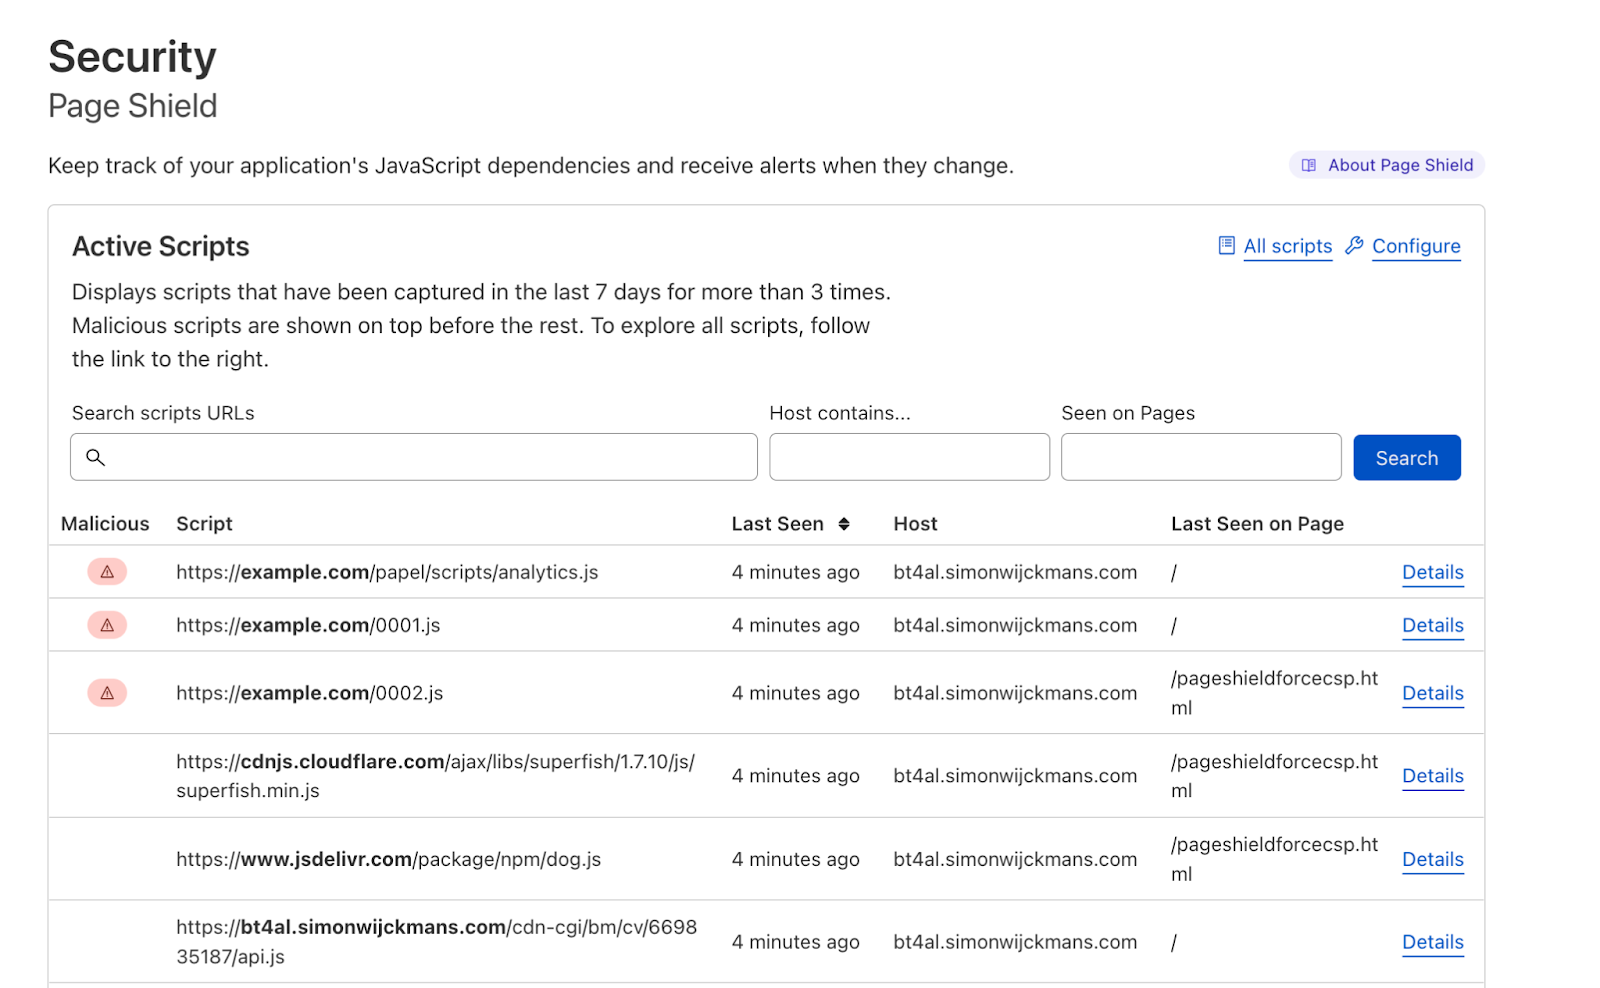
Starting today, tackling the risk of external JavaScript libraries just got easier. We are adding a new feature to our client side security solution: Page Shield policies. Using policies you can now ensure only allowed and vetted libraries are executed by your application by simply reviewing a checklist.
Client side libraries
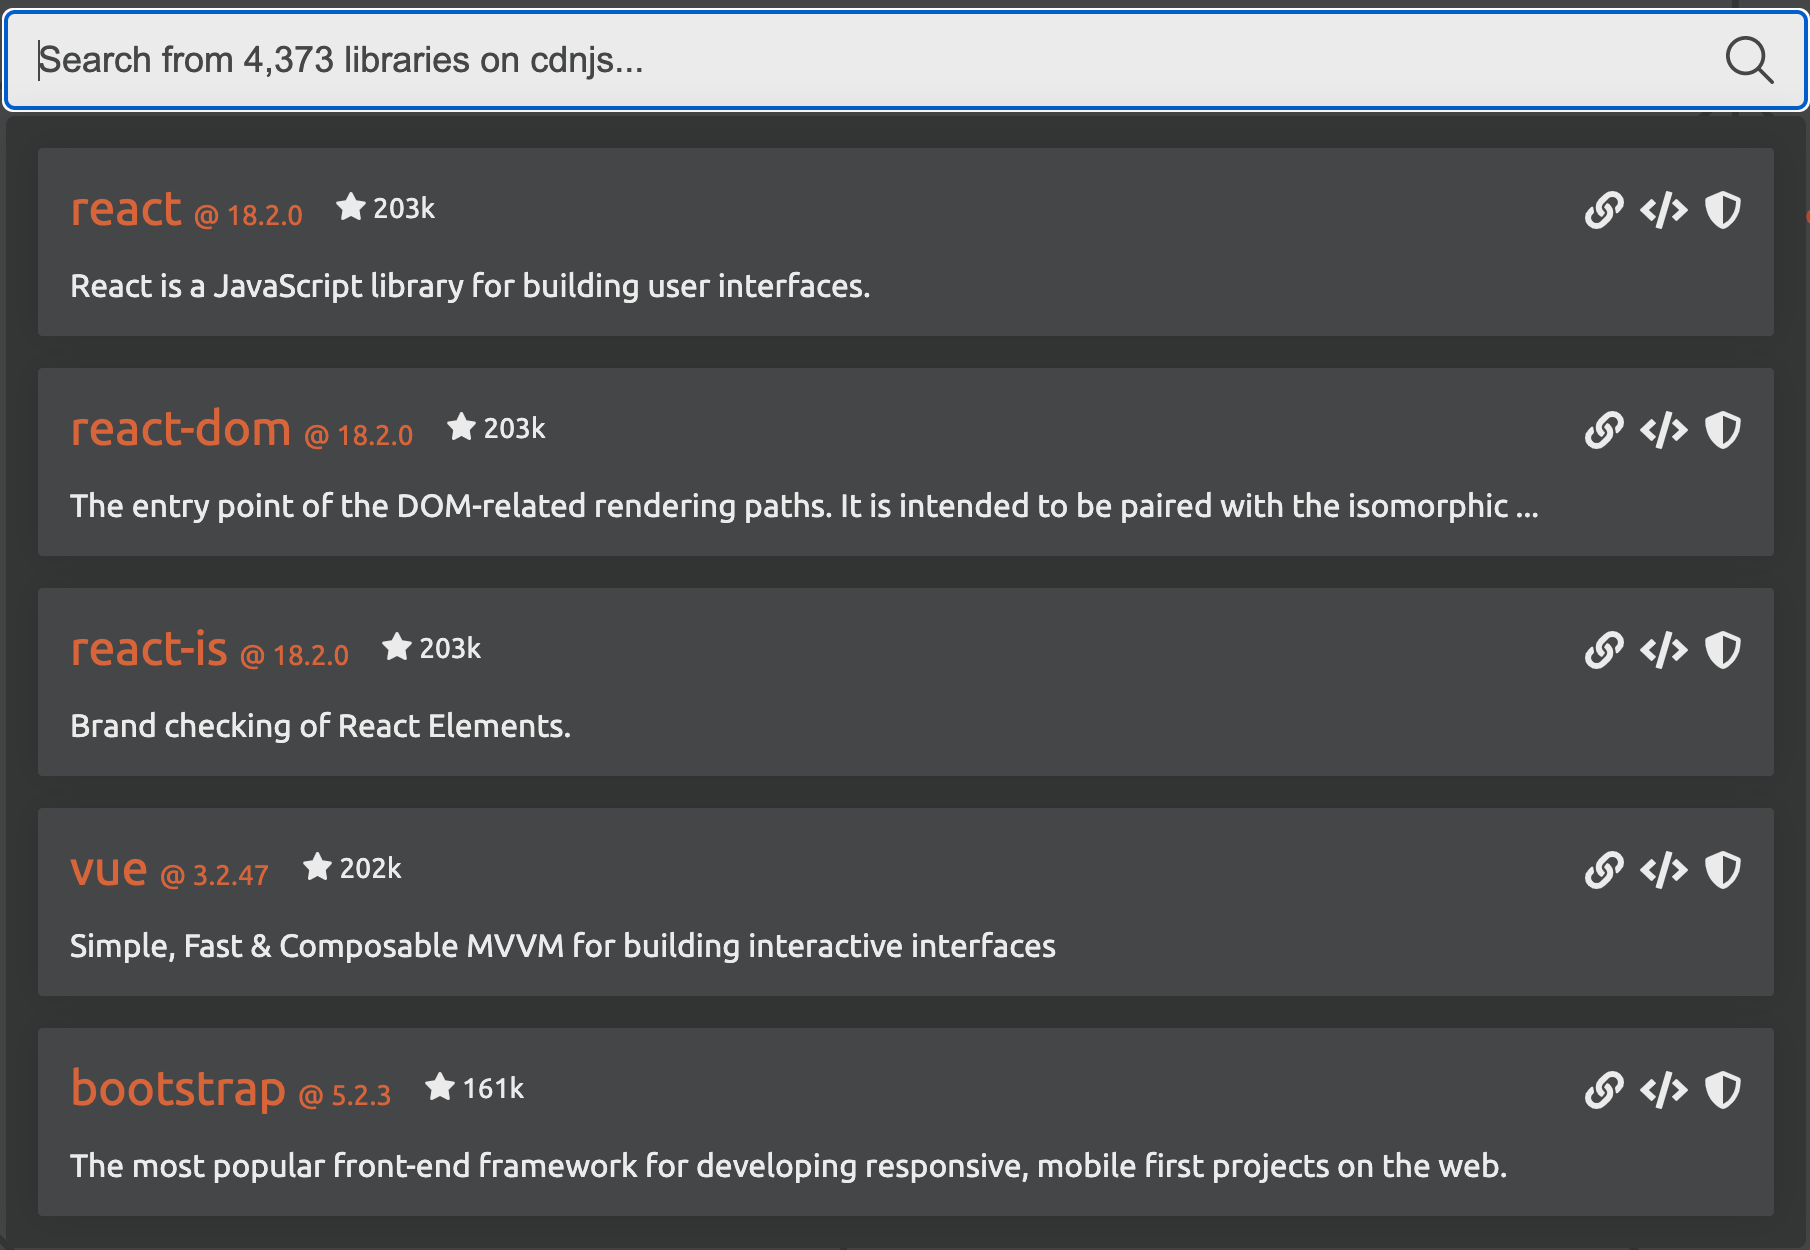
There are more than 4,373 libraries available on cdnjs, a popular JavaScript repository, at the time of writing. These libraries provide access to pre-built functionality to build web applications. The screenshot below shows the most popular on the platform such as React, Vue.js and Bootstrap. Bootstrap alone, according to W3Techs, is used on more than 20% of all websites.
In addition to library repositories like cdnjs, there are thousands of plugins provided directly by SaaS platforms including from names such as Google, Meta, Microsoft, and more.
According to our Page Shield data, any large enterprise application is loading AND connecting to tens if not hundreds of different destinations for analytics, payments, real user monitoring, conversion tracking, customer relationship management, and many other features that internal teams “must have”.
Script hosts (JavaScript loaded from…)
Connection hosts (Data sent to…)
Google
Google
Facebook
Facebook
Cloudflare
Microsoft
Salesforce
Hotjar
Prospect One
OneTrust
Open JS Foundation
Pinterest
Microsoft
TikTok
Hotjar
PayPal
hCaptcha
Snapchat
Fly.io
NewRelic
Ultimately, it is hard for most organizations to not rely on external JavaScript libraries.
Yet another vector for attackers
Although there are good reasons to embed external JavaScript in an application, the proliferation of client side libraries, especially from SaaS providers, has increased scrutiny from malicious actors seeking new ways to exploit web applications. A single compromised SaaS provider that offers a client side library can provide direct access to thousands of applications drastically increasing return on “hacker” investment.
Client side security issues are not new. Attacks such as “web skimming”, also referred to as “Magecart-style” when in the context of payment pages, have been around for a long time. Yet, core application security products often focus on protecting the underlying web application rather than the end user data resulting in a large attack surface that most security teams simply have no visibility on. This gap in visibility, caused by “supply chains”, led us to build Page Shield, Cloudflare’s native client-side security solution.
Although the risk of supply chain attacks is becoming widely known, they are still very much an active threat. New research is being published monthly from vendors in this space highlighting ongoing attack campaigns. The Payment Card Industry Security Standards Council has also introduced new requirements in PCI DSS 4.0* that enforce companies to have systems and processes in place to tackle client side security threats.
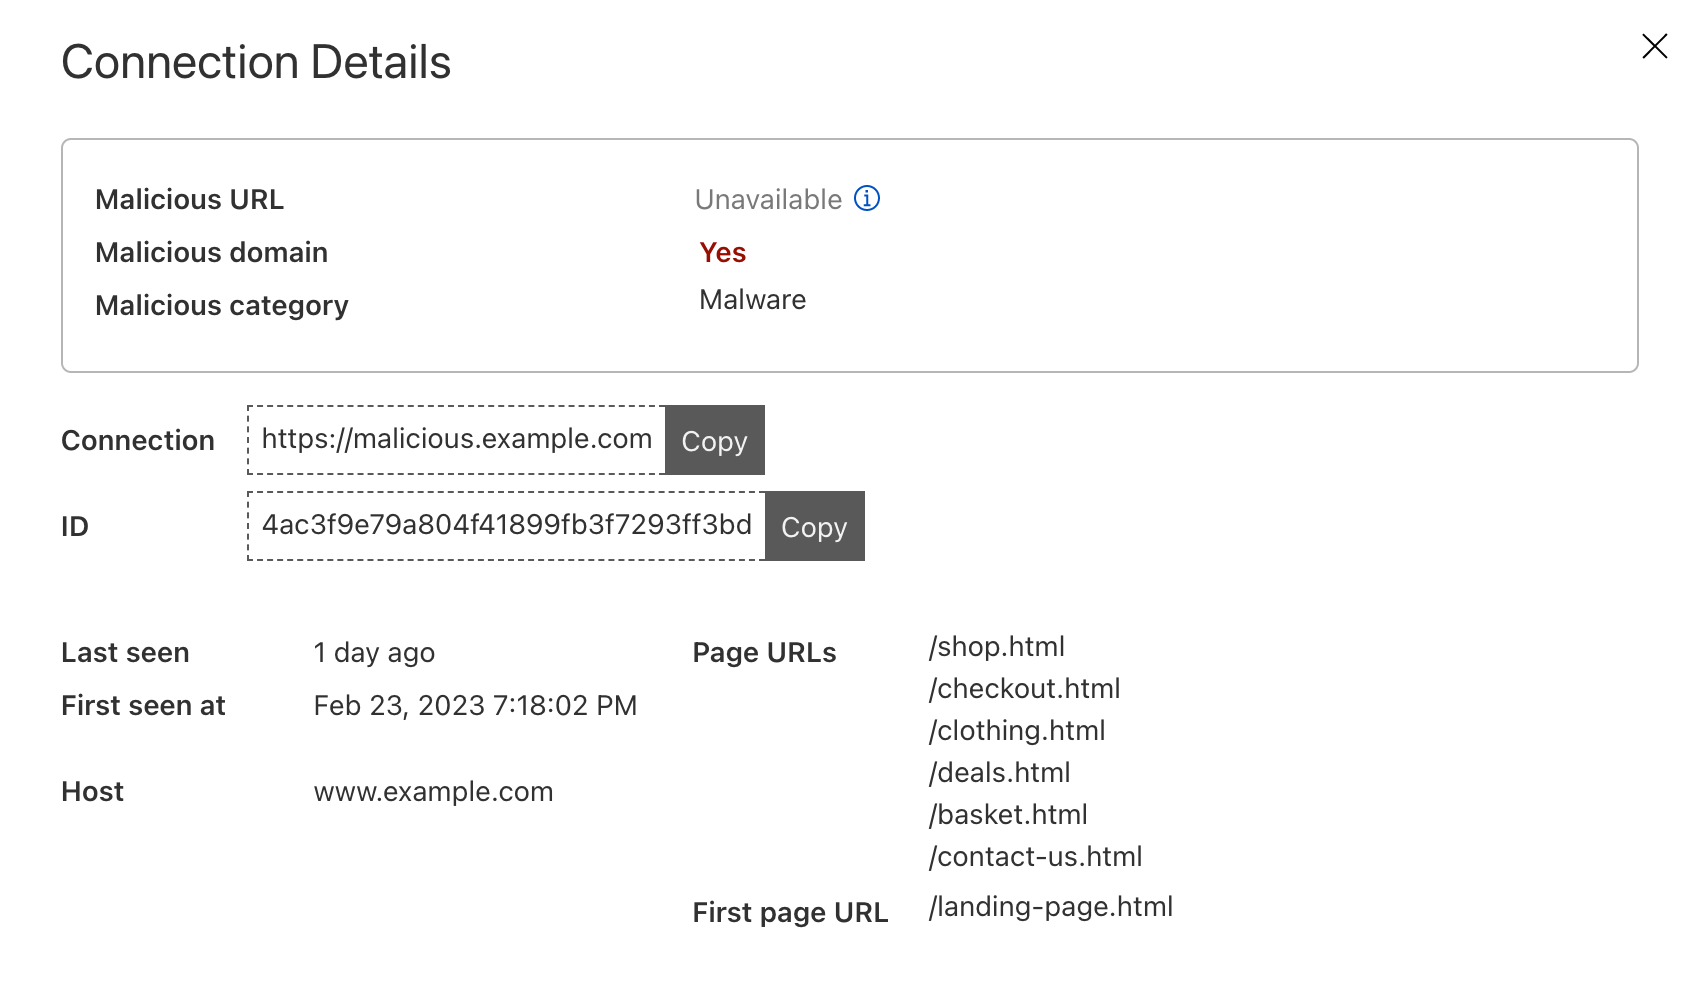
Page Shield itself has already been effective at warning customers of ongoing attacks on their applications, such as the screenshot below highlighting an active malicious outbound connection from a Magecart-style attack on a customer e-commerce application.
* PCI DSS 4.0 requirements 6.4.3 and 11.6.1 are just two examples focusing on client side security.
Reducing the attack surface
Page Shield aims to detect and alert whenever malicious activity is found within the client environment. That’s still a core focus as we improve detection capabilities further.
We are now also looking at expanding capabilities to also reduce the opportunity for an attacker to compromise an application in the first place. In other words, prevent attacks happening by reducing the attack surface available.
Today we are announcing our first major feature in this space: Page Shield policies. Here’s what it looks like:
Positive blocking policies
By leveraging our position in the network stack as a reverse proxy, and by using Page Shield policies, you can now enforce client browsers to load and execute JavaScript libraries only from your pre-approved list of allowed sources implementing a positive security model.
This ensures that an attacker that is able to inject a script in a page, won’t be successful in compromising users, as browsers will refuse to load it. At the same time, vetted tools will run without issues.
Policies will also soon allow you to specify data destinations (connection endpoints) also enforcing not only where JavaScript files are being loaded from, but also where the browser can send data to drastically reduce the risk of “Magecart-style” attacks.
CSPs as the core mechanism
Page Shield policies are currently implemented with Content Security Policies (CSPs), a feature natively supported by all major browsers.
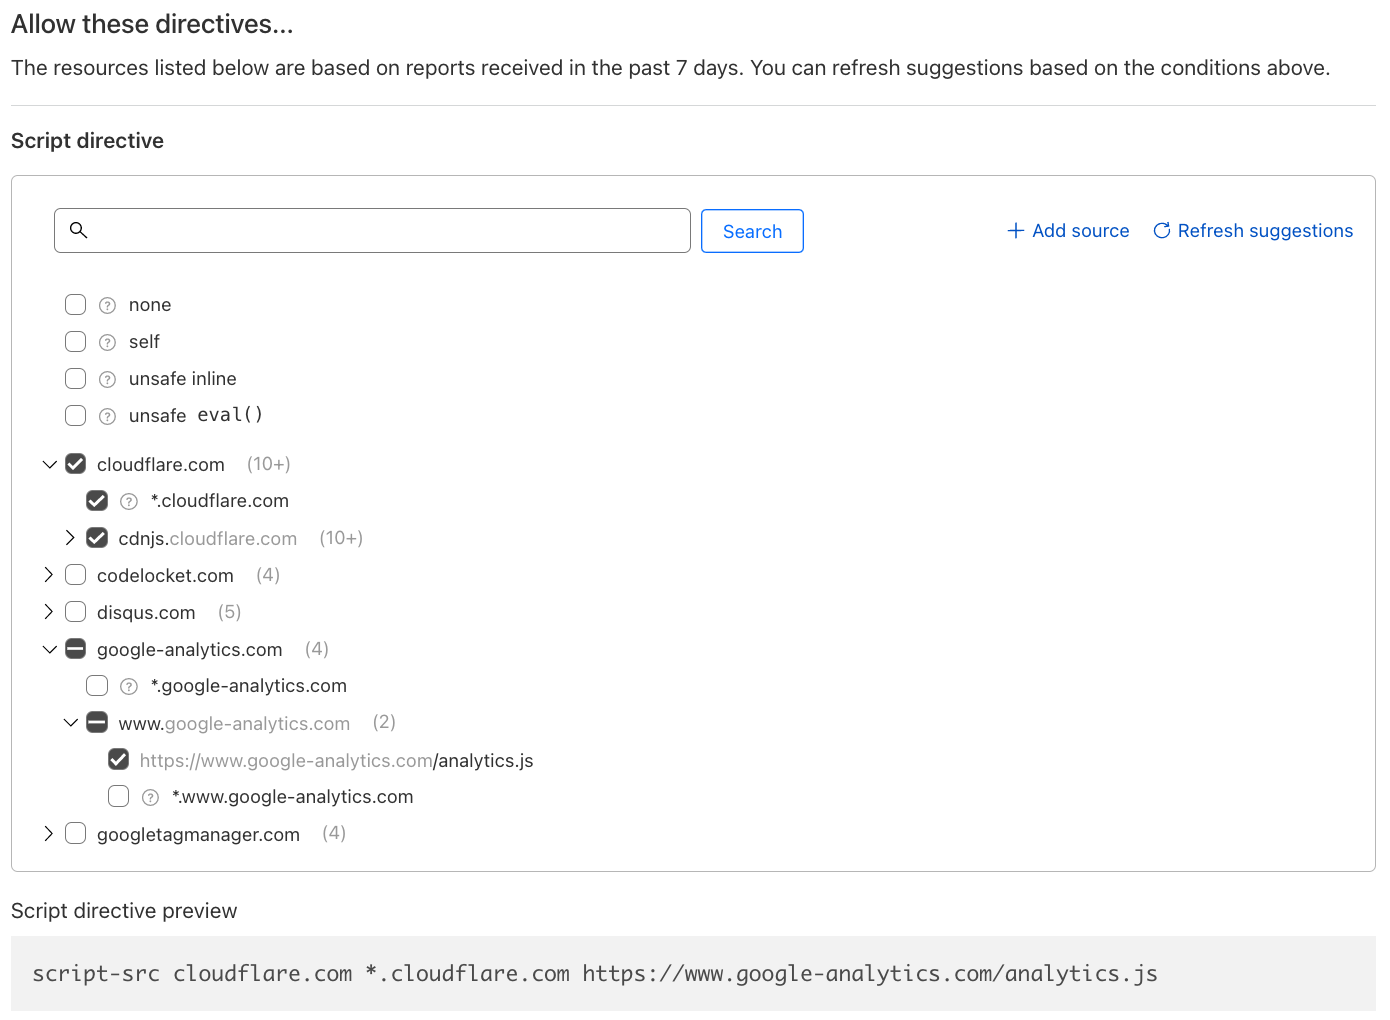
CSPs are specially formatted HTTP response headers that are added to HTML page loads. These headers may contain one or more directives that instruct the browser how to and what to execute in the context of the given page.
From today Page Shield policies support the script-src directive. This directive lets application owners specify “where” JavaScript files are allowed to be loaded from. Support for the connect-src directive is also being finalized which behaves similarly to script-src, but specifies where the browser is allowed to send data “to”.
Let’s take a look at a one example and assume we were opening the following web page www.example.com/index.html and the browser received a CSP header as below:
The header instructs the browser to allow scripts (defined by the use of the script-src directive) to be loaded from the same hostname as the page itself (defined by self) as well as from any subdomain (*.example.com). It is additionally allowing any script under cdnjs and only a specific script for Google Analytics and no other scripts under the Google owned domain.
This ensures that any attacker injected script from different hosts would not be executed, drastically reducing the attack surface available.
If rather than Content-Security-Policy we had received a Content-Security-Policy-Report-Only header, the policy would not be enforced, but browsers would only send violation reports letting you know what is outside of policy.
This is useful when testing and when investigating new scripts that have been added to your application.
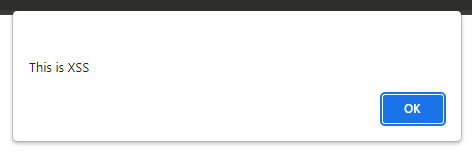
Additional statements are also available and supported by Page Shield within the script-src directive to block inline JavaScript (unsafe-inline) or normally unsafe function calls (unsafe-eval). These directives help prevent other attack types such as cross site scripting attacks (XSS).
Making policy management easy
CSPs, the underlying system used by Page Shield policies, are great but hard to manage. The larger the application, the more complex CSPs become while also causing a bottleneck for application development teams. This leads to CSPs becoming ineffective as security teams broaden the list of allowed hosts to the point that their purpose becomes debatable.
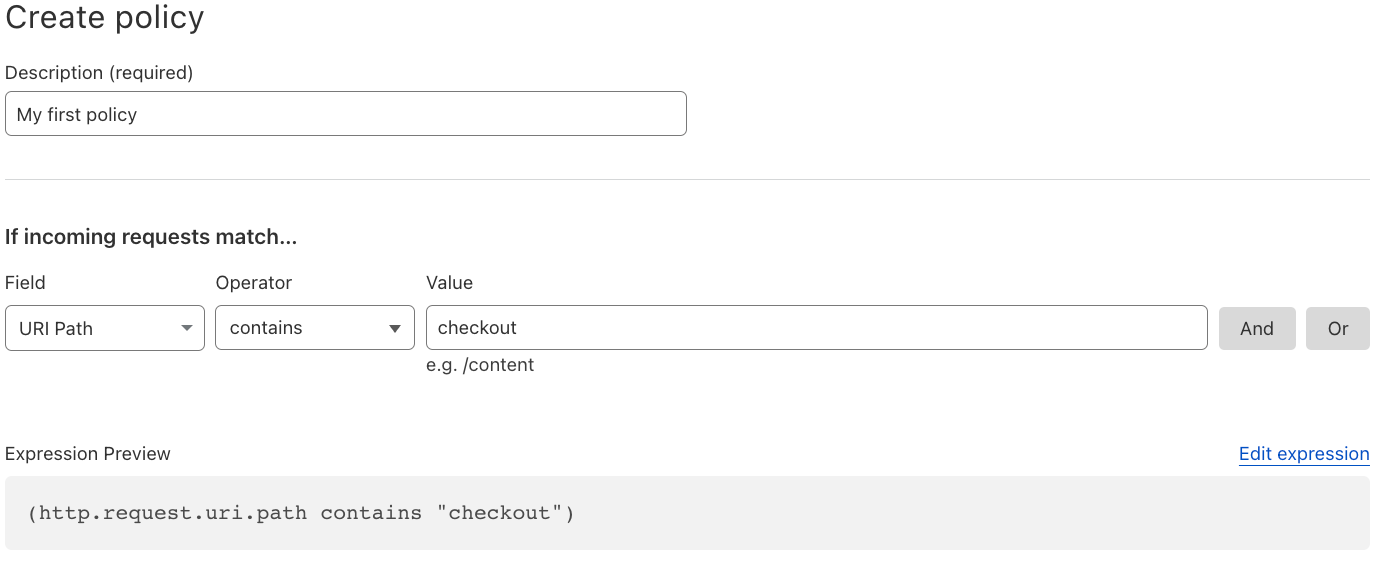
Making policy management easy, and ensuring they are effective, was a core goal of our design process. This led us to build a suggestions feature.
When deploying a policy, the first step is deciding “where” will the policy be applied to. Typical examples may include only your checkout flow or admin pages. This is done using wirefilter syntax, the same syntax that powers Cloudflare’s WAF.
Once the filter is specified, using the data already collected by Page Shield, the interface will provide a list of suggested directive values, making it very easy to build the simplest and most effective policy for your application. No need to worry about syntax, the policy preview will be shown before committing.
Finally, policies can be deployed both in “report only/log” and “enforce/allow”, letting you control and test as required.
We are currently finishing work on our alerting backend to warn you whenever we notice a spike in violation reports. This lets you easily return to the policy builder and update it with any newly seen script that may have been added by your development team.
Positive blocking policies are not enough
It is important not to forget that CSPs provide no security or malicious activity detection within the list of allowed endpoints. They are meant to reduce the likelihood of an attack happening by reducing the attack surface available. For this reason, Page Shield’s automated malicious activity detection will continue to function in the background regardless of any policy being deployed.
Secure your end user data today
All Cloudflare paid customers have access to a subset of Page Shield features today. Turning on Page Shield is as simple as clicking a button. Head over to Security > Page Shield and give it a go!
If you are an enterprise customer and are interested in Page Shield policies, reach out to your account team to get access to the full feature set.
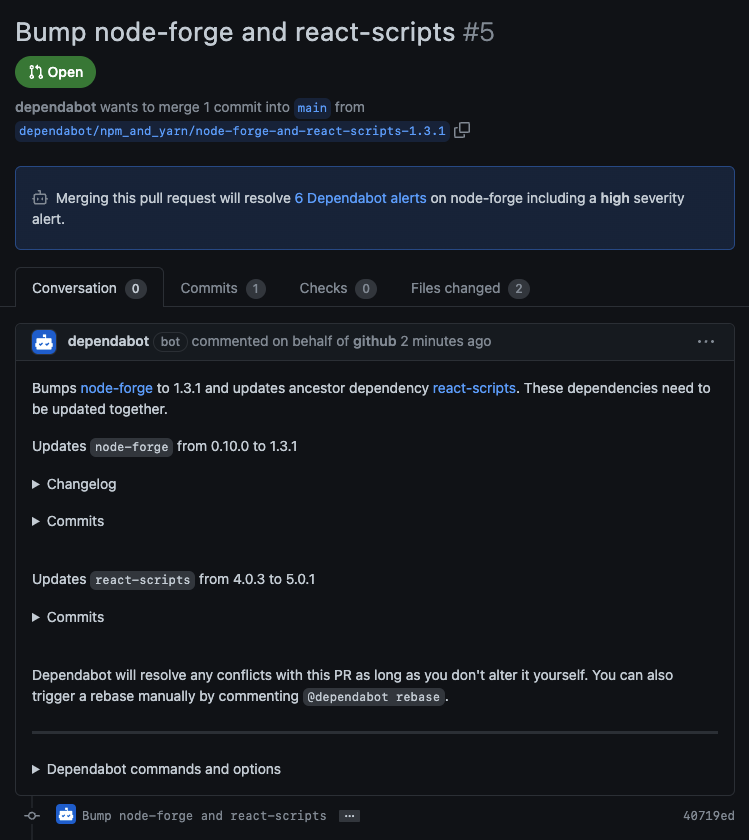
Dependabot helps developers secure their software with automated security updates: when a security advisory is published that affects a project dependency, Dependabot will try to submit a pull request that updates the vulnerable dependency to a safe version if one is available. Of course, there’s no rule that says a security vulnerability will only affect direct dependencies—dependencies at any level of a project’s dependency graph could become vulnerable.
Until recently, Dependabot did not address vulnerabilities on transitive dependencies, that is, on the dependencies sitting one or more levels below a project’s direct dependencies. Developers would encounter an error message in the GitHub UI and they would have to manually update the chain of ancestor dependencies leading to the vulnerable dependency to bring it to a safe version.
Internally, this would show up as a failed background job due to an update-not-possible error—and we would see a lot of these errors.
Understanding the challenge
Dependabot offers two strategies for updating dependencies: scheduled version updates and security updates. With version updates, the explicit goal is to keep project dependencies updated to the latest available version, and Dependabot can be configured to widen or increase a version requirement so that it accommodates the latest version. With security updates, Dependabot tries to make the most conservative update that removes the vulnerability while respecting version requirements. In this post we’ll be looking at security updates.
As an example, let’s say we have a repository with security updates enabled that contains an npm project with a single dependency on react-scripts@^4.0.3.
Not all package managers handle version requirements in the same way, so let’s quickly refresh. A version requirement like ^4.0.3 (a “caret range”) in npm permits updates to versions that don’t change the leftmost nonzero element in the MAJOR.MINOR.PATCHsemver version number. The version requirement ^4.0.3, then, can be understood as allowing versions greater than or equal to 4.0.3 and less than 5.0.0.
On March 18, 2022, a high-severity security advisory was published for node-forge, a popular npm package that provides tools for writing cryptographic and network-heavy applications. The advisory impacts versions earlier than 1.3.0, the patched version released the day before the advisory was published.
While we don’t have a direct dependency on node-forge, if we zoom in on our project’s dependency tree we can see that we do indirectly depend on a vulnerable version:
In order to resolve the vulnerability, we need to bring node-forge from 0.10.0 to 1.3.0, but a sequence of conflicting ancestor dependencies prevents us from doing so:
4.0.3 is the latest version of react-scripts permitted by our project
3.11.1 is the only version of webpack-dev-server permitted by [email protected]
1.10.14 is the latest version of selfsigned permitted by [email protected]
0.10.0 is the latest version of node-forge permitted by[email protected]
This is the point at which the security update would fail with an update-not-possible error. The challenge is in finding the version of selfsigned that permits [email protected], the version of webpack-dev-server that permits that version of selfsigned, and so on up the chain of ancestor dependencies until we reach react-scripts.
How we chose npm
When we set out to reduce the rate of update-not-possible errors, the first thing we did was pull data from our data warehouse in order to identify the greatest opportunities for impact.
JavaScript is the most popular ecosystem that Dependabot supports, both by Dependabot enablement and by update volume. In fact, more than 80% of the security updates that Dependabot performs are for npm and Yarn projects. Given their popularity, improving security update outcomes for JavaScript projects promised the greatest potential for impact, so we focused our investigation there.
npm and Yarn both include an operation that audits a project’s dependencies for known security vulnerabilities, but currently only npm natively has the ability to additionally make the updates needed to resolve the vulnerabilities that it finds.
After a successful engineering spike to assess the feasibility of integrating with npm’s audit functionality, we set about productionizing the approach.
Tapping into npm audit
When you run the npm audit command, npm collects your project’s dependencies, makes a bulk request to the configured npm registry for all security advisories affecting them, and then prepares an audit report. The report lists each vulnerable dependency, the dependency that requires it, the advisories affecting it, and whether a fix is possible—in other words, almost everything Dependabot should need to resolve a vulnerable transitive dependency.
node-forge  <=1.2.1
Severity: high
Open Redirect in node-forge - https://github.com/advisories/GHSA-8fr3-hfg3-gpgp
Prototype Pollution in node-forge debug API. - https://github.com/advisories/GHSA-5rrq-pxf6-6jx5
Improper Verification of Cryptographic Signature in node-forge - https://github.com/advisories/GHSA-cfm4-qjh2-4765
URL parsing in node-forge could lead to undesired behavior. - https://github.com/advisories/GHSA-gf8q-jrpm-jvxq
fix available via `npm audit fix --force`
Will install [email protected], which is a breaking change
node_modules/node-forge
  selfsigned  1.1.1 - 1.10.14
  Depends on vulnerable versions of node-forge
  node_modules/selfsigned
There were two ways in which we had to supplement npm audit to meet our requirements:
The audit report doesn’t include the chain of dependencies linking a vulnerable transitive dependency, which a developer may not recognize, to a direct dependency, which a developer should recognize. The last step in a security update job is creating a pull request that removes the vulnerability and we wanted to include some context that lets developers know how changes relate to their project’s direct dependencies.
Dependabot performs security updates for one vulnerable dependency at a time. (Updating one dependency at a time keeps diffs to a minimum and reduces the likelihood of introducing breaking changes.) npm audit and npm audit fix, however, operate on all project dependencies, which means Dependabot wouldn’t be able to tell which of the resulting updates were necessary for the dependency it’s concerned with.
Fortunately, there’s a JavaScript API for accessing the audit functionality underlying the npm audit and npm audit fix commands via Arborist, the component npm uses to manage dependency trees. Since Dependabot is a Ruby application, we wrote a helper script that uses the Arborist.audit() API and can be invoked in a subprocess from Ruby. The script takes as input a vulnerable dependency and a list of security advisories affecting it and returns as output the updates necessary to remove the vulnerabilities as reported by npm.
To meet our first requirement, the script uses the audit results from Arborist.audit() to perform a depth-first traversal of the project’s dependency tree, starting with direct dependencies. This top-down, recursive approach allows us to maintain the chain of dependencies linking the vulnerable dependency to its top-level ancestor(s) (which we’ll want to mention later when creating a pull request), and its worst-case time complexity is linear in the total number of dependencies.
function buildDependencyChains(auditReport, name) {
  const helper = (node, chain, visited) => {
    if (!node) {
      return []
    }
    if (visited.has(node.name)) {
      // We've already seen this node; end path.
      return []
    }
    if (auditReport.has(node.name)) {
      const vuln = auditReport.get(node.name)
      if (vuln.isVulnerable(node)) {
        return [{ fixAvailable: vuln.fixAvailable, nodes: [node, ...chain.nodes] }]
      } else if (node.name == name) {
        // This is a non-vulnerable version of the advisory dependency; end path.
        return []
      }
    }
    if (!node.edgesOut.size) {
      // This is a leaf node that is unaffected by the vuln; end path.
      return []
    }
    return [...node.edgesOut.values()].reduce((chains, { to }) => {
      // Only prepend current node to chain/visited if it's not the project root.
      const newChain = node.isProjectRoot ? chain : { nodes: [node, ...chain.nodes] }
      const newVisited = node.isProjectRoot ? visited : new Set([node.name, ...visited])
      return chains.concat(helper(to, newChain, newVisited))
    }, [])
  }
  return helper(auditReport.tree, { nodes: [] }, new Set())
}
To meet our second requirement of operating on one vulnerable dependency at a time, the script takes advantage of the fact that the Arborist constructor accepts a custom audit registry URL to be used when requesting bulk advisory data. We initialize a mock audit registry server using nock that returns only the list of advisories (in the expected format) for the dependency that was passed into the script and we tell the Arborist instance to use it.
We see both of these use cases—linking a vulnerable dependency to its top-level ancestor and conducting an audit for a single package or a particular set of vulnerabilities—as opportunities to extend Arborist and we’re working on integrating them upstream.
Back in the Ruby code, we parse and verify the audit results emitted by the helper script, accounting for scenarios such as a dependency being downgraded or removed in order to fix a vulnerability, and we incorporate the updates recommended by npm into the remainder of the security update job.
With a viable update path in hand, Dependabot is able to make the necessary updates to remove the vulnerability and submit a pull request that tells the developer about the transitive dependency and its top-level ancestor.
Caveats
When npm audit decides that a vulnerability can only be fixed by changing major versions, it requires use of the force option with npm audit fix. When the force option is used, npm will update to the latest version of a package, even if it means jumping several major versions. This breaks with Dependabot’s previous security update behavior. It also achieves our goal: to unlock conflicting dependencies in order to bring the vulnerable dependency to an unaffected version. Of course, you should still always review the changelog for breaking changes when jumping minor or major versions of a package.
Impact
We rolled out support for transitive security updates with npm in September 2022. Now, having a full quarter of data with the changes in place, we’re able to measure the impact: between Q1Y22 and Q4Y22 we saw a 42% reduction in update-not-possible errors for security updates on JavaScript projects.
If you have Dependabot security updates enabled on your npm projects, there’s nothing extra for you to do—you’re already benefiting from this improvement.
Looking ahead
I hope this post illustrates some of the considerations and trade-offs that are necessary when making improvements to an established system like Dependabot. We prefer to leverage the native functionality provided by package managers whenever possible, but as package managers come in all shapes and sizes, the approach may vary substantially from one ecosystem to the next.
We hope other package managers will introduce functionality similar to npm audit and npm audit fix that Dependabot can integrate with and we look forward to extending support for transitive security updates to those ecosystems as they do.
Cloudflare is used by a highly diverse customer base. We offer simple-to-use products for everything from setting HTTP headers to rewriting the URI path and performing URL redirects. Sometimes customers need more than the out-of-the-box functionality, not just adding an HTTP header – but performing some advanced calculation to create the output. Today they would need to create a feature request and wait for it to be shipped, write a Cloudflare Worker, or keep this modification ‘on origin’ – on their own infrastructure.
To simplify this, we are delighted to announce Cloudflare Snippets. Snippets are a new way to perform traffic modifications that users either cannot do via our productised offerings, or want to do programmatically. The best part? The vast majority of customers will pay nothing extra for using Snippets.
Users now have a choice. Perform the action via a rule. Or, if more functionality is needed, write a Snippet. Neither will mean waiting. Neither will incur additional cost (although a high fair usage cap will apply). Snippets unblocks users to do what they want, when they want. All on Cloudflare.
Snippets will support the import of code written in various languages, such as JavaScript (modern), VCL (legacy) and Apache .htaccess files (legacy). This allows customers to migrate legacy operational code onto our platform – whilst also consolidating their JavaScript operations.
Please use the sign-up form to join the waitlist for Snippets if you are interested in testing. We hope to begin admitting users into the closed beta early 2023.
Why build Snippets?
Over the past 18 months we have released a number of new rules products such as Transform Rules,Cache Rules, Origin Rules, Config Rules and Redirect Rules. These new products give more control to customers on how we process their traffic as it flows through our global network. The feedback on these products so far has been overwhelmingly positive. However, our customers still occasionally need the ability to do more than the out-of-the-box functionality allows.
There are always some use cases where a product doesn’t provide the functionality that a customer needs for their specific situation. For example, whilst thousands of our customers are now using Transform Rules to solve their HTTP header modification use cases, there remains a small number of use cases that are not possible, such as setting dynamic expiry times with cookies or hashing tokens with a key.
This is where Cloudflare Snippets help. Customers will no longer need to use the full Cloudflare Workers platform to implement these relatively simple use cases. Nor will they need to wait for us to build their feature requests. Instead, they will be able to run a Snippet of JavaScript.
Migrating legacy code to Snippets
Varnish Control Language (VCL) is only used within the context of Varnish. Launched around 16 years ago, it has historically been used to configure traffic and routing for Content Delivery Networks as it was extensible to a wide range of use cases.
There are still a good number of businesses out there using VCL to perform routing and traffic modification actions. Whilst other providers are deprecating support for VCL, we want to make sure those of you comfortable using it are still supported.
Snippets won’t run pure VCL. Instead, we will convert VCL into easy to maintain rules or Snippets. To achieve this we’re building a simple-to-use, self-serve VCL converter that analyzes uploaded VCL code and auto-generates suggested Snippets, and if we can find a match, also generates suggested rules for products such as Transform Rules or Cache Rules.
This topic was initially handled via Project Turpentine, a suite of tools used by Cloudflare employees to parse a customer’s VCL into a suggested JavaScript configuration. This JavaScript could then be loaded into a Worker, or series of Workers.
Snippets takes the idea and principles of Turpentine further. Much further. By building a parser directly in the dashboard it puts the power directly into the hands of users and gives them a choice. You can tell us to migrate everything we can into Rules with the remaining code migrated into Snippets, or, you can choose to tell us to migrate everything into discrete Snippets. It’s your call.
We’ll give Apache htaccess and NGINX configuration files the same treatment. The goal being users simply upload the files from their websites Apache or NGINX configuration, and we generate suggested Snippets and/or rules.
The days of having to use legacy code for operational tasks are coming to an end. Snippets allow users to migrate these workloads to Cloudflare, and let them focus on the bigger problems of the business vs maintaining legacy systems.
The difference between Snippets and Workers
Most readers will already be familiar with Cloudflare Workers, our powerful developer platform which allows businesses to run and build entire products and solutions on Cloudflare’s global network. Snippets is also built on this platform, but has a few key differences.
The first major difference is that a Snippet will run as part of the Ruleset Engine as dedicated new phases, similar to Transform Rules and Cache Rules. Customers will be able to select and execute a Snippet based on any ruleset engine filter. This allows customers to run a Snippet against every request, or filter for specific HTTP traffic based on the fields we offer, such as traffic with a certain bot score, originating from a specific country, or with a specific cookie. Snippets will be additive, meaning users can have one Snippet to add an HTTP header, and another to rewrite the URL, and both will execute if they match:
Another major difference – Cloudflare Snippets are available for all plan levels, at no additional cost. 99% of users won’t pay a single cent, ever, to use this solution. This allows customers to migrate their simple workloads from legacy solutions like VCL to the Cloudflare platform, and actively reduce their monthly spend.
Free Plans
Pro Plans
Business Plans
Enterprise Plans
Snippets available
5 Snippets per zone.
20 Snippets per zone.
50 Snippets per zone.
200 Snippets per zone* (Customers can speak with their Customer Success team to have this increased).
Cloudflare Snippets are lightweight when compared with Workers, offering 5ms maximum execution time, 2MB maximum memory and 32KB total package size. This comparably small footprint allows us to offer this to 99% of users at no additional cost, whilst also being sufficient for the identified use cases like HTTP header modification, URL rewriting and traffic routing – all of which don’t need the vast resources offered by Cloudflare Workers.
Cloudflare Snippets
Cloudflare Workers Unbound (For comparison)
Runtime support
JavaScript
JavaScript and WASM
Execution location
Global – All Cloudflare locations
Global – All Cloudflare locations
Triggers supported
Ruleset Engine Filters
HTTP Request HTTP Response Cron Triggers
Maximum execution time
5ms
30 Seconds HTTP 15 Minutes (Cron Trigger)
Maximum memory
2MB
128MB
Total package size
32KB
5MB
Environment variables
8/Snippet
64/Worker
Environment variable size
1KB
5KB
Subrequests
1/request
1000/request
Terraform Support
✅
✅
Wrangler Support
✅
Cron Triggers
✅
Key Value Store
✅
Durable Objects
✅
R2 Integration
✅
What will you be able to build with Cloudflare Snippets?
Snippets will allow customers to migrate their existing workloads to Cloudflare. They will also open up a number of new possible use cases for customers. We have highlighted three common examples below, however there are many more to choose from.
Example 1: Sending suspect bots to a honeypot
When creating Snippets customers will be able to access Cloudflare features available in the Workers runtime, such as the bot score field. This enables customers to forward an HTTP request to a honeypot or use the RegExp Javascript function to change the URL construct being sent back to the end user when traffic is assigned a bot score below a certain threshold, e.g. 29 and lower.
Another common use case we foresee Snippets addressing is cookie modification. Usage can range from simply setting an expiry in five minutes by using getTime and setTime JavaScript functions to setting a dynamic cookie based on user request attributes for A/B testing purposes.
…
{
let res = await fetch(request);
res = new Response(res.body, res);
// 24h * 60m * 60s * 1000ms = 86400000ms
const expiry = new Date(Date.now() + 7 * 86400000).toUTCString();
const group = request.headers.get("userGroup") == "premium" ? "A" : "B";
res.headers.append(
      "Set-Cookie",
`testGroup=${group}; Expires=${expiry}; path=/`
    );
…
Example 3: URI query management
Customers can also deploy Cloudflare Snippets to do complex operations such as splicing the URI query value to selectively remove or inject additional parameters. Query string manipulation is typically done using Transform Rules. However, with Transform Rules the set/ action is effectively a replace action. This action when applied to the URI query string will remove the entire value if there is one and set it to what the user specifies, thus overwriting it. This is a problem for customers who wish to selectively inject specific query parameters for matching traffic. For example, setting an additional query, e.g. ?utm_campaign=facebook when common social media platforms are detected in the user agent. With Snippets, customers will be able to do this selective removal and insertion using a simple piece of JavaScript, e.g.
…
if (userAgent.includes("Facebook")) {
      const url = new URL(request.url);
      const params = new URLSearchParams(url.search);
      params.set("utm_campaign", "facebook");
      url.search = params.toString();
      const transformedRequest = new Request(url, request)
…
}
We are excited to see what other use cases Cloudflare Snippets unlock for our customers.
Will you stop adding actions to rulesets?
The simple answer is no! We will continue to build out our no-code actions within the ruleset engine, developing new products to solve customer needs.
It may sound obvious – but a core component to feature improvement is talking to customers. Talking to Snippet users will help us understand what real life use cases Snippets help solve and highlight feature gaps we have in our product suite. We can then review if it makes sense to productise that use case, or leave it requiring Snippets.
We also understand that not everyone is a software developer. We are therefore exploring how we can make Snippets accessible to all by creating selectable templates available in a library that can be copied and modified by customers, with minimum coding knowledge required. With Snippets, powerful won’t mean difficult.
Accessing Cloudflare Snippets
Snippets are currently under development — you can sign up here to join the waitlist for access.
We hope to begin admitting users into the closed beta in early 2023, with an open beta to follow.
We rely on technology to help us on a daily basis – if you are not good at keeping track of time, your calendar can remind you when it’s time to prepare for your next meeting. If you made a reservation at a really nice restaurant, you don’t want to miss it! You appreciate the app to remind you a day before your plans the next evening.
However, who tells the application when it’s the right time to send you a notification? For this, we generally rely on scheduled events. And when you are relying on them, you really want to make sure that they occur. Turns out, this can get difficult. The scheduler and storage backend need to be designed with scale in mind – otherwise you may hit limitations quickly.
Workers, Durable Objects, and Alarms are actually a perfect match for this type of workload. Thanks to the distributed architecture of Durable Objects and their storage, they are a reliable and scalable option. Each Durable Object has access to its own isolated storage and alarm scheduler, both being automatically replicated and failover in case of failures.
There are many use cases where having a reliable scheduler can come in handy: running a webhook service, sending emails to your customers a week after they sign up to keep them engaged, sending invoices reminders, and more!
Today, we’re going to show you how to build a scalable service that will schedule HTTP requests on a specific schedule or as one-off at a specific time as a way to guide you through any use case that requires scheduled events.
Quick intro into the application stack
Before we dive in, here are some of the tools we’re going to be using today:
Wrangler – CLI tool to develop and publish Workers
The application is going to have following components:
Scheduling system API to accept scheduled requests and manage Durable Objects
Unique Durable Object per scheduled request, each with
Storage – keeping the request metadata, such as URL, body, or headers.
Alarm – a timer (trigger) to wake Durable Object up.
While we will focus on building the application, the Cloudflare global network will take care of the rest – storing and replicating our data, and making sure to wake our Durable Objects up when the time’s right. Let’s build it!
Initialize new Workers project
Get started by generating a completely new Workers project using the wrangler init command, which makes creating new projects quick & easy.
From my personal experience, at least a draft of TypeScript types significantly helps to be more productive down the road, so let’s prepare and describe our scheduled request in advance. Create a file types.ts in src directory and paste the following TypeScript definitions.
src/types.ts
export interface Env {
    DO_REQUEST: DurableObjectNamespace
}

export interface ScheduledRequest {
  url: string // URL of the request
  triggerAt?: number // optional, unix timestamp in milliseconds, defaults to `new Date()`
  requestInit?: RequestInit // optional, includes method, headers, body
}
A scheduled request Durable Object class & alarm
Based on our architecture design, each scheduled request will be saved into its own Durable Object, effectively separating storage and alarms from each other and allowing our scheduling system to scale horizontally – there is no limit to the number of Durable Objects we create.
In the end, the Durable Object class is a matter of a couple of lines. The code snippet below accepts and saves the request body to a persistent storage and sets the alarm timer. Workers runtime will wake up the Durable Object and call the alarm() method to process the request.
The alarm method reads the scheduled request data from the storage, then processes the request, and in the end reschedules itself in case it’s configured to be executed on a recurring schedule.
src/request-durable-object.ts
import { ScheduledRequest } from "./types";

export class RequestDurableObject {
  id: string|DurableObjectId
  storage: DurableObjectStorage

  constructor(state:DurableObjectState) {
    this.storage = state.storage
    this.id = state.id
  }

    async fetch(request:Request) {
    // read scheduled request from request body
    const scheduledRequest:ScheduledRequest = await request.json()

    // save scheduled request data to Durable Object storage, set the alarm, and return Durable Object id
    this.storage.put("request", scheduledRequest)
    this.storage.setAlarm(scheduledRequest.triggerAt || new Date())
    return new Response(JSON.stringify({
      id: this.id.toString()
    }), {
      headers: {
        "content-type": "application/json"
      }
    })
  }

  async alarm() {
    // read the scheduled request from Durable Object storage
    const scheduledRequest:ScheduledRequest|undefined = await this.storage.get("request")

    // call fetch on scheduled request URL with optional requestInit
    if (scheduledRequest) {
      await fetch(scheduledRequest.url, scheduledRequest.requestInit ? webhook.requestInit : undefined)

      // cleanup scheduled request once done
      this.storage.deleteAll()
    }
  }
}
Wrangler configuration
Once we have the Durable Object class, we need to create a Durable Object binding by instructing Wrangler where to find it and what the exported class name is.
wrangler.toml
name = "durable-objects-request-scheduler"
main = "src/index.ts"
compatibility_date = "2022-08-02"

# added Durable Objects configuration
[durable_objects]
bindings = [
  { name = "DO_REQUEST", class_name = "RequestDurableObject" },
]

[[migrations]]
tag = "v1"
new_classes = ["RequestDurableObject"]
Scheduling system API
The API Worker will accept POST HTTP methods only, and is expecting a JSON body with scheduled request data – what URL to call, optionally what method, headers, or body to send. Any other method than POST will return 405 – Method Not Allowed HTTP error.
HTTP POST /:scheduledRequestId? will create or override a scheduled request, where :scheduledRequestId is optional Durable Object ID returned from a scheduling system API before.
src/index.ts
import { Env } from "./types"
export { RequestDurableObject } from "./request-durable-object"

export default {
    async fetch(
        request: Request,
        env: Env
    ): Promise<Response> {
        if (request.method !== "POST") {
            return new Response("Method Not Allowed", {status: 405})
        }

        // parse the URL and get Durable Object ID from the URL
        const url = new URL(request.url)
        const idFromUrl = url.pathname.slice(1)

        // construct the Durable Object ID, use the ID from pathname or create a new unique id
        const doId = idFromUrl ? env.DO_REQUEST.idFromString(idFromUrl) : env.DO_REQUEST.newUniqueId()

        // get the Durable Object stub for our Durable Object instance
        const stub = env.DO_REQUEST.get(doId)

        // pass the request to Durable Object instance
        return stub.fetch(request)
    },
}
It’s good to mention that the script above does not implement any listing of scheduled or processed webhooks. Depending on how the scheduling system would be integrated, you can save each created Durable Object ID to your existing backend, or write your own registry – using one of the Workers storage options.
Starting a local development server and testing our application
We are almost done! Before we publish our scheduler system to the Cloudflare edge, let’s start Wrangler in a completely local mode to run a couple of tests against it and to see it in action – which will work even without an Internet connection!
wrangler dev --local
The development server is listening on localhost:8787, which we will use for scheduling our first request. The JSON request payload should match the TypeScript schema we defined in the beginning – required URL, and optional triggerEverySeconds number or triggerAt unix timestamp. When only the required URL is passed, the request will be dispatched right away.
An example of request payload that will send a GET request to https://example.com every 30 seconds.
From the wrangler logs we can see the scheduled request ID 000000018265a5ecaa5d3c0ab6a6997bf5638fdcb1a8364b269bd2169f022b0f is being triggered in 30s intervals.
Need to double the interval? No problem, just send a new POST request and pass the request ID as a pathname.
Every scheduled request gets a unique Durable Object ID with its own storage and alarm. As we demonstrated, the ID becomes handy when you need to change the settings of the scheduled request, or to deschedule them completely.
Publishing to the network
Following command will bundle our Workers application, export and bind Durable Objects, and deploy it to our workers.dev subdomain.
wrangler publish
That’s it, we are live! 🎉 The URL of your deployment is shown in the Workers logs. In a reasonably short period of time we managed to write our own scheduling system that is ready to handle requests at scale.
This blog post is written by Sara Gerion, Senior Solutions Architect.
Development teams must have a shared understanding of the workloads they own and their expected behaviors to deliver business value fast and with confidence. The AWS Well-Architected Framework and its Serverless Lens provide architectural best practices for designing and operating reliable, secure, efficient, and cost-effective systems in the AWS Cloud.
Developers should design and configure their workloads to emit information about their internal state and current status. This allows engineering teams to ask arbitrary questions about the health of their systems at any time. For example, emitting metrics, logs, and traces with useful contextual information enables situational awareness and allows developers to filter and select only what they need.
Following such practices reduces the number of bugs, accelerates remediation, and speeds up the application lifecycle into production. They can help mitigate deployment risks, offer more accurate production-readiness assessments and enable more informed decisions to deploy systems and changes.
AWS Lambda Powertools for TypeScript
AWS Lambda Powertools provides a suite of utilities for AWS Lambda functions to ease the adoption of serverless best practices. The AWS Hero Yan Cui’s initial implementation of DAZN Lambda Powertools inspired this idea.
AWS Lambda Powertools for TypeScript provides a suite of utilities for Node.js runtimes, which you can use in both JavaScript and TypeScript code bases. The library follows a modular approach similar to the AWS SDK v3 for JavaScript. Each utility is installed as standalone NPM package.
Today, the library is ready for production use with three observability features: distributed tracing (Tracer), structured logging (Logger), and asynchronous business and application metrics (Metrics).
You can instrument your code with Powertools in three different ways:
Manually. It provides the most granular control. It’s the most verbose approach, with the added benefit of no additional dependency and no refactoring to TypeScript Classes.
Middy middleware. It is the best choice if your existing code base relies on the Middy middleware engine. Powertools offers compatible Middy middleware to make this integration seamless.
Method decorator. Use TypeScript method decorators if you prefer writing your business logic using TypeScript Classes. If you aren’t using Classes, this requires the most significant refactoring.
The examples in this blog post use the Middy approach. To follow the examples, ensure that middy is installed:
npm i @middy/core
Logger
Logger provides an opinionated logger with output structured as JSON. Its key features include:
Capturing key fields from the Lambda context, cold starts, and structure logging output as JSON.
Logging Lambda invocation events when instructed (disabled by default).
Printing all the logs only for a percentage of invocations via log sampling (disabled by default).
Appending additional keys to structured logs at any point in time.
Providing a custom log formatter (Bring Your Own Formatter) to output logs in a structure compatible with your organization’s Logging RFC.
To install, run:
npm install @aws-lambda-powertools/logger
Usage example:
import { Logger, injectLambdaContext } from '@aws-lambda-powertools/logger';
 import middy from '@middy/core';

 const logger = new Logger({
    logLevel: 'INFO',
    serviceName: 'shopping-cart-api',
});

 const lambdaHandler = async (): Promise<void> => {
     logger.info('This is an INFO log with some context');
 };

 export const handler = middy(lambdaHandler)
     .use(injectLambdaContext(logger));
In Amazon CloudWatch, the structured log emitted by your application looks like:
{
     "cold_start": true,
     "function_arn": "arn:aws:lambda:eu-west-1:123456789012:function:shopping-cart-api-lambda-prod-eu-west-1",
     "function_memory_size": 128,
     "function_request_id": "c6af9ac6-7b61-11e6-9a41-93e812345678",
     "function_name": "shopping-cart-api-lambda-prod-eu-west-1",
     "level": "INFO",
     "message": "This is an INFO log with some context",
     "service": "shopping-cart-api",
     "timestamp": "2021-12-12T21:21:08.921Z",
     "xray_trace_id": "abcdef123456abcdef123456abcdef123456"
 }
Logs generated by Powertools can also be ingested and analyzed by any third-party SaaS vendor that supports JSON.
AWS X-Ray segments and subsegments emitted by Powertools
Example service map generated with Powertools
Metrics
Metrics create custom metrics asynchronously by logging metrics to standard output following the Amazon CloudWatch Embedded Metric Format (EMF). These metrics can be visualized through CloudWatch dashboards or used to trigger alerts.
Its key features include:
Aggregating up to 100 metrics using a single CloudWatch EMF object (large JSON blob).
Validating your metrics against common metric definitions mistakes (for example, metric unit, values, max dimensions, max metrics).
Metrics are created asynchronously by the CloudWatch service. You do not need any custom stacks, and there is no impact to Lambda function latency.
Creating a one-off metric with different dimensions.
The Serverless TypeScript Demo shows how to use Lambda Powertools for TypeScript. You can find instructions on how to deploy and load test this application in the repository.
Serverless TypeScript Demo architecture
The code for the Get Products Lambda function shows how to use the utilities. The function is instrumented with Logger, Metrics and Tracer to emit observability data.
The Logger utility adds useful context to the application logs. Structuring your logs as JSON allows you to search on your structured data using Amazon CloudWatch Logs Insights. This allows you to filter out the information you don’t need.
For example, use the following query to search for any errors for the serverless-typescript-demo service.
CloudWatch Logs Insights showing errors for the serverless-typescript-demo service.
The Tracer utility adds custom annotations and metadata during the function invocation, which it sends to AWS X-Ray. Annotations allow you to search for and filter traces by business or application contextual information such as product ID, or cold start.
You can see the duration of the putProduct method and the ColdStart and Service annotations attached to the Lambda handler function.
putProduct trace view
The Metrics utility simplifies the creation of complex high-cardinality application data. Including structured data along with your metrics allows you to search or perform additional analysis when needed.
In this example, you can see how many times per second a product is created, deleted, or queried. You could configure alarms based on the metrics.
The AWS CDK lets you build reliable and scalable applications in the cloud with the expressive power of a programming language, including TypeScript. The AWS SAM CLI is that makes it easier to create and manage serverless applications.
You can use the sample applications provided in the GitHub repository to understand how to use the library quickly and experiment in your own AWS environment.
Conclusion
AWS Lambda Powertools for TypeScript can help simplify, accelerate, and scale the adoption of serverless best practices within your team and across your organization.
The library implements best practices recommended as part of the AWS Well-Architected Framework, without you needing to write much custom code.
Since the library relieves the operational burden needed to implement these functionalities, you can focus on the features that matter the most, shortening the Software Development Life Cycle and reducing the Time To Market.
The library helps both individual developers and engineering teams to standardize their organizational best practices. Utilities are designed to be incrementally adoptable for customers at any stage of their serverless journey, from startup to enterprise.
To get started with AWS Lambda Powertools for TypeScript, see the official documentation. For more serverless learning resources, visit Serverless Land.
Last year during CIO week, we announced Page Shield in general availability. Today, we talk about improvements we’ve made to help Page Shield users focus on the highest impact scripts and get more value out of the product. In this post we go over improvements to script status, metadata and categorization.
What is Page Shield?
Page Shield protects website owners and visitors against malicious 3rd party JavaScript. JavaScript can be leveraged in a number of malicious ways: browser-side crypto mining, data exfiltration and malware injection to mention a few.
For example a single hijacked JavaScript can expose millions of user’s credit card details across a range of websites to a malicious actor. The bad actor would scrape details by leveraging a compromised JavaScript library, skimming inputs to a form and exfiltrating this to a 3rd party endpoint under their control.
Today Page Shield partially relies on Content Security Policies (CSP), a browser native framework that can be used to control and gain visibility of which scripts are allowed to load on pages (while also reporting on any violations). We use these violation reports to provide detailed information in the Cloudflare dashboard regarding scripts being loaded by end-user browsers.
Page Shield users, via the dashboard, can see which scripts are active on their website and on which pages. Users can be alerted in case a script performs malicious activity, and monitor code changes of the script.
Script status
To help identify malicious scripts, and make it easier to take action on live threats, we have introduced a status field.
When going to the Page Shield dashboard, the customer will now only see scripts with a status of active. Active scripts are those that were seen in the last seven days and didn’t get served through the “cdn-cgi” endpoint (which is managed by Cloudflare).
We also introduced other statuses:
infrequent scripts are scripts that have only been seen in a negligible amount of CSP reports over a period of time. TThey normally indicate a single user’s browser using a compromised browser extension. The goal of this status is to reduce noise caused by browser plugins that inject their JavaScript in the HTML.
inactive scripts are those that have not been reported for seven days and therefore have likely since been removed or replaced.
cdn-cgi are scripts served from the ‘/cdn-cgi/’ endpoint which is managed by Cloudflare. These scripts are related to Cloudflare products like our analytics or Bot Management features. Cloudflare closely monitors these scripts, they are fairly static, so they shouldn’t require close monitoring by a customer and therefore are hidden by default unless our detections find anything suspicious.
If the customer wishes to see the full list of scripts including the non-active scripts they can still do so by clicking ‘All scripts’.
Script metadata in alerts
Customers that opt into the enterprise add-on version of Page Shield can also choose to set up notifications for malicious scripts. In the previous version, we offered the script URL, first seen on and last seen on data. These alerts have been revamped to improve the experience for security analysts. Our goal is to provide all data a security analyst would manually look-up in order to validate a script. With this update we’ve made a significant step in that direction through using insights delivered by Cloudflare Radar.
At the top of the email alert you will now find where the script was seen along with other information regarding when the script was seen and the full URL (not clickable for security purposes).
As part of the enterprise add-on version of Page Shield we review the scripts through a custom machine learning classifier and a range of domain and URL threat feeds. A very common question with any machine learning scoring system is “why did it score the way it scored”. Because of this, the machine learning score generated by our system has now been split up to show the components that made up the score; currently: obfuscation and data exfiltration values. This should help to improve the ability for a customer to review a script in case of a false positive.
Threat feeds can be very helpful in detecting new attack styles that our classifier hasn’t been trained for yet. Some of these feeds offer us a range of categories of malicious endpoints such as ‘malware’, ‘spyware’ or ‘phishing’. Our enterprise add-on customers will now be able to see the categorization in our alerts (as shown above) and on the dashboard. The goal is to provide more context on why a script is considered malicious.
We also now provide information on script changes along with the “malicious code score” for each version.
Right below the most essential information we have added WHOIS information on the party domain that is providing the script. In some cases the registrar may hide relevant information such as the organization’s name, however, information on the date of registration and expiration can be very useful in detecting unexpected changes in ownership. For example, we often see malicious scripts being hosted under newly registered domains.
We also now offer details regarding the SSL certificates issued for this domain through certificate transparency monitoring. This can be useful in detecting a potential take over. For example, if a 3rd party script endpoint usually uses a Digicert certificate, but recently a Let’s Encrypt certificate has been issued this could be an indicator that another party is trying to take over the domain.
Last but not least, we have improved our dashboard link to take users directly to the specific script details page provided by the Page Shield UI.
What’s next?
There are many ways to perform malicious activity through JavaScript. Because of this it is important that we build attack type specific detection mechanisms as well as overarching tools that will help detect anomalies. We are currently building a new component purpose built to look for signs of malicious intent in data endpoints by leveraging the connect-src CSP directive. The goal is to improve the accuracy of our Magecart-style attack detection.
We are also working on providing the ability to generate CSP policies directly through Page Shield making it easy to perform positive blocking and maintain rules over time.
Another feature we are working on is offering the ability to block scripts from accessing a user’s webcam, microphone or location through a single click.
More about this in future blog posts. Many more features to come!
I recently wrote a blog post on injection-type vulnerabilities and how they were knocked down a few spots from 1 to 3 on the new OWASP Top 10 for 2022. The main focus of that article was to demonstrate how stack traces could be — and still are — used via injection attacks to gather information about an application to further an attacker’s goal. In that post, I skimmed over one of my all time favorite types of injections: cross-site scripting (XSS).
In this post, I’ll cover this gem of an exploit in much more depth, highlighting how it has managed to adapt to the newer environments of today’s modern web applications, specifically the API and Javascript Object Notation (JSON).
I know the term API is thrown around a lot when referencing web applications these days, but for this post, I will specifically be referencing requests made from the front end of a web application to the back end via ajax (Asynchronous JavaScript and XML) or more modern approaches like the fetch method in JavaScript.
Before we begin, I’d like to give a quick recap of what XSS is and how a legacy application might handle these types of requests that could trigger XSS, then dive into how XSS still thrives today in modern web applications via the methods mentioned so far.
What is cross-site scripting?
There are many types of XSS, but for this post, I’ll only be focusing on persistent XSS, which is sometimes referred to as stored XSS.
XSS is a type of injection attack, in which malicious scripts are injected into otherwise benign and trusted websites. XSS attacks occur when an attacker uses a web application to execute malicious code — generally in the form of a browser-side script like JavaScript, for example — against an unsuspecting end user. Flaws that allow these attacks to succeed are quite widespread and occur anywhere a web application accepts an input from a user without sanitizing, validating, escaping, or encoding it.
Because the end user’s browser has no way to know not to trust the malicious script, the browser will execute the script. Because of this broken trust, attackers typically leverage these vulnerabilities to steal victims’ cookies, session tokens, or other sensitive information retained by the browser. They could also redirect to other malicious sites, install keyloggers or crypto miners, or even change the content of the website.
Now for the “stored” part. As the name implies, stored XSS generally occurs when the malicious payload has been stored on the target server, usually in a database, from input that has been submitted in a message forum, visitor log, comment field, form, or any parameter that lacks proper input sanitization.
What makes this type of XSS so much more damaging is that, unlike reflected XSS – which only affects specific targets via cleverly crafted links – stored XSS affects any and everyone visiting the compromised site. This is because the XSS has been stored in the applications database, allowing for a much larger attack surface.
Old-school apps
Now that we’ve established a basic understanding of stored XSS, let’s go back in time a few decades to when web apps were much simpler in their communications between the front-end and back-end counterparts.
Let’s say you want to change some personal information on a website, like your email address on a contacts page. When you enter in your email address and click the update button, it triggers the POST method to send the form data to the back end to update that value in a database. The database updates the value in a table, then pushes a response back to the web applications front end, or UI, for you to see. This would usually result in the entire page having to reload to display only a very minimal amount of change in content, and while it’s very inefficient, nonetheless the information would be added and updated for the end user to consume.
In the example below, clicking the update button submits a POST form request to the back-end database where the application updates and stores all the values, then provides a response back to the webpage with the updated info.
Old-school XSS
As mentioned in my previous blog post on injection, I give an example where an attacker enters in a payload of <script>alert(“This is XSS”)</script> instead of their email address and clicks the update button. Again, this triggers the POST method to take our payload and send it to the back-end database to update the email table, then pushes a response back to the front end, which gets rendered back to the UI in HTML. However, this time the email value being stored and displayed is my XSS payload, <script>alert(“This is XSS”)</script>, not an actual email address.
As seen above, clicking the “update” button submits the POST form data to the back end where the database stores the values, then pushes back a response to update the UI as HTML.
However, because our payload is not being sanitized properly, our malicious JavaScript gets executed by the browser, which causes our alert box to pop up as seen below.
While the payload used in the above example is harmless, the point to drive home here is that we were able to get the web application to store and execute our JavaScript all through a simple contact form. Anyone visiting my contact page will see this alert pop up because my XSS payload has been stored in the database and gets executed every time the page loads. From this point on, the possible damage that could be done here is endless and only limited by the attacker’s imagination… well, and their coding skills.
New-school apps
In the first example I gave, when you updated the email address on the contact page and the request was fulfilled by the backend, the entire page would reload in order to display the newly created or updated information. You can see how inefficient this is, especially if the only thing changing on the page is a single line or a few lines of text. Here is where ajax and/or the fetch method comes in.
Ajax, or the fetch method, can be used to get data from or post data to a remote source, then update the front-end UI of that web application without having to refresh the page. Only the content from the specific request is updated, not the entire page, and that is the key difference between our first example and this one.
And a very popular format for said data being sent and received is JavaScript Object Notation, most commonly known as JSON. (Don’t worry, I’ll get back to those curly braces in just a bit.)
New-school XSS
(Well, not really, but it sounds cool.)
Now, let’s pretend we’ve traveled back to the future and our contact page has been rewritten to use ajax or the fetch method to send and receive data to and from the database. From the user’s point of view, nothing has changed — still the same ol’ form. But this time, when the email address is being updated, only the contact form refreshes. The entire page and all of its contents do not refresh like in the previous version, which is a major win for efficiency and user experience.
Below is an example of what a POST might look like formatted in JSON.
“What is JSON?” you might ask. Short for JavaScript Object Notation, it is a lightweight text format for storing and transferring data and is most commonly used when sending data to and from servers. Remember those curly braces I mentioned earlier? Well, one quick and easy way to spot JSON is the formatting and the use of curly braces.
In the example above, you can see what our new POST looks like using ajax or the fetch method in JavaScript. While the end result is no different than before, as seen in the example below, the method that was used to update the page is quite different. The key difference here is that the data we’re wanting to update is being treated as just that: data, but in the form of JSON as opposed to HTML.
Now, let’s inject the same XSS payload into the same email field and hit update. In the example below, you can see that our POST request has been wrapped in curly braces, using JSON, and is formatted a bit differently than previously before being sent to the back end to be processed.
In the example above, you can see that the application is allowing my email address to be the XSS payload in its entirety. However, the JavaScript here is only being displayed and not being executed as code by the browser, so the alert “pop” message never gets triggered as in the previous example. That again is the key difference from the original way we were fulfilling the requests versus our new, more modern way — or in short, using JSON instead of HTML.
Now you might be asking yourself, what’s wrong with allowing the XSS payload to be the email address if it’s only being displayed and not being executed as JavaScript by the browser. That is a valid question, but hear me out.
See, I’ve been working in this industry long enough to know that the two most common responses to a question or statement regarding cybersecurity begin with either “that depends…” or “what if…” I’m going to go with the latter here and throw a couple what-ifs at you.
Now that my XSS is stored in your database, it’s only a matter of time before this ticking time bomb goes off. Just because my XSS is being treated as JSON and not HTML now does not mean that will always be the case, and attackers are betting on this.
Here are a few scenarios.
Scenario 1
What if team B handles this data differently from team A? What if team B still uses more traditional methods of sending and receiving data to and from the back end and does leverage the use of HTML and not JSON?
In that case, the XSS would most likely eventually get executed. It might not affect the website that the XSS was originally injected into, but the stored data can be (and usually is) also used elsewhere. The XSS stored in that database is probably going to be shared and used by multiple other teams and applications at some point. The odds of all those different teams leveraging the exact same standards and best practices are slim to none, and attackers know this.
Scenario 2
What if, down the road, a developer using more modern techniques like ajax or the fetch method to send and receive data to and from the back end decides to use the .innerHTML property instead of .innerTEXT to load that JSON into the UI? All bets are off, and the stored XSS that was previously being protected by those lovely curly braces will now most likely get executed by the browser.
Scenario 3
Lastly, what if the current app had been developed to use server-side rendering, but a decision from higher up has been made that some costs need to be cut and that the company could actually save money by recoding some of their web apps to be client-side rather than server-side?
Previously, the back end was doing all the work, including sanitizing all user input, but now the shift will be for the browser to do all the heavy lifting. Good luck spotting all the XSS stored in the DB — in its previous state, it was “harmless,” but now it could get rendered to the UI as HTML, allowing the browser to execute said stored XSS. In this scenario, a decision that was made upstream will have an unexpected security impact downstream, both figuratively and literally — a situation that is all too well-known these days.
Final thoughts
Part of my job as a security advisor is to, well, advise. And it’s these types of situations that keep me up at night. I come across XSS in applications every day, and while I may not see as many fun and exciting “pops” as in years past, I see something a bit more troubling.
This type of XSS is what I like to call a “sleeper vuln” – laying dormant, waiting for the right opportunity to be woken up. If I didn’t know any better, I’d say XSS has evolved and is aware of its new surroundings. Of course, XSS hasn’t evolved, but the applications in which it lives have.
At the end of the day, we’re still talking about the same XSS from its conception, the same XSS that has been on the OWASP Top 10 for decades — what we’re really concerned about is the lack of sanitization or handling of user input. But now, with the massive adoption of JavaScript frameworks like Angular, libraries like React, the use of APIs, and the heavy reliance on them to handle the data properly, we’ve become complacent in our duties to harden applications the proper way.
There seems to be a division in camps around XSS in JSON. On the one hand, some feel that since the JavaScript isn’t being executed by the browser, everything is fine. Who cares if an email address (or any data for that matter) is potentially dangerous — as long as it’s not being executed by the browser. And on the other hand, you have the more fundamentalist, dare I say philosophical thought that all user input should never be trusted: It should always be sanitized, regardless of whether it’s treated as data or not — and not solely because of following best coding and security practices, but also because of the “that depends” and “what if” scenarios in the world.
I’d like to point out in my previous statement above, that “as long as” is vastly different from “cannot.” “As long as” implies situational awareness and that a certain set of criteria need to be met for it to be true or false, while “cannot” is definite and fixed, regardless of the situation or criteria. “As long as the XSS is wrapped in curly braces” means it does not pose a risk in its current state but could in other states. But if input is sanitized and escaped properly, the XSS would never exist in the first place, and thus it “cannot” or could not be executed by the browser, ever.
I guess I cannot really complain too much about these differences of opinions though. The fact that I’m even having these conversations with others is already a step in the right direction. But what does concern me is that it’s 2022, and we’re still seeing XSS rampant in applications, but because it’s wrapped in JSON somehow makes it acceptable. One of the core fundamentals of my job is to find and prioritize risk, then report. And while there is always room for discussion around the severity of these types of situations, lots of factors have to be taken into consideration, a spade isn’t always a spade in application security, or cybersecurity in general for that matter. But you can rest assured if I find XSS in JSON in your environment, I will be calling it out.
I hope there will be a future where I can look back and say, “Remember that one time when curly braces were all that prevented your website from getting hacked?” Until then, JSON or not, never trust user data, and sanitize all user input (and output for that matter). A mere { } should never be the difference between your site getting hacked or not.
Handling payments inside your apps is crucial to building a business online. For many developers, the leading choice for handling payments is Stripe. Since my first encounter with Stripe about seven years ago, the service has evolved far beyond simple payment processing. In the e-commerce example application I shared last year, Stripe managed a complete seller marketplace, using the Connect product. Stripe’s product suite is great for developers looking to go beyond accepting payments.
Earlier versions of Stripe’s SDK had core Node.js dependencies, like many popular JavaScript packages. In Stripe’s case, it interacted directly with core Node.js libraries like net/http, to handle HTTP interactions. For Cloudflare Workers, a V8-based runtime, this meant that the official Stripe JS library didn’t work; you had to fall back to using Stripe’s (very well-documented) REST API. By doing so, you’d lose the benefits of using Stripe’s native JS library — things like automatic type-checking in your editor, and the simplicity of function calls like stripe.customers.create(), instead of manually constructed HTTP requests, to interact with Stripe’s various pieces of functionality.
We won’t stop until our users can import popular Node.js libraries seamlessly. This effort will be large-scale and ongoing for us, but we think it’s well worth it.
I’m excited to announce general availability for the stripe JS package for Cloudflare Workers. You can now use the native Stripe SDK directly in your projects! To get started, install stripe in your project: npm i stripe.
This also opens up a great opportunity for developers who have deployed sites to Cloudflare Pages to begin using Stripe right alongside their applications. With this week’s announcement of serverless function support in Cloudflare Pages, you can accept payments for your digital product, or handle subscriptions for your membership site, with a few lines of JavaScript added to your Pages project. There’s no additional configuration, and it scales automatically, just like your Pages site.
To showcase this, we’ve prepared an example open-source repository, showing how you can integrate Stripe Checkout into your Pages application. There’s no additional configuration needed — as we announced yesterday, Pages’ new Workers Functions features allows you to deploy infinitely-scalable functions just by adding a new functions folder to your project. See it in action at stripe.pages.dev, or check out the open-source repository on GitHub.
With the SDK installed, you can begin accepting payments directly in your applications. The below example shows how to initiate a new Checkout session and redirect to Stripe’s hosted checkout page:
With support for the Stripe SDK natively in Cloudflare Workers, you aren’t just limited to payment processing either. Any JavaScript example that’s currently in Stripe’s extensive documentation works directly in Workers, without needing to make any changes.
In particular, using Workers to handle the multitude of available Stripe webhooks means that you can get better visibility into how your existing projects are working, without needing to spin up any new infrastructure. The below example shows how you can securely validate incoming webhook requests to a Workers function, and perform business logic by parsing the data inside that webhook:
const Stripe = require("stripe");

const stripe = Stripe(STRIPE_API_KEY, {
  httpClient: Stripe.createFetchHttpClient()
});

export default {
  async fetch(request) {
    const body = await request.text()
    const sig = request.headers.get('stripe-signature')
    const event = stripe.webhooks.constructEvent(body, sig, secret)

    // Handle the event
    switch (event.type) {
      case 'payment_intent.succeeded':
        const paymentIntent = event.data.object;
        // Then define and call a method to handle the successful payment intent.
        // handlePaymentIntentSucceeded(paymentIntent);
        break;
      case 'payment_method.attached':
        const paymentMethod = event.data.object;
        // Then define and call a method to handle the successful attachment of a PaymentMethod.
        // handlePaymentMethodAttached(paymentMethod);
        break;
      // ... handle other event types
      default:
        console.log(`Unhandled event type ${event.type}`);
    }

    // Return a response to acknowledge receipt of the event
    return new Response(JSON.stringify({ received: true }), {
      headers: { 'Content-type': 'application/json' }
    })
  }
}
We’re also announcing a new Workers template in partnership with Stripe. The template will help you get up and running with Stripe and Workers, using our best practices.
In less than five minutes, you can begin accepting payments for your next digital product or membership business. You can also handle and validate incoming webhooks at the edge, from a single codebase. This comes with no upfront cost, server provisioning, or any of the standard scaling headaches. Take your serverless functions, deploy them to Cloudflare’s edge, and start making money!
“We’re big fans of Cloudflare Workers over here at Stripe. Between the wild performance at the edge and fantastic serverless development experience, we’re excited to see what novel ways you all use Stripe to make amazing apps.” — Brian Holt, Stripe
We’re thrilled with this incredible update to Stripe’s JavaScript SDK. We’re also excited to see what you’ll build with native Stripe support in Workers. Join our Discord server and share what you’ve built in the #what-i-built channel — get your invite here.
We’re excited to announce that JavaScript modules are now supported on Cloudflare Workers. If you’ve ever taken look at an example Worker written in JavaScript, you might recognize the following code snippet that has been floating around the Internet the past few years:
The above syntax is known as the “Service Worker” API, and it was proposed to be standardized for use in web browsers. The idea is that you can attach a JavaScript file to a web page to modify its HTTP requests and responses, acting like a virtual endpoint. It was exactly what we needed for Workers, and it even integrated well with standard Web APIs like fetch() and caches.
Before introducing modules, we want to make it clear that we will continue to support the Service Worker API. No developer wants to get an email saying that you need to rewrite your code because an API or feature is being deprecated; and you won’t be getting one from us. If you’re interested in learning why we made this decision, you can read about our commitment to backwards-compatibility for Workers.
What are JavaScript modules?
JavaScript modules, also known as ECMAScript (abbreviated. “ES”) modules, is the standard API for importing and exporting code in JavaScript. It was introduced by the “ES6” language specification for JavaScript, and has been implemented by most Web browsers, Node.js, Deno, and now Cloudflare Workers. Here’s an example to demonstrate how it works:
// filename: ./src/util.js
export function getDate(time) {
  return new Date(time).toISOString().split("T")[0]; // "YYYY-MM-DD"
}
The “export” keyword indicates that the “getDate” function should be exported from the current module. Then, you can use “import” from another module to use that function.
Those are the basics, but there’s a lot more you can do with modules. It allows you to organize, maintain, and re-use your code in an elegant way that just works. While we can’t go over every aspect of modules here, if you’d like to learn more we’d encourage you to read the MDN guide on modules, or a more technical deep-dive by Lin Clark.
How can I use modules in Workers?
You can export a default module, which will represent your Worker. Instead of using “addEventListener,” each event handler is defined as a function on that module. Today, we support “fetch” for HTTP and WebSocket requests and “scheduled” for cron triggers.
You may also notice some other differences, such as the parameters on each event handler. Instead of a single “Event” object, the parameters that you need the most are spread out on their own. The first parameter is specific to the event type: for “fetch” it’s the Request object, and for “scheduled” it’s a controller that contains the cron schedule.
The second parameter is an object that contains your environment variables (also known as “bindings“). Previously, each variable was inserted into the global scope of the Worker. While a simple solution, it was confusing to have variables magically appear in your code. Now, with an environment object, you can control which modules and libraries get access to your environment variables. This mechanism is more secure, as it can prevent a compromised or nosy third-party library from enumerating all your variables or secrets.
The third parameter is a context object, which allows you to register background tasks using waitUntil(). This is useful for tasks like logging or error reporting that should not block the execution of the event.
When you put that all together, you can import and export multiple modules, as well as use the new event handler syntax.
Let’s not forget about Durable Objects, which became generally available earlier this week! You can also export classes, which is how you define a Durable Object class. Here’s another example with a “Counter” Durable Object, that responds with an incrementing value.
// filename: ./src/counter.js
export class Counter {
  value = 0;
  fetch() {
    this.value++;
    return new Response(this.value.toString());
  }
}
// filename: ./src/worker.js
// We need to re-export the Durable Object class in the Worker module.
export { Counter } from "./counter.js"

export default {
  async fetch(request, environment) {
    const clientId = request.headers.get("cf-connecting-ip");
    const counterId = environment.Counter.idFromName(clientId);
    // Each IP address gets its own Counter.
    const counter = environment.Counter.get(counterId);
    return counter.fetch("https://counter.object/increment");
  }
}
Are there non-JavaScript modules?
Yes! While modules are primarily for JavaScript, we also support other modules types, some of which are not yet standardized.
For instance, you can import WebAssembly as a module. Previously, with the Service Worker API, WebAssembly was included as a binding. We think that was a mistake, since WebAssembly should be represented as code and not an external resource. With modules, here’s the new way to import WebAssembly:
import module from "./lib/hello.wasm"

export default {
  async fetch(request) {
    const instance = await WebAssembly.instantiate(module);
    const result = instance.exports.hello();
    return new Response(result);
  }
}
While not supported today, we look forward to a future where WebAssembly and JavaScript modules can be more tightly integrated, as outlined in this proposal. The ergonomics improvement, demonstrated below, can go a long way to make WebAssembly more included in the JavaScript ecosystem.
import { hello } from "./lib/hello.wasm"

export default {
  async fetch(request) {
    return new Response(hello());
  }
}
We’ve also added support for text and binary modules, which allow you to import a String and ArrayBuffer, respectively. While not standardized, it allows you to easily import resources like an HTML file or an image.
import html from "../public/index.html"

export default {
  fetch(request) {
    if (request.url.endsWith("/index.html") {
       return new Response(html, {
          headers: { "Content-Type": "text/html" }
       });
    }
    return fetch(request);
  }
}
How can I get started?
There are many ways to get started with modules.
First, you can try out modules in your browser using our playground (which doesn’t require an account) or by using the dashboard quick editor. Your browser will automatically detect when you’re using modules to allow you to seamlessly switch from the Service Worker API. For now, you’ll only be able to create one JavaScript module in the browser, though supporting multiple modules is something we’ll be improving soon.
If you’re feeling adventurous and want to start a new project using modules, you can try out the beta release of wrangler 2.0, the next-generation of the command-line interface (CLI) for Workers.
For existing projects, we still recommend using wrangler 1.0 (release 1.17 or later). To enable modules, you can adapt your “wrangler.toml” configuration to the following example:
name = "my-worker"
type = "javascript"
workers_dev = true

[build.upload]
format = "modules"
dir = "./src"
main = "./worker.js" # becomes "./src/worker.js"

[[build.upload.rules]]
type = "ESModule"
globs = "**/*.js"

# Uncomment if you have a build script.
# [build]
# command = "npm run build"
We’ve updated our documentation to provide more details about modules, though some examples will still be using the Service Worker API as we transition to showing both formats. (and TypeScript as a bonus!)
If you experience an issue or notice something strange with modules, please let us know, and we’ll take a look. Happy coding, and we’re excited to see what you build with modules!
As we continue to grow here at Netflix, the needs of Revenue and Growth Engineering are rapidly evolving; and our tools must also evolve just as rapidly. The Revenue and Growth Tools (RGT) team decided to set off on a journey to build tools in an abstract manner to have solutions readily available within our organization. We identified common design patterns and architectures scattered across various tools which were all duplicating efforts in some way or another.
We needed to consolidate these tools in a way that scaled with the teams we served. It needed to have the agility of a micro frontend and the extensibility of a framework to empower our stakeholders to extend our tools. We would abstract parts of which anyone can then customize, or extend, to meet their specific business or technical requirements. The end result is Lattice: RGT’s pluggable framework for micro frontends.
A Different Approach to Our Tools
A UI composed of other dependencies is nothing new; it’s something all modern web applications do today. The traditional approach of bundling dependencies at build time lacks the flexibility we need to empower our stakeholders. We want external dependencies to be resolved on-demand from any number of sources, from another application to an engineer’s laptop.
This led us to the following high level objectives:
Low Friction Adoption: Encourage reuse of existing front end code and avoid creating new packages that encapsulate UI functionality. Applications can be difficult to manage when functionality must be shared across packages. We would leverage an approach that enabled applications to extend their core functionality using common, and familiar, React paradigms.
Weak Dependencies: Host applications could reference modules over https to a remote bundle hosted internally within Netflix. These bundles could be owned by teams outside of RGT built by already adopted standards such as with Webpack Module Federation or native JavaScript Modules.
Highly Aligned, Loosely Coupled: fully align with the standard frameworks and libraries used within Netflix. Plugins should be focused on delivering their core functionality without unnecessary boilerplate and have the freedom to implement without cumbersome API wrappers.
Metadata Driven: Plugin modules are defined from a configuration which could be injected at any point in the application lifecycle. The framework must be flexible enough to register, and unregister, plugins such that the extensions only apply when necessary.
Rapid Development: Reduce the development cycle by avoiding unnecessary builds and deployments. Plugins would be developed in a manner in which all of the context is available to them ahead of time via TypeScript declarations. By designing to rigid interfaces defined by a host application, both the plugin and host can be developed in parallel.
A Theoretical Example
Example Developer Dashboard Application with Embedded Lattice Plugins
Let’s take the above example — it renders and controls its own header and content areas to expose specific functionality to users. Upon release, we receive feedback that it would be nice if we could include information presented from other tools within this application. Using our new framework, Lattice, we are able to embed the existing functionality from the other applications.
A Lattice Plugin Host (which we’ll dive into later) allows us to extend the existing application by referencing two external plugins, Workflows and Spinnaker. In our example, we need to define two areas that can be extended — the application content for portal components and configurable routing.
The sequence of events in order to accomplish the above rendering process would be handled by three components — our new framework Lattice and the two plugins:
Dispatch Cycle within Lattice
First, Lattice will load both plugins asynchronously.
Next, the framework will dispatch events as they flow through the application.
In our example, Workflows will register its routes and Spinnaker will add its overlays.
An Implementation with React
In order to accomplish the above scenario, the Host Application needs to include the Lattice library and add a new PluginHost with a configuration referencing the external plugins. This host requires information about the specific application and the configuration indicating which plugins to load:
Enhancing a React Application with a Lattice Plugin Host
We’ve mocked this implementation in the example above with a useFetchPluginConfiguration hook to retrieve the metadata from an external service. Owners can then choose to add or remove plugins dynamically, outside of the application source code.
Allowing plugins access to the routing can be done using hooks defined by the Lattice framework. The usePluggableState hook will retrieve the default application routes and pass them through the Lattice framework. If any plugin responds to this AppRoutes identifier, they can choose to inject their specific routes:
Extending Existing Application State with Lattice Hooks
Plugins can inject any React element into the page with the<Pluggable /> component as illustrated below. This will allow plugins to render within this AppContent area:
Rendering Custom Children with Lattice Pluggable
The final example application snippet has been included below:
Under the Hood
Lattice is a tiny framework that provides an abstraction layer for React web applications to leverage.
Using Lattice, developers can focus on their core product, and simply wrap areas of their application that are customizable by external plugins. Developers can also extend components to use external state by using Lattice hooks.
Lattice Plugin Modules are JavaScript functions implemented by remote applications. These functions act as the “glue” between the host application and the remote component(s) being shared. Modules declare which components within their application should be exposed and how they should be rendered based on information the host provides.
A Lattice Pluggable Component allows a host application to expose a mount point through a standard React component that plugins can manipulate or override with their own content.
Lattice Custom Hooks are used to manipulate state using a state reducer pattern. These hooks allow host applications to maintain their own initial state, and modify accordingly, while also allowing plugins the opportunity to inject their own data.
Lattice Plugins
Lattice Functionality within a Host Application
The core of Lattice provides the ability to asynchronously load remote modules via Webpack Module Federation, Native ES Modules, or a custom implementation defined outside of the framework. The host application provides Lattice with basic application context and a configuration which defines the remote plugin modules to load. Once loaded, references to these plugins are stored internally within a React Context instance.
Exposing Functionality to Lattice as a Federated Module
Plugin modules can then provide new functionality, or change existing functionality, to the host application. Standard identifiers are used that all Lattice-enabled applications should implement to allow plugins to universally work across different applications. Most extensions will choose to extend existing application functionality, which will not be universal, and requires knowledge of the host’s design.
Lattice requires constant identifier values (aka “magic strings”) to understand what is being rendered. The Lattice Plugin Host will dispatch this identifier through all of the plugins which have been registered and loaded. Plugin responses are composed together, and the final returned value is what gets rendered in the component tree. Through this model, plugins can decide to extend, change, or simply ignore the event. Think of this process as an approach similar to that of Redux or Express Middleware functions.
Lattice can also be used to extend existing application functionality. In order to accomplish this, Plugins must be aware of the host identifiers and data shapes used in the host application lifecycle. While this might sound like an impossible task to maintain, we encourage host applications to publish a TypeScript declarations project which is shared between the host and plugins. Think of us as having a DefinitelyTyped repository for all of the Netflix internal tools that embrace extending via Lattice.
Using this approach, we are able to provide developers with a highly aligned, loosely coupled development environment shared between host applications and plugins. Plugins can be developed in a silo, simply adhering to the interface which has been declared.
The Possibilities are Endless
While our original approach was to extend core functionality within an application, we have found that we are able to leverage Lattice in other ways. The concept of writing a simple if statement has been replaced; we take a step back, and consider which domain in our organization should be responsible for said logic and consider moving the logic into their respective plugin.
We have also found that we can easily model more fine-grained areas within an application. For example, we can render individual form components using Lattice identifiers and have plugins be responsible for the specific UI elements. This empowers us to build these generic tools backed by metadata models and a default out-of-box experience which others can choose to override.
Most importantly, we are able to easily, and quickly, respond to conflicting requirements by simply implementing different plugins.
What’s Next?
We are only getting started with Lattice and currently gauging interest internally from other teams. By dogfooding our approach within RGT, we can work out the kinks, squash some bugs, and build a robust process for building micro frontends with Lattice. The developer experience is crucial for Lattice to be successful. Empowering developers with the ability to understand the lifecycle of Lattice events within an application, verify functionality prior to deployments, versioning, developing end-to-end test suites, and general best practices are some nuggets critical to our success.
Using async Rust libraries is usually easy. It’s just like using normal Rust code, with a little async or .await here and there. But writing your own async libraries can be hard. The first time I tried this, I got really confused by arcane, esoteric syntax like T: ?Unpin and Pin<&mut Self>. I had never seen these types before, and I didn’t understand what they were doing. Now that I understand them, I’ve written the explainer I wish I could have read back then. In this post, we’re gonna learn
What Futures are
What self-referential types are
Why they were unsafe
How Pin/Unpin made them safe
Using Pin/Unpin to write tricky nested futures
What are Futures?
A few years ago, I needed to write some code which would take some async function, run it and collect some metrics about it, e.g. how long it took to resolve. I wanted to write a type TimedWrapper that would work like this:
// Some async function, e.g. polling a URL with [https://docs.rs/reqwest]
// Remember, Rust functions do nothing until you .await them, so this isn't
// actually making a HTTP request yet.
let async_fn = reqwest::get("http://adamchalmers.com");

// Wrap the async function in my hypothetical wrapper.
let timed_async_fn = TimedWrapper::new(async_fn);

// Call the async function, which will send a HTTP request and time it.
let (resp, time) = timed_async_fn.await;
println!("Got a HTTP {} in {}ms", resp.unwrap().status(), time.as_millis())
I like this interface, it’s simple and should be easy for the other programmers on my team to use. OK, let’s implement it! I know that, under the hood, Rust’s async functions are just regular functions that return aFuture. The Future trait is pretty simple. It just means a type which:
Can be polled
When it’s polled, it might return “Pending” or “Ready”
If it’s pending, you should poll it again later
If it’s ready, it responds with a value. We call this “resolving”.
Here’s a really easy example of implementing a Future. Let’s make a Future that returns a random u16.
use std::{future::Future, pin::Pin, task::Context}

/// A future which returns a random number when it resolves.
#[derive(Default)]
struct RandFuture;

impl Future for RandFuture {
	// Every future has to specify what type of value it returns when it resolves.
	// This particular future will return a u16.
	type Output = u16;

	// The `Future` trait has only one method, named "poll".
fn poll(self: Pin<&mut Self>, _cx: &mut Context) -> Poll<Self::Output  {
		Poll::ready(rand::random())
	}
}
Not too hard! I think we’re ready to implement TimedWrapper.
OK, so a TimedWrapper is generic over a type Fut, which must be a Future. And it will store a future of that type as a field. It’ll also have a start field which will record when it first was first polled. Let’s write a constructor:
Nothing too complicated here. The new function takes a future and wraps it in the TimedWrapper. Of course, we have to set start to None, because it hasn’t been polled yet. So, let’s implement the poll method, which is the only thing we need to implement Future and make it .awaitable.
impl<Fut: Future> Future for TimedWrapper<Fut> {
	// This future will output a pair of values:
	// 1. The value from the inner future
	// 2. How long it took for the inner future to resolve
	type Output = (Fut::Output, Duration);

	fn poll(self: Pin<&mut Self>, cx: &mut Context) -> Poll<Self::Output> {
		// Call the inner poll, measuring how long it took.
		let start = self.start.get_or_insert_with(Instant::now);
		let inner_poll = self.future.poll(cx);
		let elapsed = self.elapsed();

		match inner_poll {
			// The inner future needs more time, so this future needs more time too
			Poll::Pending => Poll::Pending,
			// Success!
			Poll::Ready(output) => Poll::Ready((output, elapsed)),
		}
	}
}
OK, that wasn’t too hard. There’s just one problem: this doesn’t work.
So, the Rust compiler reports an error on self.future.poll(cx), which is “no method named poll found for type parameter Fut in the current scope”. This is confusing, because we know Fut is a Future, so surely it has a poll method? OK, but Rust continues: Fut doesn’t have a poll method, but Pin<&mut Fut> has one. What is this weird type?
Well, we know that methods have a “receiver”, which is some way it can access self. The receiver might be self, &self or &mut self, which mean “take ownership of self,” “borrow self,” and “mutably borrow self” respectively. So this is just a new, unfamiliar kind of receiver. Rust is complaining because we have Fut and we really need a Pin<&mut Fut>. At this point I have two questions:
What is Pin?
If I have a T value, how do I get a Pin<&mut T>?
The rest of this post is going to be answering those questions. I’ll explain some problems in Rust that could lead to unsafe code, and why Pin safely solves them.
Self-reference is unsafe
Pin exists to solve a very specific problem: self-referential datatypes, i.e. data structures which have pointers into themselves. For example, a binary search tree might have self-referential pointers, which point to other nodes in the same struct.
Self-referential types can be really useful, but they’re also hard to make memory-safe. To see why, let’s use this example type with two fields, an i32 called val and a pointer to an i32 called pointer.
So far, everything is OK. The pointer field points to the val field in memory address A, which contains a valid i32. All the pointers are valid, i.e. they point to memory that does indeed encode a value of the right type (in this case, an i32). But the Rust compiler often moves values around in memory. For example, if we pass this struct into another function, it might get moved to a different memory address. Or we might Box it and put it on the heap. Or if this struct was in a Vec<MyStruct>, and we pushed more values in, the Vec might outgrow its capacity and need to move its elements into a new, larger buffer.
When we move it, the struct’s fields change their address, but not their value. So the pointer field is still pointing at address A, but address A now doesn’t have a valid i32. The data that was there was moved to address B, and some other value might have been written there instead! So now the pointer is invalid. This is bad — at best, invalid pointers cause crashes, at worst they cause hackable vulnerabilities. We only want to allow memory-unsafe behaviour in unsafe blocks, and we should be very careful to document this type and tell users to update the pointers after moves.
Unpin and !Unpin
To recap, all Rust types fall into two categories.
Types that are safe to move around in memory. This is the default, the norm. For example, this includes primitives like numbers, strings, bools, as well as structs or enums entirely made of them. Most types fall into this category!
Types in category (1) are totally safe to move around in memory. You won’t invalidate any pointers by moving them around. But if you move a type in (2), then you invalidate pointers and can get undefined behaviour, as we saw before. In earlier versions of Rust, you had to be really careful using these types to not move them, or if you moved them, to use unsafe and update all the pointers. But since Rust 1.33, the compiler can automatically figure out which category any type is in, and make sure you only use it safely.
Any type in (1) implements a special auto trait calledUnpin. Weird name, but its meaning will become clear soon. Again, most “normal” types implement Unpin, and because it’s an auto trait (like Send or Sync or Sized1), so you don’t have to worry about implementing it yourself. If you’re unsure if a type can be safely moved, just check it on docs.rs and see if it impls Unpin!
Types in (2) are creatively named !Unpin (the ! in a trait means “does not implement”). To use these types safely, we can’t use regular pointers for self-reference. Instead, we use special pointers that “pin” their values into place, ensuring they can’t be moved. This is exactly what thePin type does.
Pin wraps a pointer and stops its value from moving. The only exception is if the value impls Unpin — then we know it’s safe to move. Voila! Now we can write self-referential structs safely! This is really important, because as discussed above, many Futures are self-referential, and we need them for async/await.
Using Pin
So now we understand why Pin exists, and why our Future poll method has a pinned &mut self to self instead of a regular &mut self. So let’s get back to the problem we had before: I need a pinned reference to the inner future. More generally: given a pinned struct, how do we access its fields?
The solution is to write helper functions which give you references to the fields. These references might be normal Rust references like &mut, or they might also be pinned. You can choose whichever one you need. This is called projection: if you have a pinned struct, you can write a projection method that gives you access to all its fields.
Projecting is really just getting data into and out of Pins. For example, we get the start: Option<Duration> field from the Pin<&mut self>, and we need to put the future: Fut into a Pin so we can call its poll method). If you read thePin methods you’ll see this is always safe if it points to an Unpin value, but requires unsafe otherwise.
// Putting data into Pin
pub        fn new          <P: Deref<Target:Unpin>>(pointer: P) -> Pin<P>;
pub unsafe fn new_unchecked<P>                     (pointer: P) -> Pin<P>;

// Getting data from Pin
pub        fn into_inner          <P: Deref<Target: Unpin>>(pin: Pin<P>) -> P;
pub unsafe fn into_inner_unchecked<P>                      (pin: Pin<P>) -> P;
I know unsafe can be a bit scary, but it’s OK to write unsafe code! I think of unsafe as the compiler saying “hey, I can’t tell if this code follows the rules here, so I’m going to rely on you to check for me.” The Rust compiler does so much work for us, it’s only fair that we do some of the work every now and then. If you want to learn how to write your own projection methods, I can highly recommend this fasterthanli.me blog post on the topic. But we’re going to take a little shortcut.
Using pin-project instead
So, OK, look, it’s time for a confession: I don’t like using unsafe. I know I just explained why it’s OK, but still, given the option, I would rather not.
I didn’t start writing Rust because I wanted to carefully think about the consequences of my actions, damnit, I just want to go fast and not break things. Luckily, someone sympathized with me and made a crate which generates totally safe projections! It’s called pin-project and it’s awesome. All we need to do is change our definition:
#[pin_project::pin_project] // This generates a `project` method
pub struct TimedWrapper<Fut: Future> {
	// For each field, we need to choose whether `project` returns an
	// unpinned (&mut T) or pinned (Pin<&mut T>) reference to the field.
	// By default, it assumes unpinned:
	start: Option<Instant>,
	// Opt into pinned references with this attribute:
	#[pin]
	future: Fut,
}
For each field, you have to choose whether its projection should be pinned or not. By default, you should use a normal reference, just because they’re easier and simpler. But if you know you need a pinned reference — for example, because you want to call .poll(), whose receiver is Pin<&mut Self> — then you can do that with #[pin].
Now we can finally poll the inner future!
fn poll(self: Pin<&mut Self>, cx: &mut Context) -> Poll<Self::Output> {
	// This returns a type with all the same fields, with all the same types,
	// except that the fields defined with #[pin] will be pinned.
	let mut this = self.project();

    // Call the inner poll, measuring how long it took.
	let start = this.start.get_or_insert_with(Instant::now);
	let inner_poll = this.future.as_mut().poll(cx);
	let elapsed = start.elapsed();

	match inner_poll {
		// The inner future needs more time, so this future needs more time too
		Poll::Pending => Poll::Pending,
		// Success!
		Poll::Ready(output) => Poll::Ready((output, elapsed)),
	}
}
Finally, our goal is complete — and we did it all without any unsafe code.
Summary
If a Rust type has self-referential pointers, it can’t be moved safely. After all, moving doesn’t update the pointers, so they’ll still be pointing at the old memory address, so they’re now invalid. Rust can automatically tell which types are safe to move (and will auto impl the Unpin trait for them). If you have a Pin-ned pointer to some data, Rust can guarantee that nothing unsafe will happen (if it’s safe to move, you can move it, if it’s unsafe to move, then you can’t). This is important because many Future types are self-referential, so we need Pin to safely poll a Future. You probably won’t have to poll a future yourself (just use async/await instead), but if you do, use the pin-project crate to simplify things.
I hope this helped — if you have any questions, please ask me on Twitter. And if you want to get paid to talk to me about Rust and networking protocols, my team at Cloudflare is hiring, so be sure to visit careers.cloudflare.com.
A microservice architecture is characterized by independent services that are focused on a specific business function and maintained by small, self-contained teams. Microservice architectures are used frequently for web applications developed on AWS, and for good reason. They offer many well-known benefits such as development agility, technological freedom, targeted deployments, and more. Despite the popularity of microservices, many frontend applications are still built in a monolithic style. For example, they have one large code base that interacts with all backend microservices, and is maintained by a large team of developers.
Figure 1. Microservice backend with monolith frontend
What is a Micro-frontend?
The micro-frontend architecture introduces microservice development principles to frontend applications. In a micro-frontend architecture, development teams independently build and deploy “child” frontend applications. These applications are combined by a “parent” frontend application that acts as a container to retrieve, display, and integrate the various child applications. In this parent/child model, the user interacts with what appears to be a single application. In reality, they are interacting with several independent applications, published by different teams.
Figure 2. Microservice backend with micro-frontend
Micro-frontend Benefits
Compared to a monolith frontend, a micro-frontend offers the following benefits:
Independent artifacts: A core tenet of microservice development is that artifacts can be deployed independently, and this remains true for micro-frontends. In a micro-frontend architecture, teams should be able to independently deploy their frontend applications with minimal impact to other services. Those changes will be reflected by the parent application.
Autonomous teams: Each team is the expert in its own domain. For example, the billing service team members have specialized knowledge. This includes the data models, the business requirements, the API calls, and user interactions associated with the billing service. This knowledge allows the team to develop the billing frontend faster than a larger, less specialized team.
Flexible technology choices: Autonomy allows each team to make technology choices that are independent from other teams. For instance, the billing service team could develop their micro-frontend using Vue.js and the profile service team could develop their frontend using Angular.
Scalable development: Micro-frontend development teams are smaller and are able to operate without disrupting other teams. This allows us to quickly scale development by spinning up new teams to deliver additional frontend functionality via child applications.
Easier maintenance: Keeping frontend repositories small and specialized allows them to be more easily understood, and this simplifies long-term maintenance and testing. For instance, if you want to change an interaction on a monolith frontend, you must isolate the location and dependencies of the feature within the context of a large codebase. This type of operation is greatly simplified when dealing with the smaller codebases associated with micro-frontends.
Micro-frontend Challenges
Conversely, a micro-frontend presents the following challenges:
Parent/child integration: A micro-frontend introduces the task of ensuring the parent application displays the child application with the same consistency and performance expected from a monolith application. This point is discussed further in the next section.
Operational overhead: Instead of managing a single frontend application, a micro-frontend application involves creating and managing separate infrastructure for all teams.
Consistent user experience: In order to maintain a consistent user experience, the child applications must use the same UI components, CSS libraries, interactions, error handling, and more. Maintaining consistency in the user experience can be difficult for child applications that are at different stages in the development lifecycle.
Building Micro-frontends
The most difficult challenge with the micro-frontend architecture pattern is integrating child applications with the parent application. Prioritizing the user experience is critical for any frontend application. In the context of micro-frontends, this means ensuring a user can seamlessly navigate from one child application to another inside the parent application. We want to avoid disruptive behavior such as page refreshes or multiple logins. At its most basic definition, parent/child integration involves the parent application dynamically retrieving and rendering child applications when the parent app is loaded. Rendering the child application depends on how the child application was built, and this can be done in a number of ways. Two of the most popular methods of parent/child integration are:
Importing each child application as an independent module. These modules either declares a function to render itself or is dynamically imported by the parent application (such as with module federation).
<html>
    <head>
        <script src="https://shipping.example.com/shipping-service.js"></script>
        <script src="https://profile.example.com/profile-service.js"></script>
        <script src="https://billing.example.com/billing-service.js"></script>
     <title>Parent Application</title>
    </head>
    <body>
    </body>
    <script>
        // Load and render the child applications form their JS bundles.
    </script>
</html>
The following diagram shows an example micro-frontend architecture built on AWS.
Figure 3. Micro-frontend architecture on AWS
In this example, each service team is running a separate, identical stack to build their application. They use the AWS Developer Tools and deploy the application to Amazon Simple Storage Service (S3) with Amazon CloudFront. The CI/CD pipelines use shared components such as CSS libraries, API wrappers, or custom modules stored in AWS CodeArtifact. This helps drive consistency across parent and child applications.
When you retrieve the parent application, it should prompt you to log in to an identity provider and retrieve JWTs. In this example, the identity provider is an Amazon Cognito User Pool. After a successful login, the parent application retrieves the child applications from CloudFront and renders them inside the parent application. Alternatively, the parent application can elect to render the child applications on demand, when you navigate to a specific route. The child applications should not require you to log in again to the Amazon Cognito user pool. They should be configured to use the JWT obtained by the parent app or silently retrieve a new JWT from Amazon Cognito.
Conclusion
Micro-frontend architectures introduce many of the familiar benefits of microservice development to frontend applications. A micro-frontend architecture also simplifies the process of building complex frontend applications by allowing you to manage small, independent components.
The collective thoughts of the interwebz
By continuing to use the site, you agree to the use of cookies. more information
The cookie settings on this website are set to "allow cookies" to give you the best browsing experience possible. If you continue to use this website without changing your cookie settings or you click "Accept" below then you are consenting to this.