Tag Archives: JWT

How to protect HMACs inside AWS KMS

Post Syndicated from Jeremy Stieglitz original https://aws.amazon.com/blogs/security/how-to-protect-hmacs-inside-aws-kms/

Today AWS Key Management Service (AWS KMS) is introducing new APIs to generate and verify hash-based message authentication codes (HMACs) using the Federal Information Processing Standard (FIPS) 140-2 validated hardware security modules (HSMs) in AWS KMS. HMACs are a powerful cryptographic building block that incorporate secret key material in a hash function to create a unique, keyed message authentication code.

In this post, you will learn the basics of the HMAC algorithm as a cryptographic building block, including how HMACs are used. In the second part of this post, you will see a few real-world use cases that show an application builder’s perspective on using the AWS KMS HMAC APIs.

HMACs provide a fast way to tokenize or sign data such as web API requests, credit cards, bank routing information, or personally identifiable information (PII).They are commonly used in several internet standards and communication protocols such as JSON Web Tokens (JWT), and are even an important security component for how you sign AWS API requests.

HMAC as a cryptographic building block

You can consider an HMAC, sometimes referred to as a keyed hash, to be a combination function that fuses the following elements:

  • A standard hash function such as SHA-256 to produce a message authentication code (MAC).
  • A secret key that binds this MAC to that key’s unique value.

Combining these two elements creates a unique, authenticated version of the digest of a message. Because the HMAC construction allows interchangeable hash functions as well as different secret key sizes, one of the benefits of HMACs is the easy replaceability of the underlying hash function (in case faster or more secure hash functions are required), as well as the ability to add more security by lengthening the size of the secret key used in the HMAC over time. The AWS KMS HMAC API is launching with support for SHA-224, SHA-256, SHA-384, and SHA-512 algorithms to provide a good balance of key sizes and performance trade-offs in the implementation. For more information about HMAC algorithms supported by AWS KMS, see HMAC keys in AWS KMS in the AWS KMS Developer Guide.

HMACs offer two distinct benefits:

  1. Message integrity: As with all hash functions, the output of an HMAC will result in precisely one unique digest of the message’s content. If there is any change to the data object (for example you modify the purchase price in a contract by just one digit: from “$350,000” to “$950,000”), then the verification of the original digest will fail.
  2. Message authenticity: What distinguishes HMAC from other hash methods is the use of a secret key to provide message authenticity. Only message hashes that were created with the specific secret key material will produce the same HMAC output. This dependence on secret key material ensures that no third party can substitute their own message content and create a valid HMAC without the intended verifier detecting the change.

HMAC in the real world

HMACs have widespread applications and industry adoption because they are fast, high performance, and simple to use. HMACs are particularly popular in the JSON Web Token (JWT) open standard as a means of securing web applications, and have replaced older technologies such as cookies and sessions. In fact, Amazon implements a custom authentication scheme, Signature Version 4 (SigV4), to sign AWS API requests based on a keyed-HMAC. To authenticate a request, you first concatenate selected elements of the request to form a string. You then use your AWS secret key material to calculate the HMAC of that string. Informally, this process is called signing the request, and the output of the HMAC algorithm is informally known as the signature, because it simulates the security properties of a real signature in that it represents your identity and your intent.

Advantages of using HMACs in AWS KMS

AWS KMS HMAC APIs provide several advantages over implementing HMACs in application software because the key material for the HMACs is generated in AWS KMS hardware security modules (HSMs) that are certified under the FIPS 140-2 program and never leave AWS KMS unencrypted. In addition, the HMAC keys in AWS KMS can be managed with the same access control mechanisms and auditing features that AWS KMS provides on all AWS KMS keys. These security controls ensure that any HMAC created in AWS KMS can only ever be verified in AWS KMS using the same KMS key. Lastly, the HMAC keys and the HMAC algorithms that AWS KMS uses conform to industry standards defined in RFC 2104 HMAC: Keyed-Hashing for Message Authentication.

Use HMAC keys in AWS KMS to create JSON Web Tokens

The JSON Web Token (JWT) open standard is a common use of HMAC. The standard defines a portable and secure means to communicate a set of statements, known as claims, between parties. HMAC is useful for applications that need an authorization mechanism, in which claims are validated to determine whether an identity has permission to perform some action. Such an application can only work if a validator can trust the integrity of claims in a JWT. Signing JWTs with an HMAC is one way to assert their integrity. Verifiers with access to an HMAC key can cryptographically assert that the claims and signature of a JWT were produced by an issuer using the same key.

This section will walk you through an example of how you can use HMAC keys from AWS KMS to sign JWTs. The example uses the AWS SDK for Python (Boto3) and implements simple JWT encoding and decoding operations. This example shows the ease with which you can integrate HMAC keys in AWS KMS into your JWT application, even if your application is in another language or uses a more formal JWT library.

Create an HMAC key in AWS KMS

Begin by creating an HMAC key in AWS KMS. You can use the AWS KMS console or call the CreateKey API action. The following example shows creation of a 256-bit HMAC key:

import boto3

kms = boto3.client('kms')

# Use CreateKey API to create a 256-bit key for HMAC
key_id = kms.create_key(
	KeySpec='HMAC_256',
	KeyUsage='GENERATE_VERIFY_MAC'
)['KeyMetadata']['KeyId']

Use the HMAC key to encode a signed JWT

Next, you use the HMAC key to encode a signed JWT. There are three components to a JWT token: the set of claims, header, and signature. The claims are the very application-specific statements to be authenticated. The header describes how the JWT is signed. Lastly, the MAC (signature) is the output of applying the header’s described operation to the message (the combination of the claims and header). All these are packed into a URL-safe string according to the JWT standard.

The following example uses the previously created HMAC key in AWS KMS within the construction of a JWT. The example’s claims simply consist of a small claim and an issuance timestamp. The header contains key ID of the HMAC key and the name of the HMAC algorithm used. Note that HS256 is the JWT convention used to represent HMAC with SHA-256 digest. You can generate the MAC using the new GenerateMac API action in AWS KMS.

import base64
import json
import time

def base64_url_encode(data):
	return base64.b64encode(data, b'-_').rstrip(b'=')

# Payload contains simple claim and an issuance timestamp
payload = json.dumps({
	"does_kms_support_hmac": "yes",
	"iat": int(time.time())
}).encode("utf8")

# Header describes the algorithm and AWS KMS key ID to be used for signing
header = json.dumps({
	"typ": "JWT",
	"alg": "HS256",
	"kid": key_id #This key_id is from the “Create an HMAC key in AWS KMS” #example. The “Verify the signed JWT” example will later #assert that the input header has the same value of the #key_id 
}).encode("utf8")

# Message to sign is of form <header_b64>.<payload_b64>
message = base64_url_encode(header) + b'.' + base64_url_encode(payload)

# Generate MAC using GenerateMac API of AWS KMS
MAC = kms.generate_mac(
	KeyId=key_id, #This key_id is from the “Create an HMAC key in AWS KMS” 
				 #example
	MacAlgorithm='HMAC_SHA_256',
	Message=message
)['Mac']

# Form JWT token of form <header_b64>.<payload_b64>.<mac_b64>
jwt_token = message + b'.' + base64_url_encode(mac)

Verify the signed JWT

Now that you have a signed JWT, you can verify it using the same KMS HMAC key. The example below uses the new VerifyMac API action to validate the MAC (signature) of the JWT. If the MAC is invalid, AWS KMS returns an error response and the AWS SDK throws an exception. If the MAC is valid, the request succeeds and the application can continue to do further processing on the token and its claims.

def base64_url_decode(data):
	return base64.b64decode(data + b'=' * (4 - len(data) % 4), b'-_')

# Parse out encoded header, payload, and MAC from the token
message, mac_b64 = jwt_token.rsplit(b'.', 1)
header_b64, payload_b64 = message.rsplit(b'.', 1)

# Decode header and verify its contents match expectations
header_map = json.loads(base64_url_decode(header_b64).decode("utf8"))
assert header_map == {
	"typ": "JWT",
	"alg": "HS256",
	"kid": key_id #This key_id is from the “Create an HMAC key in AWS KMS” 
				 #example
}

# Verify the MAC using VerifyMac API of AWS KMS. # If the verification fails, this will throw an error.
kms.verify_mac(
	KeyId=key_id, #This key_id is from the “Create an HMAC key in AWS KMS” 
				 #example
	MacAlgorithm='HMAC_SHA_256',
	Message=message,
	Mac=base64_url_decode(mac_b64)
)

# Decode payload for use application-specific validation/processing
payload_map = json.loads(base64_url_decode(payload_b64).decode("utf8"))

Create separate roles to control who has access to generate HMACs and who has access to validate HMACs

It’s often helpful to have separate JWT creators and validators so that you can distinguish between the roles that are allowed to create tokens and the roles that are allowed to verify tokens. HMAC signatures performed outside of AWS-KMS don’t work well for this because you can’t isolate creators and verifiers if they both must have a copy of the same key. However, this is not an issue for HMAC keys in AWS KMS. You can use key policies to separate out who has permission to ask AWS KMS to generate HMACs and who has permission to ask AWS KMS to validate. Each party uses their own unique access keys to access the HMAC key in AWS KMS. Only HSMs in AWS KMS will ever have access to the actual key material. See the following example key policy statements that separate out GenerateMac and VerifyMac permissions:

{
	"Id": "example-jwt-policy",
	"Version": "2012-10-17",
	"Statement": [
		{
			"Sid": "Allow use of the key for creating JWTs",
			"Effect": "Allow",
			"Principal": {
				"AWS": "arn:aws:iam::111122223333:role/JwtProducer"
			},
			"Action": [
				"kms:GenerateMac"
			],
			"Resource": "*"
		},
		{
			"Sid": "Allow use of the key for validating JWTs",
			"Effect": "Allow",
			"Principal": {
				"AWS": "arn:aws:iam::111122223333:role/JwtConsumer"
			},
			"Action": [
				"kms:VerifyMac"
			],
			"Resource": "*"
		}
	]
}

Conclusion

In this post, you learned about the new HMAC APIs in AWS KMS (GenerateMac and VerifyMac). These APIs complement existing AWS KMS cryptographic operations: symmetric key encryption, asymmetric key encryption and signing, and data key creation and key enveloping. You can use HMACs for JWTs, tokenization, URL and API signing, as a key derivation function (KDF), as well as in new designs that we haven’t even thought of yet. To learn more about HMAC functionality and design, see HMAC keys in AWS KMS in the AWS KMS Developer Guide.

If you have feedback about this post, submit comments in the Comments section below. If you have questions about this post, start a new thread on the KMS re:Post or contact AWS Support.
Want more AWS Security news? Follow us on Twitter.

Author

Jeremy Stieglitz

Jeremy is the Principal Product Manager for AWS Key Management Service (KMS) where he drives global product strategy and roadmap for AWS KMS. Jeremy has more than 20 years of experience defining new products and platforms, launching and scaling cryptography solutions, and driving end-to-end product strategies. Jeremy is the author or co-author of 23 patents in network security, user authentication and network automation and control.

Author

Peter Zieske

Peter is a Senior Software Developer on the AWS Key Management Service team, where he works on developing features on the service-side front-end. Outside of work, he enjoys building with LEGO, gaming, and spending time with family.

Security practices in AWS multi-tenant SaaS environments

Post Syndicated from Keith P original https://aws.amazon.com/blogs/security/security-practices-in-aws-multi-tenant-saas-environments/

Securing software-as-a-service (SaaS) applications is a top priority for all application architects and developers. Doing so in an environment shared by multiple tenants can be even more challenging. Identity frameworks and concepts can take time to understand, and forming tenant isolation in these environments requires deep understanding of different tools and services.

While security is a foundational element of any software application, specific considerations apply to SaaS applications. This post dives into the challenges, opportunities and best practices for securing multi-tenant SaaS environments on Amazon Web Services (AWS).

SaaS application security considerations

Single tenant applications are often deployed for a specific customer, and typically only deal with this single entity. While security is important in these environments, the threat profile does not include potential access by other customers. Multi-tenant SaaS applications have unique security considerations when compared to single tenant applications.

In particular, multi-tenant SaaS applications must pay special attention to identity and tenant isolation. These considerations are in addition to the security measures all applications must take. This blog post reviews concepts related to identity and tenant isolation, and how AWS can help SaaS providers build secure applications.

Identity

SaaS applications are accessed by individual principals (often referred to as users). These principals may be interactive (for example, through a web application) or machine-based (for example, through an API). Each principal is uniquely identified, and is usually associated with information about the principal, including email address, name, role and other metadata.

In addition to the unique identification of each individual principal, a SaaS application has another construct: a tenant. A paper on multi-tenancy defines a tenant as a group of one or more users sharing the same view on an application they use. This view may differ for different tenants. Each individual principal is associated with a tenant, even if it is only a 1:1 mapping. A tenant is uniquely identified, and contains information about the tenant administrator, billing information and other metadata.

When a principal makes a request to a SaaS application, the principal provides their tenant and user identifier along with the request. The SaaS application validates this information and makes an authorization decision. In well-designed SaaS applications, this authorization step should not rely on a centralized authorization service. A centralized authorization service is a single point of failure in an application. If it fails, or is overwhelmed with requests, the application will no longer be able to process requests.

There are two key techniques to providing this type of experience in a SaaS application: using an identity provider (IdP) and representing identity or authorization in a token.

Using an Identity Provider (IdP)

In the past, some web applications often stored user information in a relational database table. When a principal authenticated successfully, the application issued a session ID. For subsequent requests, the principal passed the session ID to the application. The application made authorization decisions based on this session ID. Figure 1 provides an example of how this setup worked.

Figure 1 - An example of legacy application authentication.

Figure 1 – An example of legacy application authentication.

In applications larger than a simple web application, this pattern is suboptimal. Each request usually results in at least one database query or cache look up, creating a bottleneck on the data store holding the user or session information. Further, because of the tight coupling between the application and its user management, federation with external identity providers becomes difficult.

When designing your SaaS application, you should consider the use of an identity provider like Amazon Cognito, Auth0, or Okta. Using an identity provider offloads the heavy lifting required for managing identity by having user authentication, including federation, handled by external identity providers. Figure 2 provides an example of how a SaaS provider can use an identity provider in place of the self-managed solution shown in Figure 1.

Figure 2 – An example of an authentication flow that involves an identity provider.

Figure 2 – An example of an authentication flow that involves an identity provider.

Once a user authenticates with an identity provider, the identity provider issues a standardized token. This token is the same regardless of how a user authenticates, which means your application does not need to build in support for multiple different authentication methods tenants might use.

Identity providers also commonly support federated access. Federated access means that a third party maintains the identities, but the identity provider has a trust relationship with this third party. When a customer tries to log in with an identity managed by the third party, the SaaS application’s identity provider handles the authentication transaction with the third-party identity provider.

This authentication transaction commonly uses a protocol like Security Assertion Markup Language (SAML) 2.0. The SaaS application’s identity provider manages the interaction with the tenant’s identity provider. The SaaS application’s identity provider issues a token in a format understood by the SaaS application. Figure 3 provides an example of how a SaaS application can provide support for federation using an identity provider.

Figure 3 - An example of authentication that involves a tenant-provided identity provider

Figure 3 – An example of authentication that involves a tenant-provided identity provider

For an example, see How to set up Amazon Cognito for federated authentication using Azure AD.

Representing identity with tokens

Identity is usually represented by signed tokens. JSON Web Signatures (JWS), often referred to as JSON Web Tokens (JWT), are signed JSON objects used in web applications to demonstrate that the bearer is authorized to access a particular resource. These JSON objects are signed by the identity provider, and can be validated without querying a centralized database or service.

The token contains several key-value pairs, called claims, which are issued by the identity provider. Besides several claims relating to the issuance and expiration of the token, the token can also contain information about the individual principal and tenant.

Sample access token claims

The example below shows the claims section of a typical access token issued by Amazon Cognito in JWT format.

{
  "sub": "aaaaaaaa-bbbb-cccc-dddd-eeeeeeeeeeee",
  "cognito:groups": [
"TENANT-1"
  ],
  "token_use": "access",
  "auth_time": 1562190524,
  "iss": "https://cognito-idp.us-west-2.amazonaws.com/us-west-2_example",
  "exp": 1562194124,
  "iat": 1562190524,
  "origin_jti": "bbbbbbbbb-cccc-dddd-eeee-aaaaaaaaaaaa",
  "jti": "cccccccc-dddd-eeee-aaaa-bbbbbbbbbbbb",
  "client_id": "12345abcde",

The principal, and the tenant the principal is associated with, are represented in this token by the combination of the user identifier (the sub claim) and the tenant ID in the cognito:groups claim. In this example, the SaaS application represents a tenant by creating a Cognito group per tenant. Other identity providers may allow you to add a custom attribute to a user that is reflected in the access token.

When a SaaS application receives a JWT as part of a request, the application validates the token and unpacks its contents to make authorization decisions. The claims within the token set what is known as the tenant context. Much like the way environment variables can influence a command line application, the tenant context influences how the SaaS application processes the request.

By using a JWT, the SaaS application can process a request without frequent reference to an external identity provider or other centralized service.

Tenant isolation

Tenant isolation is foundational to every SaaS application. Each SaaS application must ensure that one tenant cannot access another tenant’s resources. The SaaS application must create boundaries that adequately isolate one tenant from another.

Determining what constitutes sufficient isolation depends on your domain, deployment model and any applicable compliance frameworks. The techniques for isolating tenants from each other depend on the isolation model and the applications you use. This section provides an overview of tenant isolation strategies.

Your deployment model influences isolation

How an application is deployed influences how tenants are isolated. SaaS applications can use three types of isolation: silo, pool, and bridge.

Silo deployment model

The silo deployment model involves customers deploying one set of infrastructure per tenant. Depending on the application, this may mean a VPC-per-tenant, a set of containers per tenant, or some other resource that is deployed for each tenant. In this model, there is one deployment per tenant, though there may be some shared infrastructure for cross-tenant administration. Figure 4 shows an example of a siloed deployment that uses a VPC-per-tenant model.

Figure 4 - An example of a siloed deployment that provisions a VPC-per-tenant

Figure 4 – An example of a siloed deployment that provisions a VPC-per-tenant

Pool deployment model

The pool deployment model involves a shared set of infrastructure for all tenants. Tenant isolation is implemented logically in the application through application-level constructs. Rather than having separate resources per tenant, isolation enforcement occurs within the application. Figure 5 shows an example of a pooled deployment model that uses serverless technologies.

Figure 5 - An example of a pooled deployment model using serverless technologies

Figure 5 – An example of a pooled deployment model using serverless technologies

In Figure 5, an AWS Lambda function that retrieves an item from an Amazon DynamoDB table shared by all tenants needs temporary credentials issued by the AWS Security Token Service. These credentials only allow the requester to access items in the table that belong to the tenant making the request. A requester gets these credentials by assuming an AWS Identity and Access Management (IAM) role. This allows a SaaS application to share the underlying infrastructure, while still isolating tenants from one another. See Isolation enforcement depends on service below for more details on this pattern.

Bridge deployment model

The bridge model combines elements of both the silo and pool models. Some resources may be separate, others may be shared. For example, suppose your application has a shared application layer and an Amazon Relational Database Service (RDS) instance per tenant. The application layer evaluates each request and connects to the database for the tenant that made the request.

This model is useful in a situation where each tenant may require a certain response time and one set of resources acts as a bottleneck. In the RDS example, the application layer could handle the requests imposed by the tenants, but a single RDS instance could not.

The decision on which isolation model to implement depends on your customer’s requirements, compliance needs or industry needs. You may find that some customers can be deployed onto a pool model, while larger customers may require their own silo deployment.

Your tiering strategy may also influence the type of isolation model you use. For example, a basic tier customer might be deployed onto pooled infrastructure, while an enterprise tier customer is deployed onto siloed infrastructure.

For more information about different tenant isolation models, read the tenant isolation strategies whitepaper.

Isolation enforcement depends on service

Most SaaS applications will need somewhere to store state information. This could be a relational database, a NoSQL database, or some other storage medium which persists state. SaaS applications built on AWS use various mechanisms to enforce tenant isolation when accessing a persistent storage medium.

IAM provides fine grain access controls access for the AWS API. Some services, like Amazon Simple Storage Service (Amazon S3) and DynamoDB, provide the ability to control access to individual objects or items with IAM policies. When possible, your application should use IAM’s built-in functionality to limit access to tenant resources. See Isolating SaaS Tenants with Dynamically Generated IAM Policies for more information about using IAM to implement tenant isolation.

AWS IAM also offers the ability to restrict access to resources based on tags. This is known as attribute-based access control (ABAC). This technique allows you to apply tags to supported resources, and make access control decisions based on which tags are applied. This is a more scalable access control mechanism than role-based access control (RBAC), because you do not need to modify an IAM policy each time a resource is added or removed. See How to implement SaaS tenant isolation with ABAC and AWS IAM for more information about how this can be applied to a SaaS application.

Some relational databases offer features that can enforce tenant isolation. For example, PostgreSQL offers a feature called row level security (RLS). Depending on the context in which the query is sent to the database, only tenant-specific items are returned in the results. See Multi-tenant data isolation with PostgreSQL Row Level Security for more information about row level security in PostgreSQL.

Other persistent storage mediums do not have fine grain permission models. They may, however, offer some kind of state container per tenant. For example, when using MongoDB, each tenant is assigned a MongoDB user and a MongoDB database. The secret associated with the user can be stored in AWS Secrets Manager. When retrieving a tenant’s data, the SaaS application first retrieves the secret, then authenticates with MongoDB. This creates tenant isolation because the associated credentials only have permission to access collections in a tenant-specific database.

Generally, if the persistent storage medium you’re using offers its own permission model that can enforce tenant isolation, you should use it, since this keeps you from having to implement isolation in your application. However, there may be cases where your data store does not offer this level of isolation. In this situation, you would need to write application-level tenant isolation enforcement. Application-level tenant isolation means that the SaaS application, rather than the persistent storage medium, makes sure that one tenant cannot access another tenant’s data.

Conclusion

This post reviews the challenges, opportunities and best practices for the unique security considerations associated with a multi-tenant SaaS application, and describes specific identity considerations, as well as tenant isolation methods.

If you’d like to know more about the topics above, the AWS Well-Architected SaaS Lens Security pillar dives deep on performance management in SaaS environments. It also provides best practices and resources to help you design and improve performance efficiency in your SaaS application.

Get Started with the AWS Well-Architected SaaS Lens

The AWS Well-Architected SaaS Lens focuses on SaaS workloads, and is intended to drive critical thinking for developing and operating SaaS workloads. Each question in the lens has a list of best practices, and each best practice has a list of improvement plans to help guide you in implementing them.

The lens can be applied to existing workloads, or used for new workloads you define in the tool. You can use it to improve the application you’re working on, or to get visibility into multiple workloads used by the department or area you’re working with.

The SaaS Lens is available in all Regions where the AWS Well-Architected Tool is offered, as described in the AWS Regional Services List. There are no costs for using the AWS Well-Architected Tool.

If you’re an AWS customer, find current AWS Partners that can conduct a review by learning about AWS Well-Architected Partners and AWS SaaS Competency Partners.

 
If you have feedback about this post, submit comments in the Comments section below. If you have questions about this post, start a new thread on the Security Hub forum. To start your 30-day free trial of Security Hub, visit AWS Security Hub.

Want more AWS Security how-to content, news, and feature announcements? Follow us on Twitter.

Keith P

Keith is a senior partner solutions architect on the SaaS Factory team.

Andy Powell

Andy is the global lead partner for solutions architecture on the SaaS Factory team.

Building fine-grained authorization using Amazon Cognito, API Gateway, and IAM

Post Syndicated from Artem Lovan original https://aws.amazon.com/blogs/security/building-fine-grained-authorization-using-amazon-cognito-api-gateway-and-iam/

June 5, 2021: We’ve updated Figure 1: User request flow.


Authorizing functionality of an application based on group membership is a best practice. If you’re building APIs with Amazon API Gateway and you need fine-grained access control for your users, you can use Amazon Cognito. Amazon Cognito allows you to use groups to create a collection of users, which is often done to set the permissions for those users. In this post, I show you how to build fine-grained authorization to protect your APIs using Amazon Cognito, API Gateway, and AWS Identity and Access Management (IAM).

As a developer, you’re building a customer-facing application where your users are going to log into your web or mobile application, and as such you will be exposing your APIs through API Gateway with upstream services. The APIs could be deployed on Amazon Elastic Container Service (Amazon ECS), Amazon Elastic Kubernetes Service (Amazon EKS), AWS Lambda, or Elastic Load Balancing where each of these options will forward the request to your Amazon Elastic Compute Cloud (Amazon EC2) instances. Additionally, you can use on-premises services that are connected to your Amazon Web Services (AWS) environment over an AWS VPN or AWS Direct Connect. It’s important to have fine-grained controls for each API endpoint and HTTP method. For instance, the user should be allowed to make a GET request to an endpoint, but should not be allowed to make a POST request to the same endpoint. As a best practice, you should assign users to groups and use group membership to allow or deny access to your API services.

Solution overview

In this blog post, you learn how to use an Amazon Cognito user pool as a user directory and let users authenticate and acquire the JSON Web Token (JWT) to pass to the API Gateway. The JWT is used to identify what group the user belongs to, as mapping a group to an IAM policy will display the access rights the group is granted.

Note: The solution works similarly if Amazon Cognito would be federating users with an external identity provider (IdP)—such as Ping, Active Directory, or Okta—instead of being an IdP itself. To learn more, see Adding User Pool Sign-in Through a Third Party. Additionally, if you want to use groups from an external IdP to grant access, Role-based access control using Amazon Cognito and an external identity provider outlines how to do so.

The following figure shows the basic architecture and information flow for user requests.

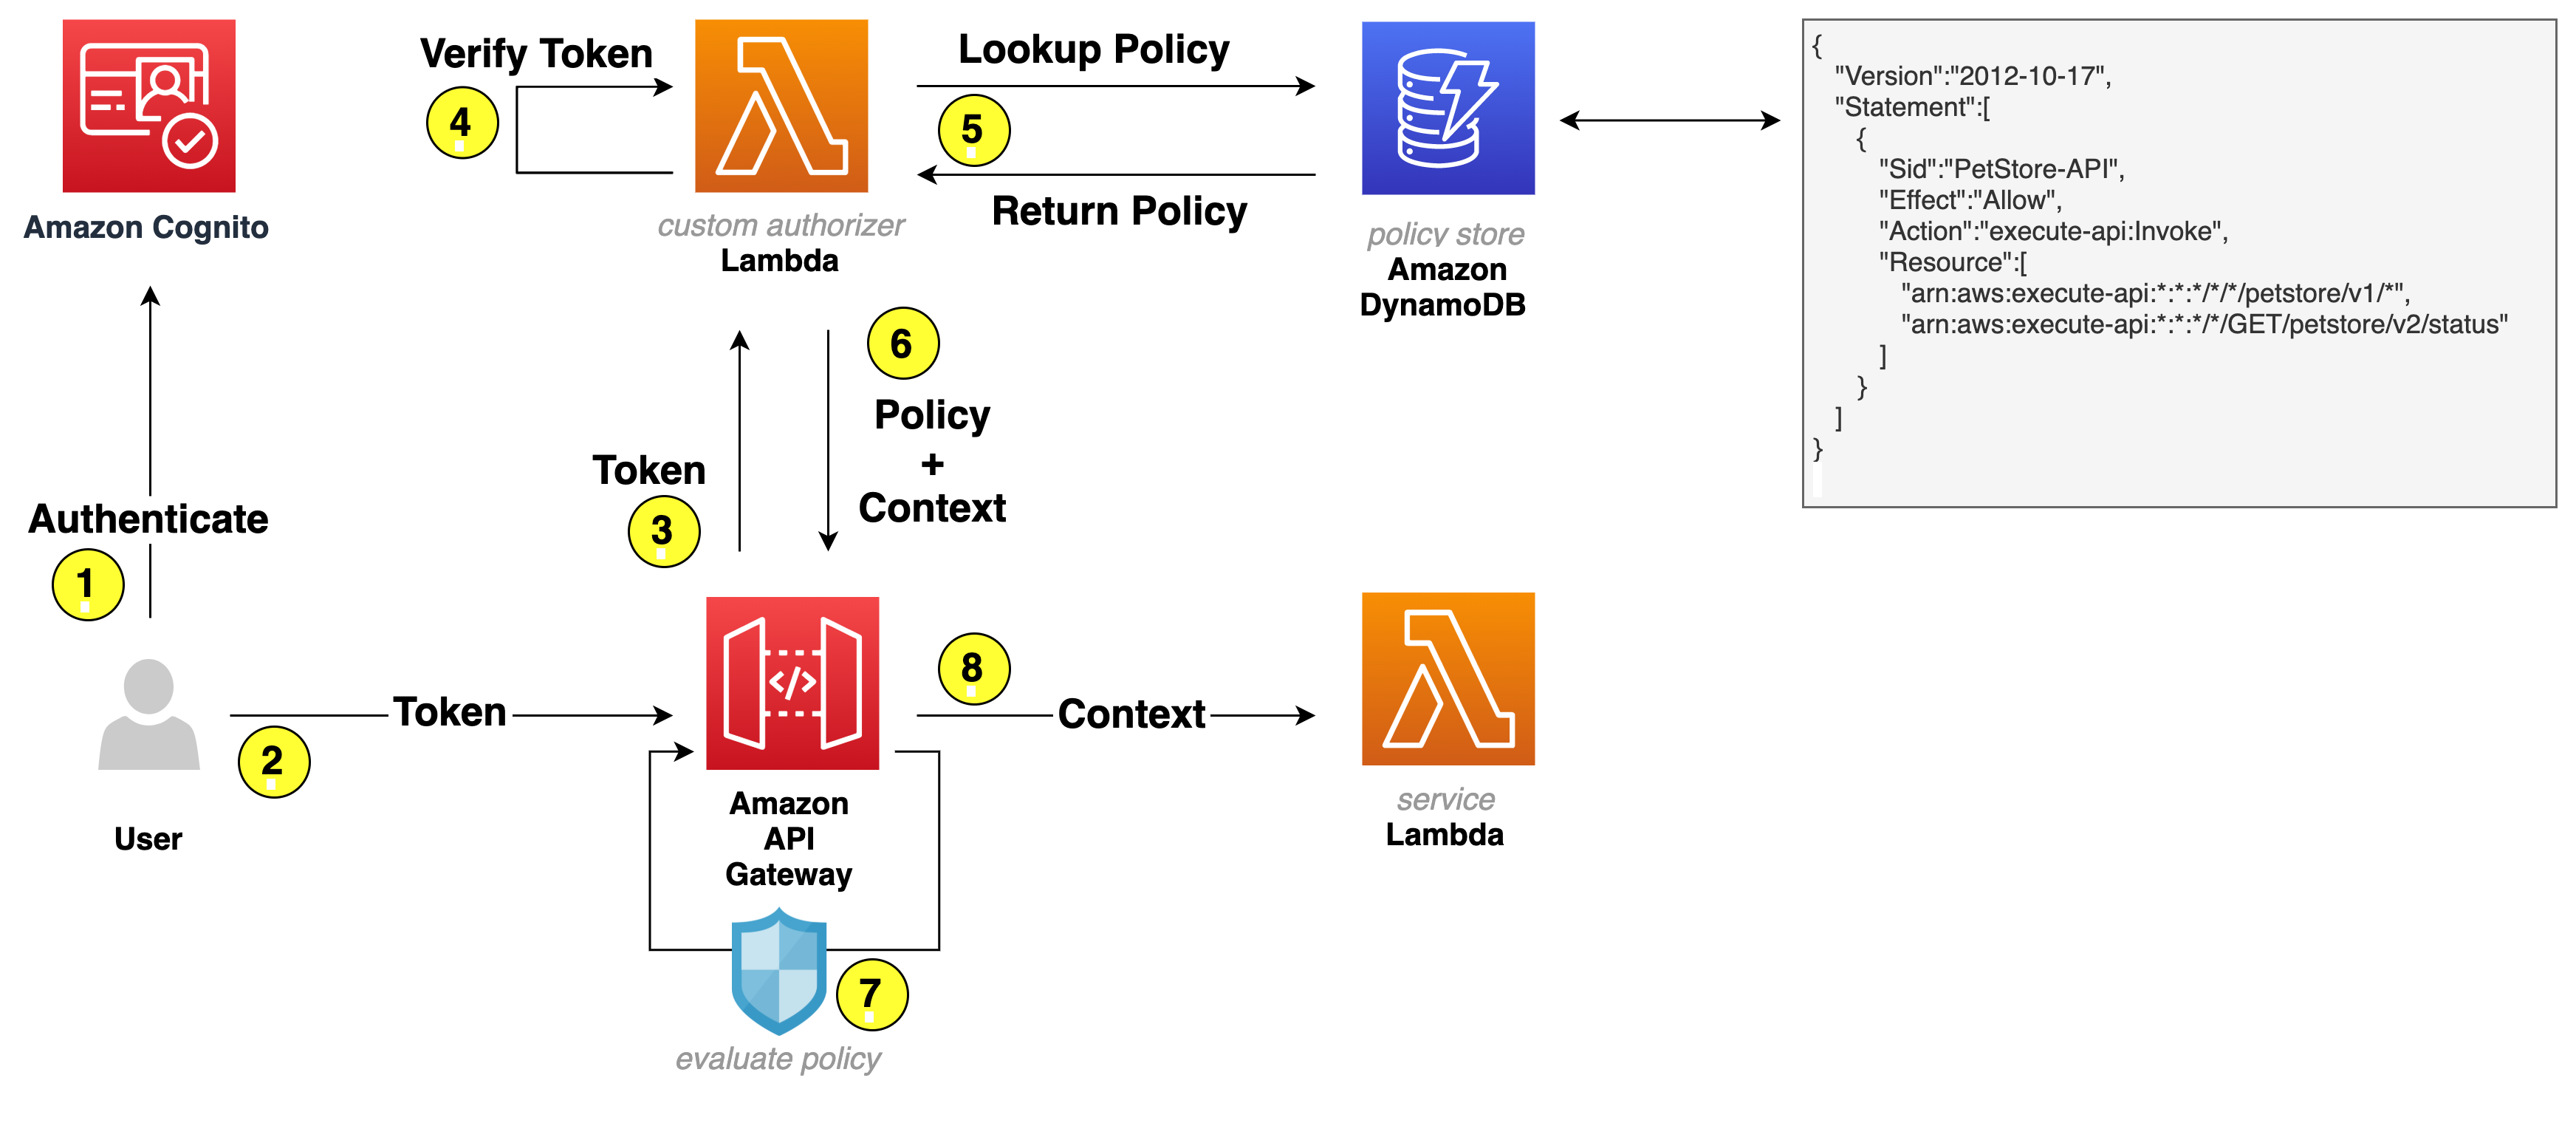
Figure 1: User request flow

Figure 1: User request flow

Let’s go through the request flow to understand what happens at each step, as shown in Figure 1:

  1. A user logs in and acquires an Amazon Cognito JWT ID token, access token, and refresh token. To learn more about each token, see using tokens with user pools.
  2. A RestAPI request is made and a bearer token—in this solution, an access token—is passed in the headers.
  3. API Gateway forwards the request to a Lambda authorizer—also known as a custom authorizer.
  4. The Lambda authorizer verifies the Amazon Cognito JWT using the Amazon Cognito public key. On initial Lambda invocation, the public key is downloaded from Amazon Cognito and cached. Subsequent invocations will use the public key from the cache.
  5. The Lambda authorizer looks up the Amazon Cognito group that the user belongs to in the JWT and does a lookup in Amazon DynamoDB to get the policy that’s mapped to the group.
  6. Lambda returns the policy and—optionally—context to API Gateway. The context is a map containing key-value pairs that you can pass to the upstream service. It can be additional information about the user, the service, or anything that provides additional information to the upstream service.
  7. The API Gateway policy engine evaluates the policy.

    Note: Lambda isn’t responsible for understanding and evaluating the policy. That responsibility falls on the native capabilities of API Gateway.

  8. The request is forwarded to the service.

Note: To further optimize Lambda authorizer, the authorization policy can be cached or disabled, depending on your needs. By enabling cache, you could improve the performance as the authorization policy will be returned from the cache whenever there is a cache key match. To learn more, see Configure a Lambda authorizer using the API Gateway console.

Let’s have a closer look at the following example policy that is stored as part of an item in DynamoDB.

{
   "Version":"2012-10-17",
   "Statement":[
      {
         "Sid":"PetStore-API",
         "Effect":"Allow",
         "Action":"execute-api:Invoke",
         "Resource":[
            "arn:aws:execute-api:*:*:*/*/*/petstore/v1/*",
            "arn:aws:execute-api:*:*:*/*/GET/petstore/v2/status"
         ],
         "Condition":{
            "IpAddress":{
               "aws:SourceIp":[
                  "192.0.2.0/24",
                  "198.51.100.0/24"
               ]
            }
         }
      }
   ]
}

Based on this example policy, the user is allowed to make calls to the petstore API. For version v1, the user can make requests to any verb and any path, which is expressed by an asterisk (*). For v2, the user is only allowed to make a GET request for path /status. To learn more about how the policies work, see Output from an Amazon API Gateway Lambda authorizer.

Getting started

For this solution, you need the following prerequisites:

  • The AWS Command Line Interface (CLI) installed and configured for use.
  • Python 3.6 or later, to package Python code for Lambda

    Note: We recommend that you use a virtual environment or virtualenvwrapper to isolate the solution from the rest of your Python environment.

  • An IAM role or user with enough permissions to create Amazon Cognito User Pool, IAM Role, Lambda, IAM Policy, API Gateway and DynamoDB table.
  • The GitHub repository for the solution. You can download it, or you can use the following Git command to download it from your terminal.

    Note: This sample code should be used to test out the solution and is not intended to be used in production account.

     $ git clone https://github.com/aws-samples/amazon-cognito-api-gateway.git
     $ cd amazon-cognito-api-gateway
    

    Use the following command to package the Python code for deployment to Lambda.

     $ bash ./helper.sh package-lambda-functions
     …
     Successfully completed packaging files.
    

To implement this reference architecture, you will be utilizing the following services:

Note: This solution was tested in the us-east-1, us-east-2, us-west-2, ap-southeast-1, and ap-southeast-2 Regions. Before selecting a Region, verify that the necessary services—Amazon Cognito, API Gateway, and Lambda—are available in those Regions.

Let’s review each service, and how those will be used, before creating the resources for this solution.

Amazon Cognito user pool

A user pool is a user directory in Amazon Cognito. With a user pool, your users can log in to your web or mobile app through Amazon Cognito. You use the Amazon Cognito user directory directly, as this sample solution creates an Amazon Cognito user. However, your users can also log in through social IdPs, OpenID Connect (OIDC), and SAML IdPs.

Lambda as backing API service

Initially, you create a Lambda function that serves your APIs. API Gateway forwards all requests to the Lambda function to serve up the requests.

An API Gateway instance and integration with Lambda

Next, you create an API Gateway instance and integrate it with the Lambda function you created. This API Gateway instance serves as an entry point for the upstream service. The following bash command below creates an Amazon Cognito user pool, a Lambda function, and an API Gateway instance. The command then configures proxy integration with Lambda and deploys an API Gateway stage.

Deploy the sample solution

From within the directory where you downloaded the sample code from GitHub, run the following command to generate a random Amazon Cognito user password and create the resources described in the previous section.

 $ bash ./helper.sh cf-create-stack-gen-password
 ...
 Successfully created CloudFormation stack.

When the command is complete, it returns a message confirming successful stack creation.

Validate Amazon Cognito user creation

To validate that an Amazon Cognito user has been created successfully, run the following command to open the Amazon Cognito UI in your browser and then log in with your credentials.

Note: When you run this command, it returns the user name and password that you should use to log in.

 $ bash ./helper.sh open-cognito-ui
  Opening Cognito UI. Please use following credentials to login:
  Username: cognitouser
  Password: xxxxxxxx

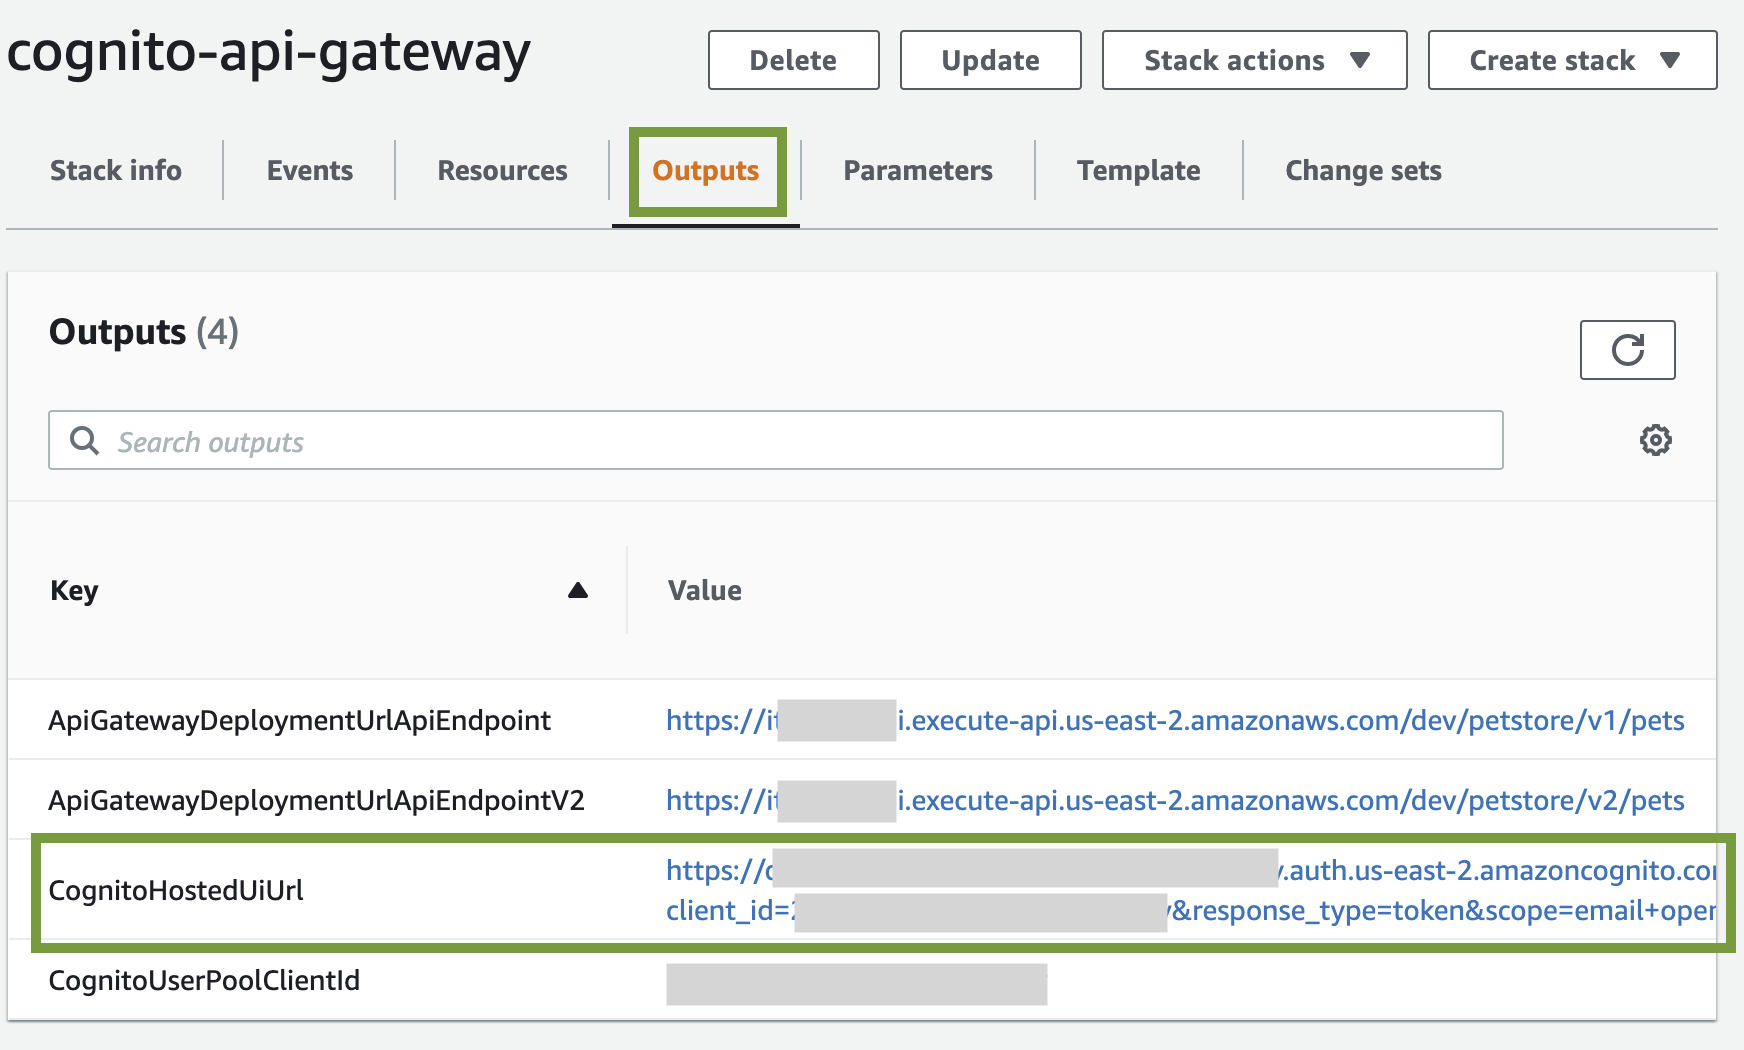
Alternatively, you can open the CloudFormation stack and get the Amazon Cognito hosted UI URL from the stack outputs. The URL is the value assigned to the CognitoHostedUiUrl variable.

Figure 2: CloudFormation Outputs - CognitoHostedUiUrl

Figure 2: CloudFormation Outputs – CognitoHostedUiUrl

Validate Amazon Cognito JWT upon login

Since we haven’t installed a web application that would respond to the redirect request, Amazon Cognito will redirect to localhost, which might look like an error. The key aspect is that after a successful log in, there is a URL similar to the following in the navigation bar of your browser:

http://localhost/#id_token=eyJraWQiOiJicVhMYWFlaTl4aUhzTnY3W...

Test the API configuration

Before you protect the API with Amazon Cognito so that only authorized users can access it, let’s verify that the configuration is correct and the API is served by API Gateway. The following command makes a curl request to API Gateway to retrieve data from the API service.

 $ bash ./helper.sh curl-api
{"pets":[{"id":1,"name":"Birds"},{"id":2,"name":"Cats"},{"id":3,"name":"Dogs"},{"id":4,"name":"Fish"}]}

The expected result is that the response will be a list of pets. In this case, the setup is correct: API Gateway is serving the API.

Protect the API

To protect your API, the following is required:

  1. DynamoDB to store the policy that will be evaluated by the API Gateway to make an authorization decision.
  2. A Lambda function to verify the user’s access token and look up the policy in DynamoDB.

Let’s review all the services before creating the resources.

Lambda authorizer

A Lambda authorizer is an API Gateway feature that uses a Lambda function to control access to an API. You use a Lambda authorizer to implement a custom authorization scheme that uses a bearer token authentication strategy. When a client makes a request to one of the API operations, the API Gateway calls the Lambda authorizer. The Lambda authorizer takes the identity of the caller as input and returns an IAM policy as the output. The output is the policy that is returned in DynamoDB and evaluated by the API Gateway. If there is no policy mapped to the caller identity, Lambda will generate a deny policy and request will be denied.

DynamoDB table

DynamoDB is a key-value and document database that delivers single-digit millisecond performance at any scale. This is ideal for this use case to ensure that the Lambda authorizer can quickly process the bearer token, look up the policy, and return it to API Gateway. To learn more, see Control access for invoking an API.

The final step is to create the DynamoDB table for the Lambda authorizer to look up the policy, which is mapped to an Amazon Cognito group.

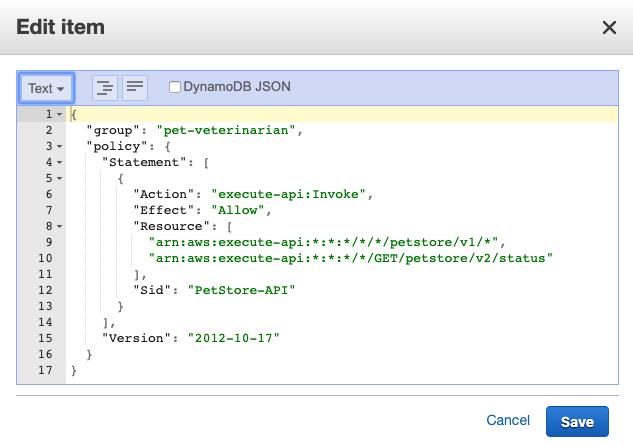
Figure 3 illustrates an item in DynamoDB. Key attributes are:

  • Group, which is used to look up the policy.
  • Policy, which is returned to API Gateway to evaluate the policy.


Figure 3: DynamoDB item

Figure 3: DynamoDB item

Based on this policy, the user that is part of the Amazon Cognito group pet-veterinarian is allowed to make API requests to endpoints https://<domain>/<api-gateway-stage>/petstore/v1/* and https://<domain>/<api-gateway-stage>/petstore/v2/status for GET requests only.

Update and create resources

Run the following command to update existing resources and create a Lambda authorizer and DynamoDB table.

 $ bash ./helper.sh cf-update-stack
Successfully updated CloudFormation stack.

Test the custom authorizer setup

Begin your testing with the following request, which doesn’t include an access token.

$ bash ./helper.sh curl-api
{"message":"Unauthorized"}

The request is denied with the message Unauthorized. At this point, the Amazon API Gateway expects a header named Authorization (case sensitive) in the request. If there’s no authorization header, the request is denied before it reaches the lambda authorizer. This is a way to filter out requests that don’t include required information.

Use the following command for the next test. In this test, you pass the required header but the token is invalid because it wasn’t issued by Amazon Cognito but is a simple JWT-format token stored in ./helper.sh. To learn more about how to decode and validate a JWT, see decode and verify an Amazon Cognito JSON token.

$ bash ./helper.sh curl-api-invalid-token
{"Message":"User is not authorized to access this resource"}

This time the message is different. The Lambda authorizer received the request and identified the token as invalid and responded with the message User is not authorized to access this resource.

To make a successful request to the protected API, your code will need to perform the following steps:

  1. Use a user name and password to authenticate against your Amazon Cognito user pool.
  2. Acquire the tokens (id token, access token, and refresh token).
  3. Make an HTTPS (TLS) request to API Gateway and pass the access token in the headers.

Before the request is forwarded to the API service, API Gateway receives the request and passes it to the Lambda authorizer. The authorizer performs the following steps. If any of the steps fail, the request is denied.

  1. Retrieve the public keys from Amazon Cognito.
  2. Cache the public keys so the Lambda authorizer doesn’t have to make additional calls to Amazon Cognito as long as the Lambda execution environment isn’t shut down.
  3. Use public keys to verify the access token.
  4. Look up the policy in DynamoDB.
  5. Return the policy to API Gateway.

The access token has claims such as Amazon Cognito assigned groups, user name, token use, and others, as shown in the following example (some fields removed).

{
    "sub": "00000000-0000-0000-0000-0000000000000000",
    "cognito:groups": [
        "pet-veterinarian"
    ],
...
    "token_use": "access",
    "scope": "openid email",
    "username": "cognitouser"
}

Finally, let’s programmatically log in to Amazon Cognito UI, acquire a valid access token, and make a request to API Gateway. Run the following command to call the protected API.

$ bash ./helper.sh curl-protected-api
{"pets":[{"id":1,"name":"Birds"},{"id":2,"name":"Cats"},{"id":3,"name":"Dogs"},{"id":4,"name":"Fish"}]}

This time, you receive a response with data from the API service. Let’s examine the steps that the example code performed:

  1. Lambda authorizer validates the access token.
  2. Lambda authorizer looks up the policy in DynamoDB based on the group name that was retrieved from the access token.
  3. Lambda authorizer passes the IAM policy back to API Gateway.
  4. API Gateway evaluates the IAM policy and the final effect is an allow.
  5. API Gateway forwards the request to Lambda.
  6. Lambda returns the response.

Let’s continue to test our policy from Figure 3. In the policy document, arn:aws:execute-api:*:*:*/*/GET/petstore/v2/status is the only endpoint for version V2, which means requests to endpoint /GET/petstore/v2/pets should be denied. Run the following command to test this.

 $ bash ./helper.sh curl-protected-api-not-allowed-endpoint
{"Message":"User is not authorized to access this resource"}

Note: Now that you understand fine grained access control using Cognito user pool, API Gateway and lambda function, and you have finished testing it out, you can run the following command to clean up all the resources associated with this solution:

 $ bash ./helper.sh cf-delete-stack

Advanced IAM policies to further control your API

With IAM, you can create advanced policies to further refine access to your APIs. You can learn more about condition keys that can be used in API Gateway, their use in an IAM policy with conditions, and how policy evaluation logic determines whether to allow or deny a request.

Summary

In this post, you learned how IAM and Amazon Cognito can be used to provide fine-grained access control for your API behind API Gateway. You can use this approach to transparently apply fine-grained control to your API, without having to modify the code in your API, and create advanced policies by using IAM condition keys.

If you have feedback about this post, submit comments in the Comments section below. If you have questions about this post, start a new thread on the Amazon Cognito forum or contact AWS Support.

Want more AWS Security how-to content, news, and feature announcements? Follow us on Twitter.

Author

Artem Lovan

Artem is a Senior Solutions Architect based in New York. He helps customers architect and optimize applications on AWS. He has been involved in IT at many levels, including infrastructure, networking, security, DevOps, and software development.